Gluten-free gyoza (vegan)
Gluten-free gyoza (vegan)

With Valentine’s Day coming up and me continuing with my sugar-free stint, I figured it was too risky to make a sweet recipe so instead I have a savoury recipe for gluten-free gyoza that is guaranteed to impress your loved one.
Since in my culture making dumplings from scratch is pretty much synonymous to a declaration of love – it’s a labour of love so you wouldn’t go to this much trouble for just anyone – I figured that a good dumpling recipe would be a perfect Valentine’s Day treat.
Since I have plenty of wheat dumplings on the blog already (oyster mushroom ones, this one with wasabi edamame or butternut squash ones, to name just a few), I decided that it’s high time to come up with gluten-free gyoza in case your loved one is an unfortunate dumpling lover who does not get on with gluten.
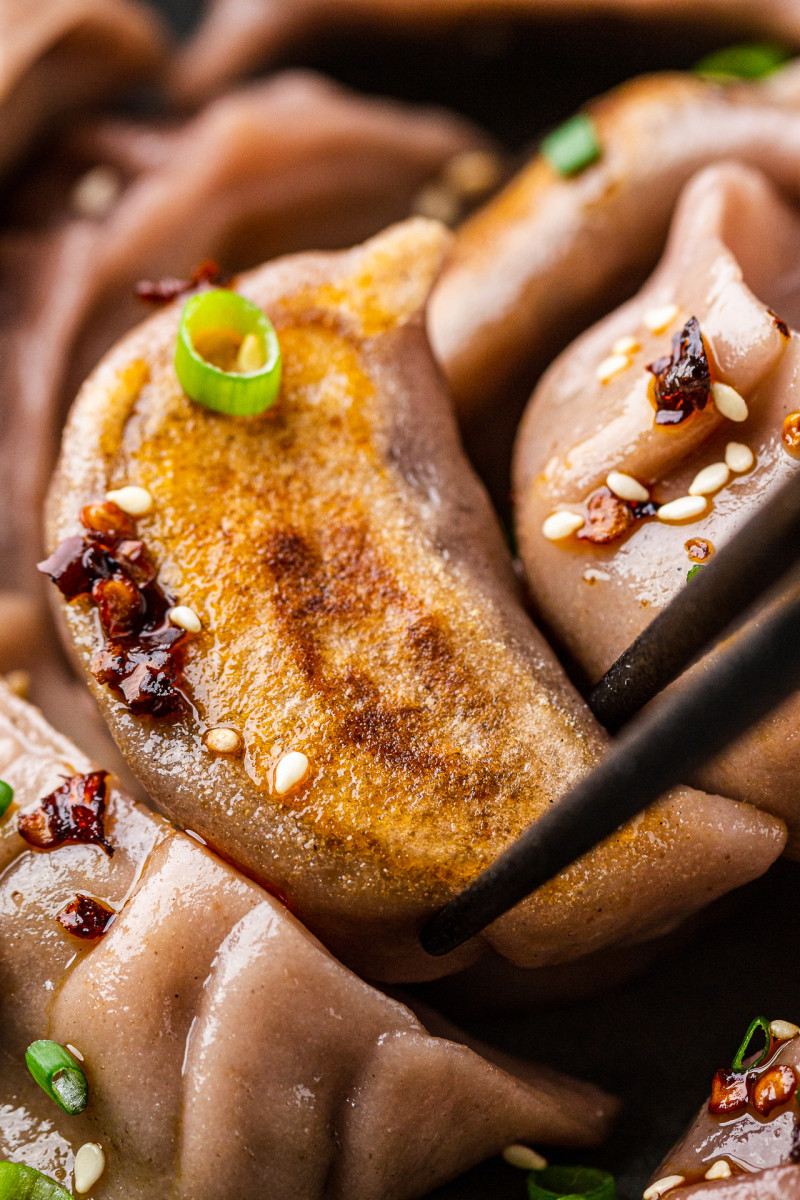
Gyoza is a Japanese dumpling that stems from Chinese jiaozi, which you may know as potstickers. The key difference is that gyoza tend to be smaller, the dough thinner and the pleating is a little different but at their core, they are very similar. Both are filled dumplings that are pan-fried and then steamed – as a result they feature delightfully crispy bottoms that contrast so beautifully with the steamed sides and plump interior – heaven.
The fillings vary, I went for a bit of a fusion filling featuring a Korean ingredient – kimchi. So yeah, these dumplings are totally a fusion dish and borne out of things I enjoy eating rather than authentic. These gluten-free gyoza are delicious and easy to make too. Even though I am a gluten lover myself, I devoured plates of these dumplings while testing and shooting this recipe with pleasure so I hope you and your loved one will do too.
MORE ABOUT THE INGREDIENTS
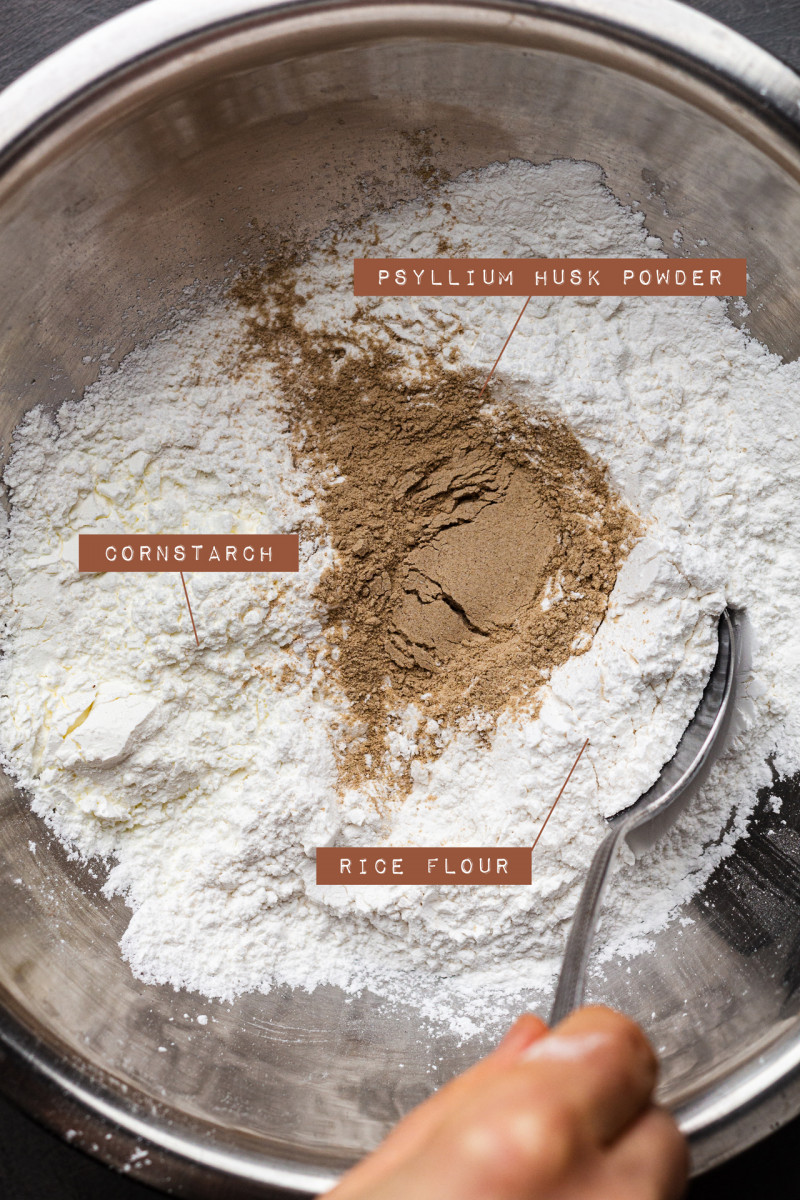
RICE FLOUR: Rice flour – white or brown, both work fine – are the main ingredient in this simple gluten-free dough.
CORNSTARCH: A bit of cornstarch (known as cornflour in the UK) helps with the elasticity of the dough. You can sub it with tapioca starch, like in these gluten-free pierogi or gluten-free ravioli recipe.
PSYLLIUM HUSK POWDER: This is an important ingredient that gives this dough much needed elasticity and makes it easy to work with. Psyllium husk is a common dietary supplement that can be found in health food stores or in pharmacies. It comes in two forms, ground (powder) and whole husks – for this application I recommend the former.
OIL: A small amount of oil is another thing that helps with the dough’s elasticity and makes it easy to work with, it’s not necessary though so if you follow low fat wholefood plantbased lifestyle, for example, you can safely skip it and simply use a little more water to bring the dough together.

There are so many filling options. For this recipe I made filling inspired by Polish cabbage and mushroom pierogi filling, but I used spicy kimchi instead of sauerkraut and seasoned them accordingly. If you are after other ideas, you could make this aromatic oyster mushroom filling, or a spicy butternut squash one or wasabi edamame one, for example.
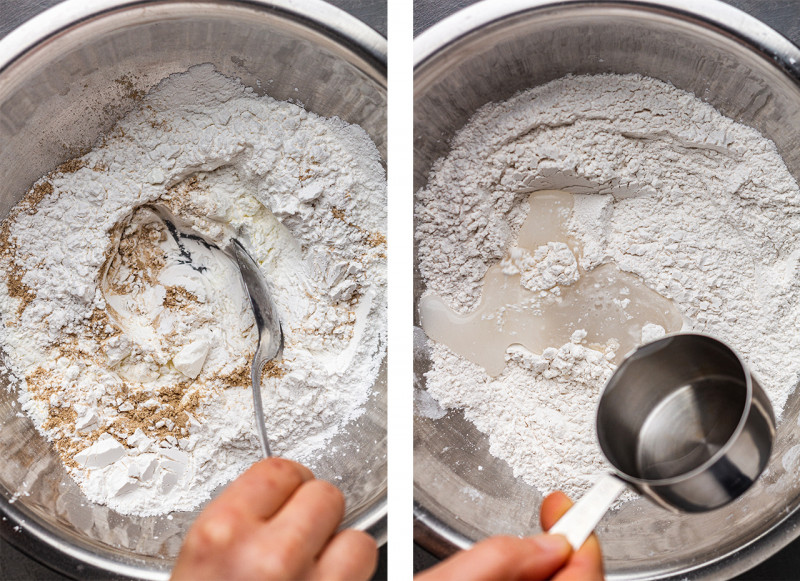
The dough could not be simpler. To make this gluten-free gyoza dough simply combine dry dough ingredients in a bowl, mix them really well before adding water. You can also add a bit of oil for better texture, but I made them without any oil too and I don’t find it necessary.
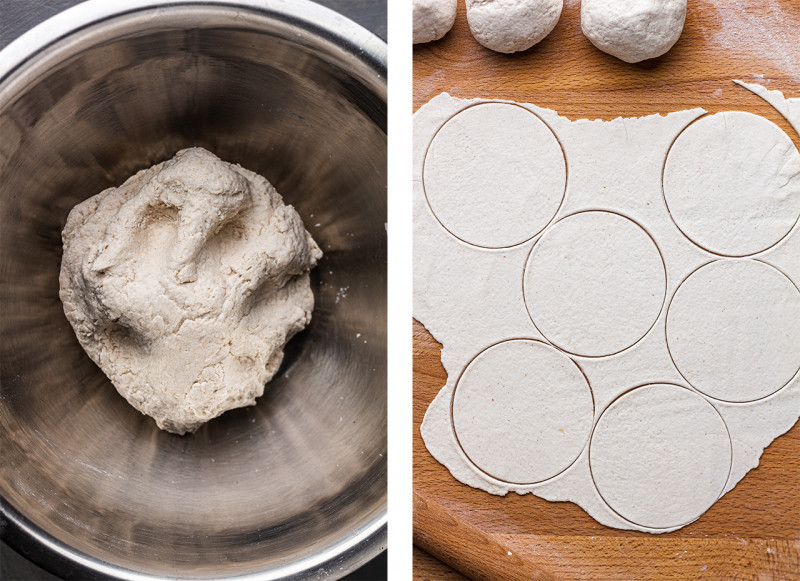
Knead the dough until elastic and smooth, then set aside for a bit. Next, roll the dough out on a lightly floured (use extra rice flour) surface as thinly as you can. Use a cookie cutter to cut out 7-8 circles out of the dough.
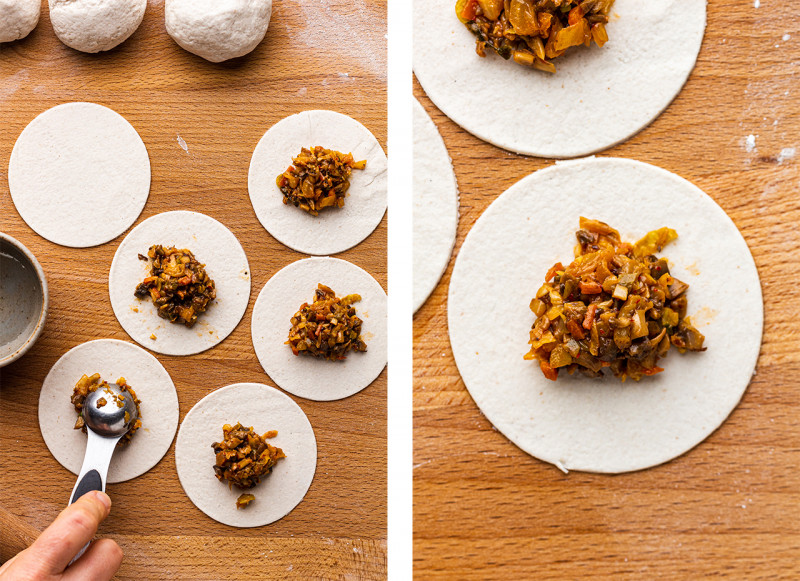
Paint the perimeter of each circle with a wet finger and place a slightly heaped teaspoon of cold filling in the middle of each circle.
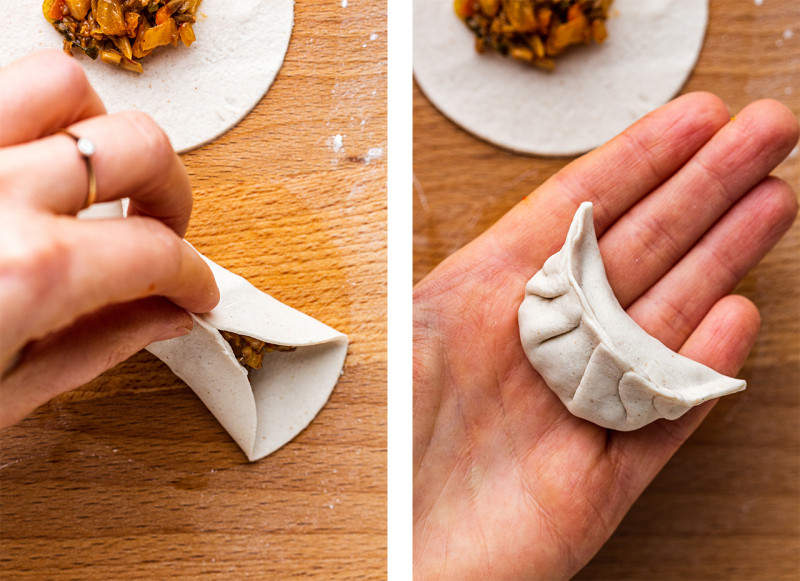
Fold the dough over the filling and pinch in the middle, then form 2-3 pleats on each side and seal. This video will help with your pleating technique but don’t get too hung up on it, as long as the dumplings are sealed well and have a nice flat base, they will work just fine.
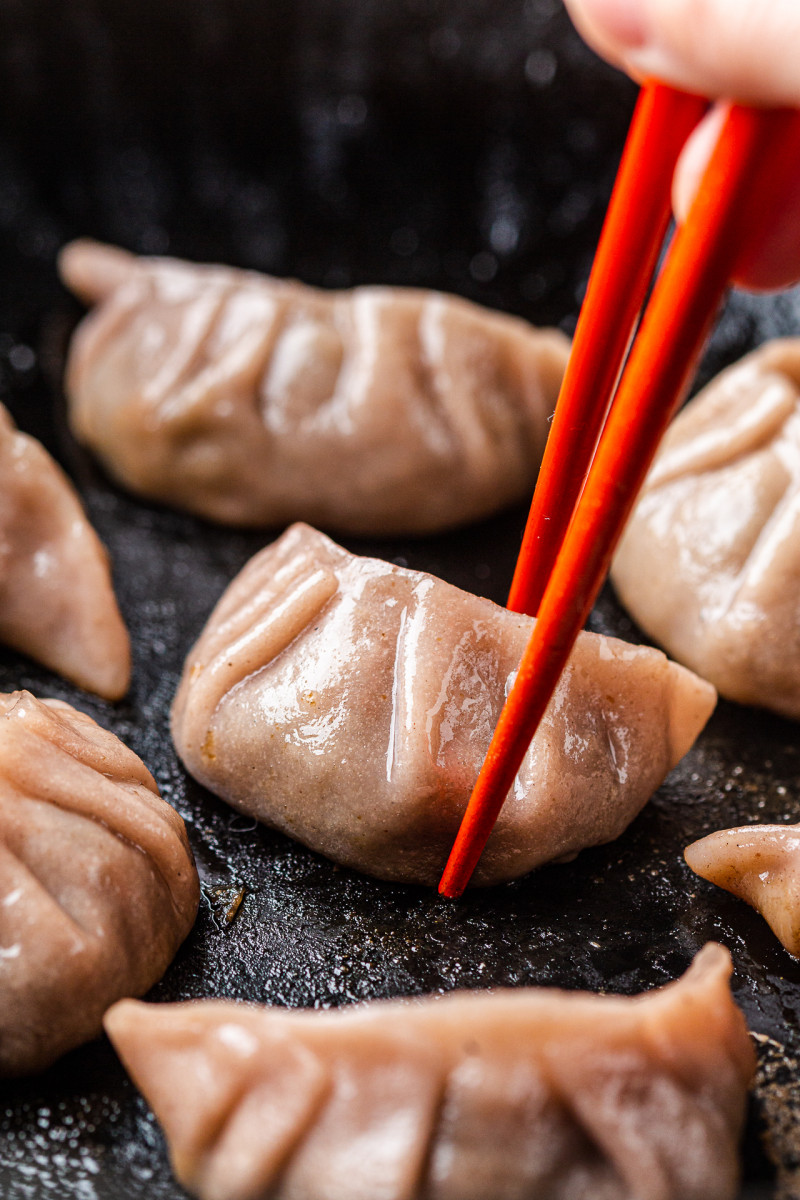
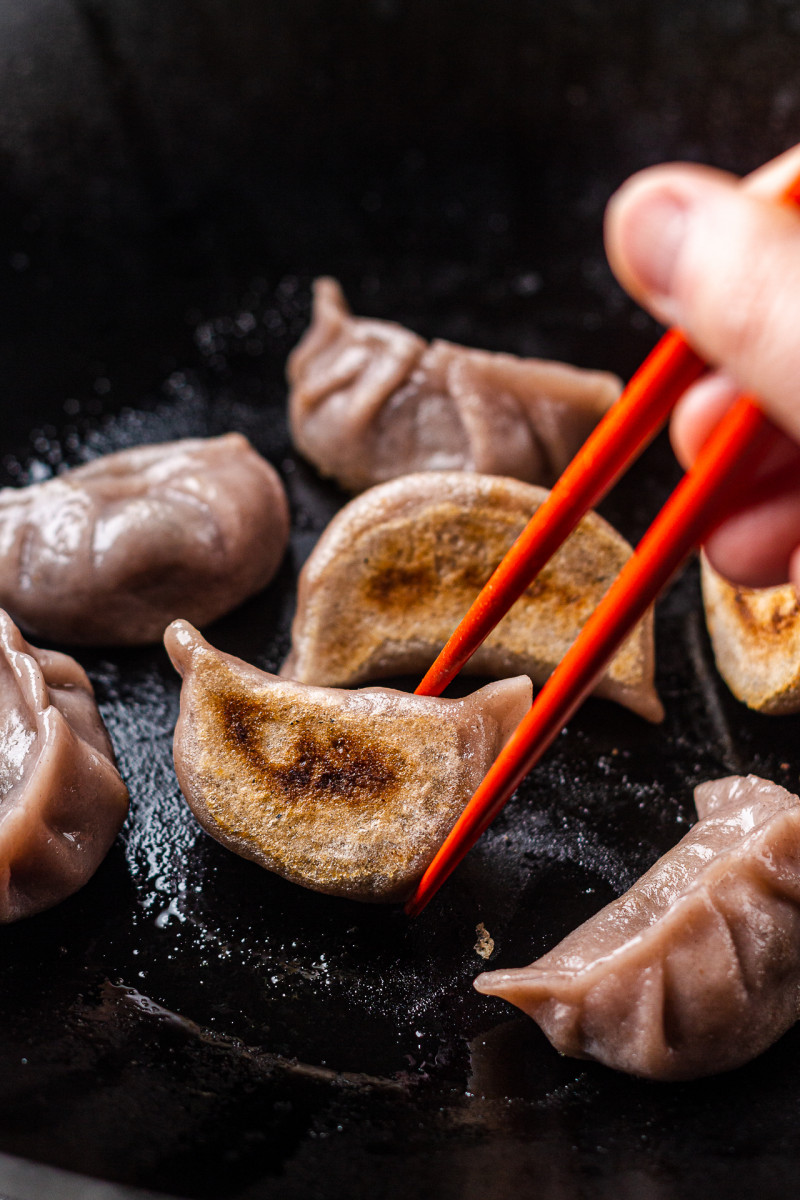
Arrange a batch of gluten-free gyoza on a pre-heated non-stick wok or frying pan you have a lid for (you can also use an upside down dinner plate). Allow the bottoms to seal and crisp up before adding some water (about 1/3 cup / 80 ml for 28 cm / 11 inch pan) and putting the lid on. Allow gluten-free gyoza to cook in their own steam for about 8 minutes on medium heat, take the lid off and allow all of the water to evaporate before prising them off gently with a spatula or a butter knife.
- 300 g / 10.5 chestnut/cremini mushrooms
- 15 ml / 1 tbsp oil, for frying (I used peanut oil)
- 5 spring onions / scallions, white & light green parts chopped finely
- 4 garlic cloves, finely chopped
- 2 tsp grated ginger, adjust to taste
- 125 g / 4.5 oz sweetheart or white cabbage
- ¼ tsp white pepper
- 1 tbsp / 15 ml tamari*, more to serve
- 5 ml / 1 tsp toasted sesame oil (optional)
- 125 g / 4.5 oz kimchi
- 8 g / 2 tsp cornflour
GLUTEN-FREE DOUGH
- 120 g / scant 1 cup rice flour, more for dusting
- 32 g / 2 tbsp cornstarch
- 9 g / 1 tbsp psyllium husks powder
- 10 ml / 2 tsp oil (optional) + more for frying
- 160 ml / 2/3 cup water
EASY DIPPING SAUCE (for 1 person)
- 10 ml / 2 tsp tamari*
- 15 ml / 1 tbsp kimchi brine
- 7 ml / ½ tbsp mirin (or 1 tsp maple syrup)
- a few drops of chilli oil or sesame oil
- Chop cleaned mushrooms into a fine dice. If using a food processor, slice them thickly first and pulse them in batches – be sure not to overprocess.
- Shred cabbage thinly and then chop into fine dice with a sharp knife or use a food processor again.
- Add diced mushrooms to a pre-heated medium pan. Allow them to cook on low-medium heat, stirring from time to time, until their released moisture cooks out.
- Transfer the mushrooms to a plate. If the pan isn’t clean, deglaze it by adding a small splash of water or mushroom stock, then add oil to the pan. Add chopped scallions/spring onions and after a minute or so garlic and ginger. Saute for a minute before adding chopped cabbage.
- Stir fry until the cabbage is cooked, return mushrooms to the pan, cook for a couple of minutes, then season with white pepper, soy sauce and sesame oil (if using).
- Combine cornflour with half a tablespoon of kimchi brine or water and add to the pan. Mix everything well and allow it to cook for a couple of minutes until thickened slightly.
- Finally, mix in well drained and finely chopped kimchi (you want to avoid cooking it to keep it’s nutritional benefits). Check the seasoning and allow the mixture to cool down completely.
DOUGH & FRY-STEAMING
- Mix rice flour, cornstarch and psyllium husks powder in a medium bowl, until homogenous in colour.
- Stir in water and oil – if not using oil add one teaspoon of water instead. If you use cups to measure, you may need a little more or less water than stated.
- Use your hands to knead the dough until elastic and smooth, then let it rest for 20 minutes under a clean kitchen towel.
- Divide the dough into quarters. Roll a piece of dough at a time on a lightly dusted surface. Apply steady even pressure to roll the dough out as thinly as you can. Use a 8 cm / 4 inch cutter to cut out 6-7 circles out.
- Paint the perimeter of each circle with a wet finger, place a slightly heaped teaspoon of the filling in the middle and pinch the two sides of the wrapper at the top, over the filling, then create 2-3 pleats on each side (here is a video on how to do it), seal and set aside on a floured surface while you work on the rest.
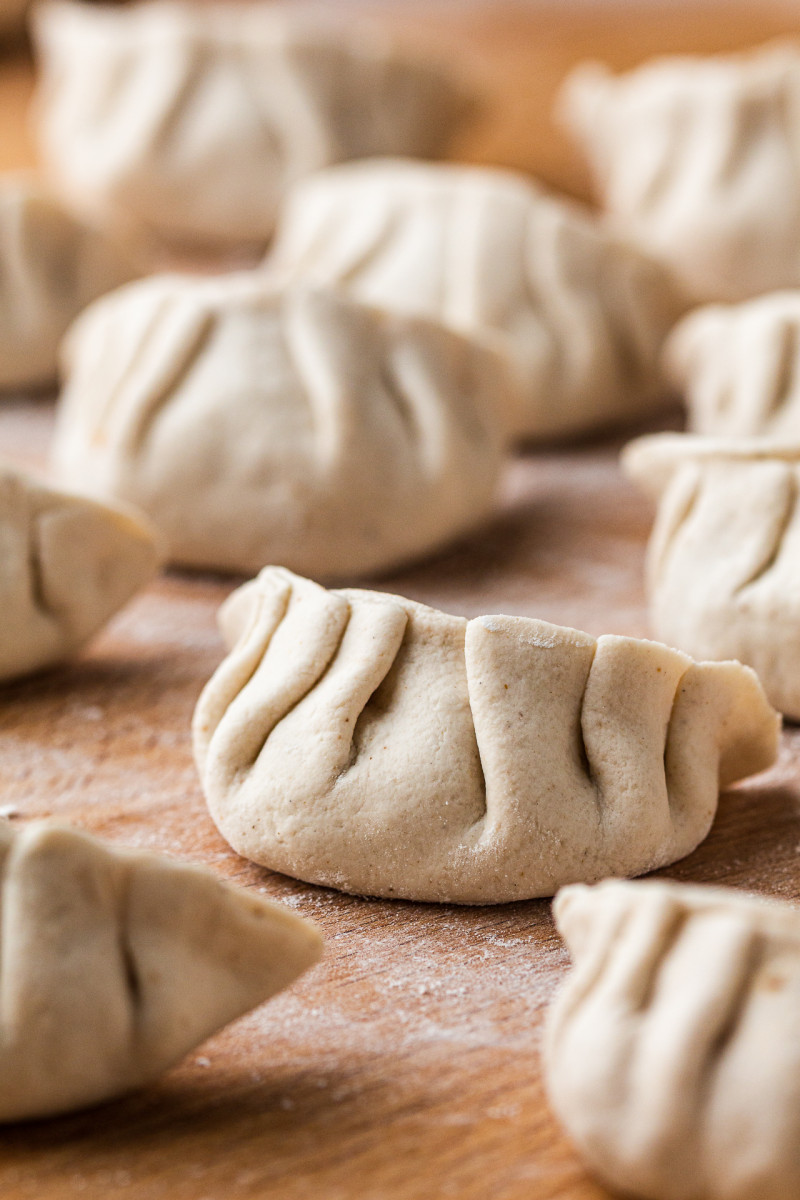
- Arrange the finished dumplings, seam up, on a lightly floured surface and cover them with a kitchen towel while making the rest so that they don’t dry out.
- Heat up a little (I used 10 ml / 2 tsp per 10 dumplings) oil in a wok or medium frying pan that you have a lid for or use an upside down plate. Choose a reliable non-sticking pan. Once the oil is hot, arrange as many potstickers as you can without them touching each other. Fry for 2-3 minutes, then add a splash of water to the pan (1 cm) and put the lid on – for my 28 cm / 11 inch pan, I need about 80 ml / 1/3 cup water. Let the dumplings cook in their own steam for about 6-8 minutes – depending on how thin your dough is. Take the lid off and leave the potstickers on heat for another minute or two so that any excess water evaporates and the bottoms crisp up. Prise them off gently with a spatula or a butter knife.
- Arrange cooked potstickers with crispy bottoms up while you cook the remaining batches.
- Divide between 2-4 plates and serve with a side of dipping sauce.
EASY DIPPING SAUCE
- Combine all the ingredients plus 2 tsp (10 ml) of water in a small dipping bowl – one bowl per person.
*OIL-FREE: You can make these dumplings completely oil-free too if you so wish. To do that simply skip oil in the dough and the filling – saute the filling ingredients using mushroom (or veggie) stock instead and instead of pan-frying the dumplings, steam them in a bamboo basket for about 8-10 minutes, depending on the thickness of your dough. Line the basket with a piece of baking paper with holes in it so that the dumplings do not stick to the bamboo.
I haven't had the chance to freeze these but I don't anticipate any issues. Hope you'll enjoy them! Ania
I'm delighted to hear that these were such a success with you and your gluten-free friend - thank you for trusting my recipe. 10 doesn't sound like many and unless they were huge, I dare you to go even thinner - this dough can take it, I promise ;) I got 32 small dumplings out of this amount. x Ania