• recipes
    • small plates
    • large plates
    • sweets
    • baking
    • salads and soups
    • breakfasts
    • pantry staples
    • drinks
  • about
  • contact
Lazy Cat Kitchen

A food blog with plant-based recipes from all over the world

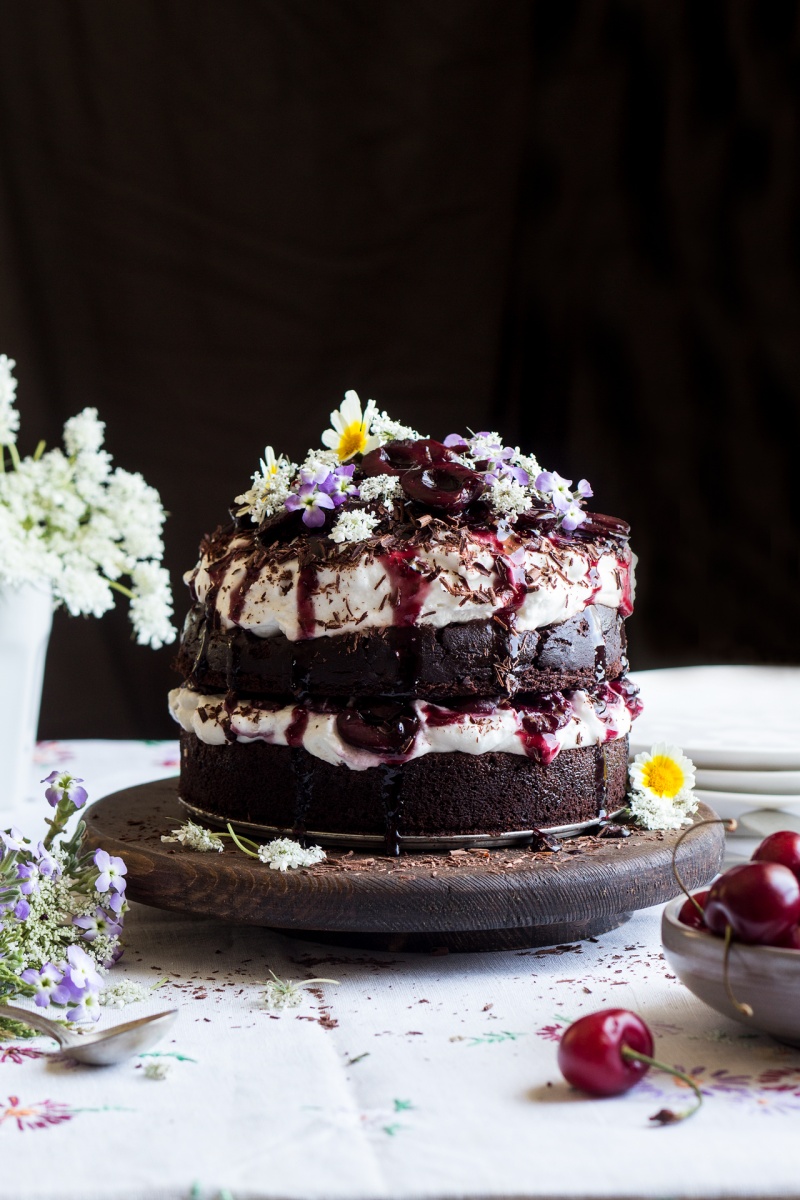
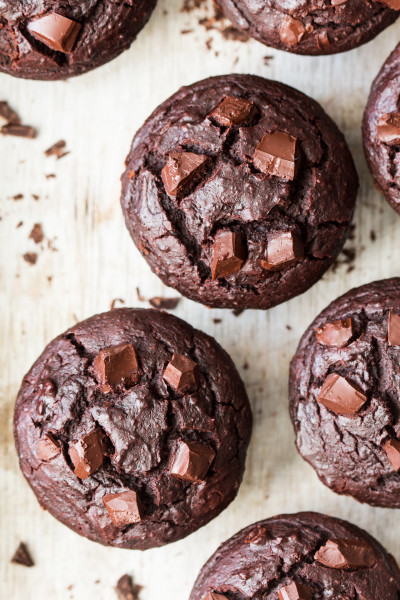
Vegan black forest cake

June 23, 2017 by Ania - 45

aquafaba, beetroot, chocolate, gluten-freego to recipe

go to recipe

vegan black forest cake

As Greece appears to be in the stone fruit season here, today my beloved cherries (I don’t think I’ve ever met a fruit I didn’t like…actually, I still need a bit of convincing from Durian 😉 ) take the centre stage in this pretty handsome vegan black forest cake.

This cake was loooong in the making! Why? As it’s tricky! Not the cake itself but making a stable vegan cream that doesn’t turn into liquid was a challenge, I’ll admit!

After a number of experiments, I decided on an airy mixture of aquafaba and coconut cream. By marrying the two together, the cream isn’t overly coconutty and it’s way lighter (and contains less fat) than a 100% coconut cream does. I also found that all my attempts at whipping chilled coconut cream (despite using an additive-free brand) have proved really underwhelming – the result is never fluffy enough for my taste.

This puppy, took me a few goes to get right (if you follow me on Instagram you might have seen an Instagram story of its collapse at some point), but once I arrived at the right ratios and reinforced it with a touch of xantham gum, it really did the job. It lasted 4 days in the fridge and it would have maybe even lasted longer if not for the fact that the cake disappeared into the abyss of our and our neighbours’ mouths 🙂 .

An important thing here is to make the cream a day in advance (the cake itself can be made a day early too) and store it in the fridge overnight. Chilling the ‘cream’ stiffens it considerably, which ensures that once you stack two layers, one on top of the other, it won’t collapse under the weight of the top layer.

PS: If you make my vegan black forest cake, don’t forget to tag me on Instagram as @lazycatkitchen and use the #lazycatkitchen hashtag. I love seeing your takes on my recipes!

vegan black forest cake small

vegan black forest cake macro

5.00 from 6 votes
Print
  • makes: 15 cm / 6" cake
  • prep: 60 min
  • cooking: 75 min

Ingredients

CREAM

  • 135 ml / ½ cup + 1 tbsp aquafaba (chickpea brine)
  • 50-75 g / 4-6 tbsp sugar
  • 1½ cup coconut cream from a tin of full fat coconut milk
  • ¼ tsp xanthan gum

DRY INGREDIENTS

  • 180 g / 1½ cup all purpose white flour*
  • 1 tsp baking soda
  • ½ tsp baking powder
  • 120 g / 1 cup cacao powder

WET INGREDIENTS

  • 90 ml / ¼ cup + 2 tbsp olive oil (or melted coconut oil)
  • 180 g / 1 scant cup sugar (I used demerara sugar)
  • 180 ml / ¾ cup beetroot puree (approx. 300 g / 0.65 lb beetroot)**
  • 240 ml / 1 cup almond milk (or other thin plant milk)
  • 60 ml / ¼ cup espresso / strong coffee***

CHERRIES

  • 450 g / 1 lb sweet cherries (or sour cherries), pitted
  • 3 tbsp Kirsch, cherry liqueur (OR 2 tbsp maple syrup and 1 tbsp lemon juice)
  • 1 heaped tsp cornflour / cornstarch

Method

CREAM (make the day before)

NOTE: It’s essential to make this cream the day before and refrigerate overnight in order for it to stiffen.

  1. Place chilled coconut cream in a bowl and give it a brisk whisk with a wire whisk so that it’s smooth and lump free.
  2. Whip aquafaba (I suggest not using one that has been sitting around in the fridge for a couple of days so that the cream has a longer shelf life) until you get stiff peaks – to check, invert the bowl and watch if the whipped aquafaba starts sliding down, if it does continue whipping until it no longer does. With my handheld whisk, it takes approximately 10 minutes.
  3. Once at stiff peaks, start adding sugar very gradually while whipping. If using sweet cherries, I recommend 4 tbsp of sugar. If using sour cherries, I recommend 6 tbsp instead.
  4. Whisk in xanthan gum.
  5. Very, very slowly and gently whisk the coconut cream into the aquafaba with a wire whisk. The mixture will deflate a bit but don’t worry, it’s normal – once chilled the fat in the coconut cream will provide structure and a nice mouth feel. Refrigerate for a few hours for the ‘cream’ to get stiffer. I refrigerated it for about 4 hours and then decorated the (cooled down) cake, but refrigerated two cake layers separately and only stacked them together on the following day to ensure the ‘cream’ has stiffened enough to be able to take the weight of the top layer.

CAKE

  1. Heat up the oven to 175° C / 350° F and grease a 15 cm / 6″ round baking tin with a small amount of oil.
  2. Mix and sift all your dry ingredients.
  3. In a large mixing bowl, cream olive oil and sugar with an electric whisk.
  4. Add beetroot puree, plant milk and espresso. Mix well.
  5. Add dry ingredients to the wet in three batches. Fold them in GENTLY until there are no flour pockets but be careful not to overmix!
  6. Spoon the batter into a greased baking tin, gently tap against the work bench to ensure there are no large air pockets trapped in the batter and bake for about 65-75 min, until a toothpick comes out fairly (it’s a moist cake) clean.
  7. Allow to cool completely before cutting in half.

CHERRIES

  1. Place pitted cherries in a small pot with Kirsch and 3 tbsp of water.
  2. Bring to a simmer and simmer gently for 10-15 minutes, just until the cherries soften a little and release some beautiful juices but not long enough to let them turn brown.
  3. Transfer cherries out of the pot and set aside to cool.
  4. Take 2 tbsp of the liquid that is left in the pot and place in a small bowl. Mix in cornflour to create a cornflour slurry.
  5. Pour cornflour / cornstarch slurry back into the pot and allow it to simmer gently for the sauce to thicken. Set aside to cool.
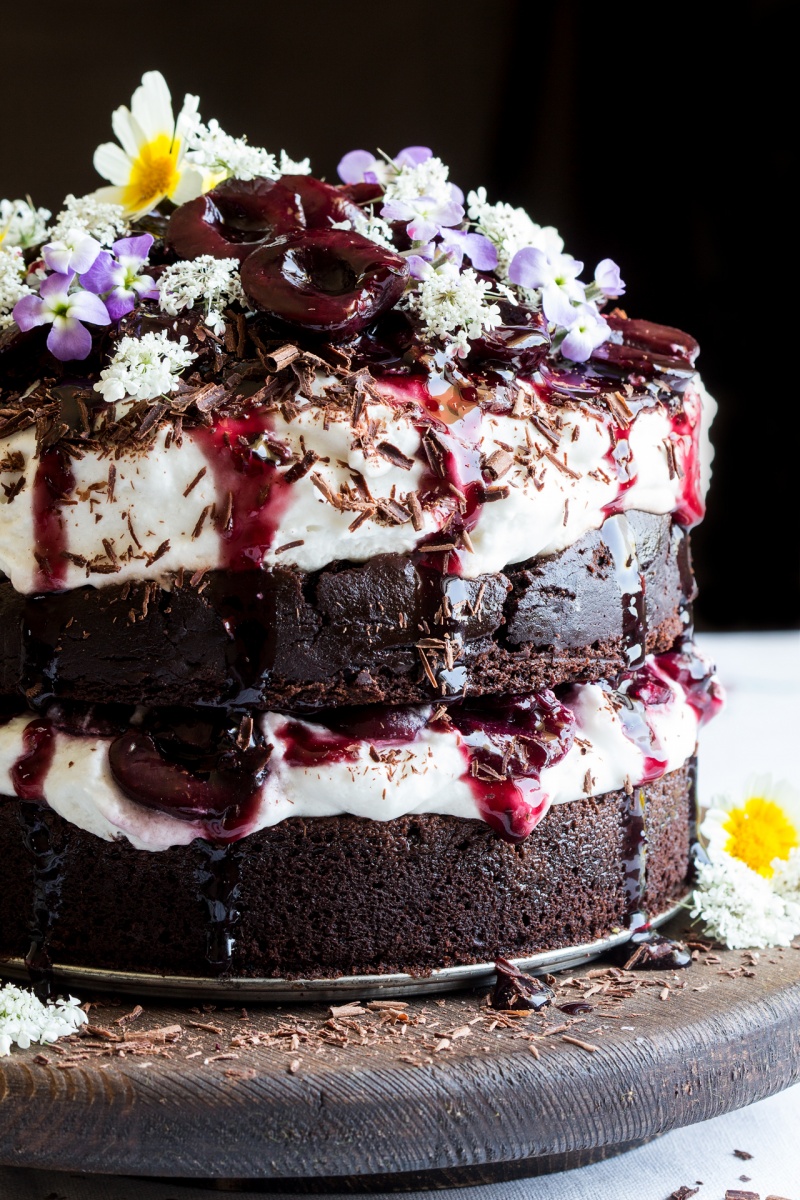
ASSEMBLY

  1. Cut cooled-down cake in half horizontally with a serrated knife.
  2. Ice the bottom and top layer with stiffened cream. If you make the cake on the same day as your cream, I recommend refrigerating the two iced layers separately (i.e. not stacked on top of each other) overnight.
  3. Top bottom layer with cooled down cherries (reserve thickened juices for the top tier).
  4. Place top layer on top. Decorate with cherries, thickened cherry juice, edible flowers and chocolate shavings.
  5. Store in the fridge and do not expose to direct heat / sunshine. I found that the cake keeps for about 3-4 days.

Notes

*Instead of all purpose white flour, you could make this cake gluten-free by using 120 g / 1 cup buckwheat flour, 30 g / 3 level tbsp rice flour and 30 g / ¼ cup cornflour / cornstarch.

**To make beetroot puree, you can bake, steam or even boil beetroots.
– TO BAKE, wrap washed beetroots in a large piece of aluminium foil creating a foil parcel that is scrunched up on top. Trickle a little bit of water to the bottom of the foil parcel and bake in a 200° C / 390° F oven for about an hour or until you can pierce the beetroot with a knife easily.
– TO BOIL, place washed beetroots in a pot of water, ensuring they are completely covered in water. Place a lid on and simmer for about 1 hour – depending on size – until you are able to easily pierce them with a knife.
– TO STEAM, place washed beetroots in a steamer (I used a bamboo one) and over a pot of boiling water. Steam for about 1 hour – depending on size – until you are able to easily pierce them with a knife.
Once cooked, let the beetroots cool down, peel the skins with your fingers and blitz to a puree in a blender, food processor or with a hand blender. You may need to add a tablespoon of water to help the food processor. I like to prepare a lot of beetroot puree at once, portion it into small jars and freeze until I am ready to make another cake / muffins. Don’t add more than 1 tablespoon of water to the puree as it will throw the cake’s ratios out. If you do that by accident, be sure to reduce the amount of liquid that goes into the batter accordingly.

***If you cannot / don’t want to have coffee, you can substitute with more plant milk. Coffee flavour does not come through here, it simply accentuates the chocolate flavour.

If you want more info on some of the ingredients that we use in our recipes, check out our glossary.
SHARE
peach salad maple balsamic glaze
Previous:
Peach salad with maple balsamic glaze
Next post:
Pesto zoodle salad with roasted fennel and tomatoes
pesto zoodle salad

get a sweet e-book

on joining our mailing list

I’d like to receive new recipe emails and a link to your free e-book.
(By submitting this form you agree to our privacy policy.)
This recipe has been written by Ania. She is the cook, stylist and photographer behind Lazy Cat Kitchen. You can read about her journey into food blogging here. You can also check her out on Pinterest and Instagram.

You may also like

easy eggless brownies cut

Easy eggless brownies

vegan chocolate cookies tray

Easy vegan chocolate cookies

peanut butter caramel mousse

Peanut butter caramel chocolate mousse

chocolate hazelnut cookies stack

Flourless chocolate hazelnut cookies

    Comments

    Leave a comment

  1. Huyen says

    June 23, 2017 at 2:05 pm

    I gasped and had to comment immediately even before reading your post that your cake looks soooo fancy 😉 Cant love your blog more 🙂
    P.S. I love how you veganize vietnamese food! Sometimes I just miss my country’s cuisine so much you know 🙂

    Reply
    • Ania says

      June 23, 2017 at 9:27 pm

      Aw, thanks so much, Huyen! I really appreciate your comment as I love Vietnamese flavours and sometimes worry if I do them justice with limited ingredients available here. Glad to know I have got a thumbs up from you! 🙂 Ania

      Reply
  2. Shez says

    June 23, 2017 at 7:01 pm

    You are a genius! I just made the cream using your technique and dates-sweetened cashew cream instead of the coconut milk. It’s perfect. Using it for topping aquafaba chocolate mousse for dinner tonight

    Reply
    • Ania says

      June 23, 2017 at 9:31 pm

      Aw, thanks so much, Shez! So glad to hear this recipe came in useful! Your cashew-based substitution sounds awesome too 🙂 Ania

      Reply
  3. Ashley @ The Naked Food Life says

    June 23, 2017 at 8:51 pm

    Wow! This is gorgeous! I love the addition of beets and that you worked so relentlessly to create the perfect fluffy cream!

    Reply
    • Ania says

      June 23, 2017 at 9:30 pm

      Thanks, Ashley! 🙂 Ania

      Reply
  4. lillian says

    June 27, 2017 at 7:28 am

    This looks so scrummy! I do have a question, though. You indicate to bring the coconut milk to room temp, so does that mean I will need to refrigerate it first? And if so, wouldn’t bringing it to room temp make it more liquid? Thanks.

    Reply
    • Ania says

      June 27, 2017 at 10:20 am

      Thank you, Lillian. Now, let me answer your questions. If you are obtaining coconut cream from a tin of full fat coconut milk, you’ll need to refrigerate the tin for several days first (conventional Internet wisdom says 24 hrs but I never found this amount of time sufficient) so that the cream comes up to the top and the water stays at the bottom. If you are simply using a tin of coconut cream then you don’t need to worry about that, of course. The reason I am saying to bring coconut cream to room temperature is that it is easier to incorporate it into whipped aquafaba when it isn’t chilled. Otherwise you get lumps of fat in your cream and knock all the air out of whipped aquafaba trying to obtain a smooth mixture. Hope that helps! Ania

      Reply
  5. DHARAMBIR CHAUDHARY says

    June 30, 2017 at 8:50 am

    yummy! great presentation ! ill try this recipe thanks for sharing this recipe!

    Reply
    • Ania says

      June 30, 2017 at 10:30 am

      Thanks 🙂 Hope you’ll like it! Ania

      Reply
  6. jenn says

    July 1, 2017 at 8:17 am

    This looks amazing, and I’m planning to make it tomorrow! Quick question about the xanthan gum, which I don’t have. Is it meant to act as a stabilizer? Could I substitute cream of tartar?

    Thanks!!
    Jenn

    Reply
    • Ania says

      July 1, 2017 at 11:50 am

      Hi Jenn,

      Awesome! I hope you’ll like it! Yes, that’s exactly what it does. I tried making one version without it and it was okay but a bit more fragile. Whether you use a stabiliser or not, it’s very important to make it a day in advance though and refrigerate overnight (I decorated both layers with it but didn’t stack them together until the following morning). Hope that helps! 🙂 Ania

      Reply
  7. Hannah says

    July 4, 2017 at 1:57 pm

    What a beautiful, beautiful cake! Now I NEED to make one too!

    Reply
    • Ania says

      July 4, 2017 at 3:30 pm

      Thanks, Hannah! And yes, you do need to 😉 x Ania

      Reply
  8. Judee@gluten free A-Z Blog says

    July 12, 2017 at 12:56 pm

    So beautiful and healthy too. I love the edition of flowers. I ‘ve been seeing a lot of recipes lately that use edible flowers. Love the idea

    Reply
    • Ania says

      July 12, 2017 at 3:51 pm

      Thanks for kind words, Judee! 🙂 Ania

      Reply
  9. Norah Meier says

    August 6, 2017 at 4:02 pm

    I’m so excited to make this! In the process of making this and have a questions about the coconut cream. I have the aquafaba whipped perfectly with the sugar and the xanthum! Then I went to fold in coconut cream from room temp can. I only folded in the cream, not the milk and it denigrated the whipped aquafaba. Is that supposed to happen?

    Reply
    • Ania says

      August 6, 2017 at 6:10 pm

      Hi Norah,

      Yes, it does deflate a little bit, for sure. Refrigerate it and the fat particles in the coconut cream should firm it all up. Let me know how you got on. Ania

      Reply
  10. JOANA says

    September 14, 2017 at 9:45 am

    WOW THIS LOOKS MIND BLOWING 😀 GREAT JOB

    HUG FROM JOANA

    Reply
    • Ania says

      September 14, 2017 at 10:27 am

      Thanks for your kind words, Joana! 🙂 Ania

      Reply
  11. Sandra says

    September 22, 2017 at 4:18 pm

    Made this for a dinner party tonight
    I just don’t have fancy flowers 🌺:-)) Y
    Would upload a pic but can”t .
    Looks delicious and hoe hey love it

    Reply
    • Ania says

      September 22, 2017 at 4:33 pm

      Thanks Sandra, hope it will go well with your guests! Ha ha, don’t worry about the flowers, they are completely optional. I would love to see a photo if your are on Instagram (tag me @lazycatkitchen #lazycatkitchen) or you can also upload it to my Facebook page as a post! x Ania

      Reply
  12. Sam says

    December 17, 2017 at 10:57 am

    I was making the cream, and it seemed to deflate quite a bit when I added the coconut cream. And I very gently folded it in and popped it in the fridge, then when I removed it, and touch it, it had seperate to water and cream. I have no idea what I did wrong.

    Reply
    • Ania says

      December 17, 2017 at 12:48 pm

      Hi Sam,

      I’m sorry to hear you’ve had trouble with this cream. You don’t mention sugar or xanthan gum but I take it that you added both as per instructions? Sugar stiffens aquafaba and xantham gum stablises it so they are both needed. The only other thing I can think of is that aquafaba wasn’t at stiff peaks when you incorporated coconut cream, which made it perish. Did you do my ‘inversion’ test? Did it pass? Sorry, but that’s all I can think off at the moment. Is it still useable? Are you able to simply discard the water? Ania

      Reply
  13. Suzie says

    January 27, 2018 at 6:16 pm

    Hello, I love this recipes, tried it for a friend but when trying to whip the coconut cream (taken from the top of the refrigerated can), it didnt cream at all and stayed all lumpy as if water and fat where separated. Did you have that experience, what do you recommend to make a nice cream when it doesnt work with the whip, blend it? Thank you, love the blog!

    Reply
    • Ania says

      January 27, 2018 at 8:23 pm

      Hi Suzie,

      Thanks for kind words about the blog. I’m happy to help you trouble shoot but I am unsure as to whether you have tried whipping coconut cream (fatty portion of coconut milk) on its own or whether you have tried my coconut cream aquafaba ‘whipped cream’? I am guessing, it’s the former in which case, I have never successfully managed to whip coconut cream either. I mean it sort of worked (it never separated for me like you describe) but it never stayed sufficiently stiff if that makes sense. I have a feeling that adding some agar powder (not flakes) could help but haven’t tried it myself. Let me know and I’m sure we could come up with a solution. Ania

      Reply
  14. Marilyn McCredie says

    April 24, 2018 at 5:59 am

    Hi Anita, really looking forward to making this, although I wondered if adding a third of every ingredient and making in an 8” tin would compromise the cake altogether. I don’t have a 6” tin and live 40km from town. Thanks for your help.
    Cheers, Marilyn

    Reply
    • Ania says

      April 24, 2018 at 11:39 am

      Hi,

      If you increase the amount of cake batter sufficiently and baking time to allow for extra volume to cook, then sure, it should not be a problem. Ania

      Reply
  15. Cassie says

    August 7, 2018 at 4:21 am

    Coconut oils SO high in fat. Is there a substitute that can be used instead of coconut oil.
    I’m on a low sodium low fat diet..

    Reply
    • Ania says

      August 7, 2018 at 12:23 pm

      If you want to be sure the recipe works out, replace with another type of oil, but not sure that solves your problem. As for other substitutions, I cannot vouch for any as I have not tried them myself, but decent cake needs fat, especially when it’s egg-free. Sorry I cannot be of help!

      Reply
  16. Alysha Radia says

    August 21, 2018 at 6:07 pm

    Can you use a regular gluten free flour blend instead of the mixture that you suggested?

    Reply
    • Ania says

      August 21, 2018 at 6:35 pm

      Sure, if it’s a GF cake mix it should work just fine! Ania

      Reply
  17. Meghann says

    September 25, 2018 at 9:57 pm

    I want to make this cake for a dinner party tomorrow but am unsure about the correct pan to use. Can I use a regular 6″ round cake pan or does it need to be baked in a springform pan since this is a sponge cake?

    Reply
    • Ania says

      September 26, 2018 at 12:52 pm

      Hi Meghann,

      Yes, 6″ is the right size! Springform pan is simply better as it’s easier to remove the cake afterwards, but if you grease the tin and add tabs of baking paper before pouring the batter in, you should be okay. Hope that helps! Ania

      Reply
  18. Andra says

    November 6, 2018 at 3:32 pm

    Hi Ania,

    I’d like to turn this cake into a log, do you think the sponge will be flexible enough to roll? Great blog and revipes btw!

    Reply
    • Ania says

      November 6, 2018 at 3:42 pm

      Hi Andra,

      I’m not 100% sure as I haven’t tried, but I think so provided it’s thin enough. Thanks for you kind words! Ania

      Reply
  19. Madison says

    November 12, 2018 at 5:37 pm

    Hi! I am making this for my fiancé’s birthday and I’m a terrible baker so wish me luck!!

    I have a couple questions.
    Do I sift the ingredients before or after measuring them?

    Can I just use coconut cream or do I have to use full fat coconut milk to get the cream?

    Thanks so much!

    Reply
    • Ania says

      November 13, 2018 at 11:45 am

      Hi Madison,

      I would recommend you to weigh the dry ingredients rather than measure as measuring is nowhere near as accurate unfortunately. You measure / weigh the flour first and then sift. Yes, you can use coconut cream here. The most important thing is to make absolutely sure that aquafaba is at stiff peaks before combining it with coconut cream and to combine them very gently (folding) so that the foam does not deflate. Hope that helps! Ania

      Reply
  20. Sarah says

    November 21, 2018 at 1:13 am

    Hi Ania,

    I’m going to be making this for my birthday next week and I was just wondering what flowers you used as they are absolutely beautiful.

    Reply
    • Ania says

      November 21, 2018 at 1:23 pm

      Hi Sarah,

      I’m sorry, but I could not tell you – they were simply wild Greek flowers that grew around our house on Paros. Ania

      Reply
  21. Laura says

    November 27, 2018 at 9:56 pm

    Hi Ania!
    Beside the fact that I want to congratulate to you for your wonderful recipes, I am struggling in finding the xantham gum. Is it possible for this recipe to switch to agar agar? I’m totally looking forward to baking this marvellous cake for my mother’s birthday!!

    Laura

    Reply
    • Ania says

      November 28, 2018 at 1:09 pm

      Hmm, not sure as agar agar needs to be activated as far as I know, which involves cooking it in liquid. I would say add a teaspoon of cornstarch (cornflour in the UK) or tapioca and an absolutely key is making sure aquafaba is at stiff peaks (you need to be able to invert the bowl over your head and it should not move at all) and fold coconut cream in very gently. Hope that helps! Ania

      Reply
  22. Laura says

    December 1, 2018 at 3:55 pm

    Thank you so much! It helps totally a lot! I will able to cook it next Thursday, I’ll let you know!
    For now, I really want to thank you for your reply.
    Laura

    Reply
  23. Mims says

    December 25, 2018 at 5:59 pm

    Merry Christmas,

    I tried making this last night and my aquafaba cream did no turn out. I think you may have a typo, or at least poorly worded instruction.
    Do you mean to say to add only the chilled part /congealed fat of a full tin (already 14 ounces) of coconut milk or coconut cream and to discard the liquids…so in fact you are only adding 3-4 ounces not the entire contents of the can (or 1.5 cups as the instructions say?) SInce I was using room temperature coconut cream, I thought I needed to add 1.5 cups. So my cream is very soupy this morning despite following the instructions with stiff peaks, sugar and xanthum gun. I suspect now , fer searching the internet for other recipes, I was only supposed to add the congealed fat, as I see some other recipes online make that distinction. No worries, I found a way to turn it into coconut cream pudding and I have some heavy whipping cream here to make a dairy version for the cake. So now I have two different desserts for christmans dinner, so win-win!

    Reply
    • Ania says

      December 26, 2018 at 1:26 pm

      Hi Mims,

      Merry Xmas and I am sorry that the cream did not work for you. What I say in the recipe is that you need 1.5 cups of the cream (from full fat coconut milk) and that is correct so the reason why your cream turned out soupy is that it sounds like you have added both the cream and coconut water. The reason why I am unable to say how may tins you’ll need is that it varies from one brand to another and my blog is read by people in different countries. I am glad to hear that you managed to turn it around. Ania

      Reply

Leave a Reply Cancel reply

Your email address will not be published. Fields marked as * are mandatory
This form collects your name and email so that we can correspond with you and display your name and the content of your comment. Check out our privacy policy for more information.

I consent to having Lazy Cat Kitchen collect my name and email

Ania Marcinowska
Hi, I'm Ania. I love good food but I love animals more! Adopting a plant-based diet has been the best decision I've made and that's how this blog was born. It's a space where I want to show you that creating delicious plant-based food isn't actually hard at all.
read more

Follow us on insta

On the blog a simple #midweek recipe for #zucchini On the blog a simple #midweek recipe for #zucchinipasta that was born out of too many zucchinis in my fridge and an encounter with a fussy toddler 🤣 Easy to make, full of flavour and can be made #oilfree if that's your jam, enjoy 🤗#recipe link in my bio or 🏃‍♀️ to lazycatkitchen.com for the latest recipe!#whatsfordinner #veganfoodporn #veganfoodshare #eatplants #eatplantsnotfriends #eatmoreplants #eatvegan #meatless #zucchinirecipes #zucchini #easyplantbasedmeals #plantbasedfood #plantbaseddiet #plantbasedrecipes #glutenfreevegan #easyveganfood #easyveganrecipes #pasta #veganpasta #midweekdinner
Shooting a new green recipe for you today, but in Shooting a new green recipe for you today,  but in the meantime here is a reminder that's this #vegan #greenthaicurry isn't hard to make and it's perfect for this transition between winter ❄️ and spring 🌱. And while you are at it, add some blitzed spinach in at the end for colour and extra plant goodness 👌#recipe link in my bio 👈 or Google 'vegan Thai green curry lazy cat kitchen' 😸#veganrecipe #veganrecipes #whatsfordinner #vegancurry #plantbased #eatmoreplants #eatvegan #govegan #ditchdairy #easyveganrecipe #vegancommunity #veganfoodshare #glutenfreevegan #vegantasty #veganfood #midweekmeals #healthyfood
Running a #foodblog when you have an insatiable #s Running a #foodblog when you have an insatiable #sweettooth is like being an alcoholic in charge of a bar! I did so well without any sweet treats for a week and then recipe testing happened and I am back at square one 🙄 Trying to distract myself with #vegannoodles...but the new recipe is banging, hopefully with you before the weekend...recipe link in my bio 👈 or Google 'vegan yaki udon lazy cat kitchen' 😸#whatsfordinner #easyvegan #veganfood #veganfoodporn #meatfree #meatlessmonday #meatless #veganfood #veganfoodblog #easyveganrecipe #veganfoodshare #plantbasedfood #eatvegan #eatmoreplants #plantbased #veganasianfood #asianfood #noodles #yakiudon
On the blog a simple #speltflour #vegangalette wit On the blog a simple #speltflour #vegangalette with #zucchini, herbs and #dukkah 🌱 that's perfect for garden gatherings in the #spring sunshine 🌞 easy and quick to make and delicious 👌recipe link in my bio 👈 or 🏃‍♀️ to lazycatkitchen.com to grab the latest recipe!#easyrecipes #easyveganrecipes #easyvegan #veganrecipes #veganfood #springiscoming #galette #veganpicnic #zucchinirecipes #plantbased #plantbasedfood #dairyfree #weekendbaking #savoury #veganrecipes #veganfoodporn #easyveganrecipe #springfood #vegancommunity
#vegangyros with roasted #jackfruit created when I #vegangyros with roasted #jackfruit created when I lived in Greece 🇬🇷recipe link in my bio 👈 or Google 'vegan gyros lazy cat kitchen'#whatsfordinner #vegangyro #jackfruitrecipes #jackfruit #bestofvegan #plantbasedfood #plantbased #plantbasedeats #easyveganrecipe #easyveganfood #veganfood #veganfoodshare #vegangreekfood #meatless #veganaf #healthier #healthierchoices #vegancomfortfood #eatplants #plantbasedeating #veganrecipeshare #midweekmeals
Signing off with a delightfully creamy and super e Signing off with a delightfully creamy and super easy to make - a few vegan staples is all you need - #veganlemoncheesecake 😋 I'm not even in the lemon 🍋 camp myself and I love it! #glutenfree version included. Enjoy and #happyeaster 🐣recipe in my bio 👈 or 🏃‍♀️ to lazycatkitchen.com and grab the latest post!#vegantreats #vegandessert #vegandesserts #bakedcheesecake #veganbaking #vegantreat #veganeaster #glutenfreevegan #easyveganrecipe #easyveganrecipes #veganfood #vegansweets #vegancake #plantbasedfood #plantbasedeats #veganfoodshare #veganfoodsharing #lemondessert
For the #greekfood aficionados amongst you, I have For the #greekfood aficionados amongst you, I have another #Easter worthy #greekrecipe for you. Yes, that's right, it's #veganspanakopita - world famous spinach pie made #vegan, with two different filling options. It can be made gluten-free too if you use GF phyllo, which I've seen around.recipe link in my bio 👈 or Google 'vegan spanakopita lazy cat kitchen'#eastermeal #easterfood #greekvegan #veganfoodlovers #veganfoodshare #plantbasedeats #plantbased #plantbasedeating #dairyfree #whatveganseat #vegancommunity #veganpie #vegangree #comfortfood #veganaf #vegetarianrecipes #veganrecipes
How about a Greek inspired #eastermeal? On the blo How about a Greek inspired #eastermeal? On the blog, totally irresistible #veganpastitsio aka #greeklasagna inspired by the countless ones I ate when living in #greece 🇬🇷 (before going vegan)! Not difficult to make and guaranteed to please both #vegan + non-vegan guests alike! Kaliorexi! 🤗😘recipe link in my bio or 🏃‍♀️ to lazycatkitchen.com to grab the latest post!#pastitsio #vegangreekfood #vegangreece #meatless #plantbased #whatveganseat #whatfatveganseat #veganeaster #eatrealfood #eatplants #vegancomfortfood #veganfoodshare #vegancommunity #plantbasedfood #plantbasedeating #plantbasedeats #vegetarianrecipes #veganaf #healthier #healthierchoices
I'm shooting an exciting new recipe for you today I'm shooting an exciting new recipe for you today (cannot wait to share!) but in the meantime, how about a thick slice of this #healthier #vegancarrotcake with some extra frosting 🤤? It's deliciously moist, fragrant with spices and topped with silky #cashewfrosting. Gimme!! 😮 (#oilfree and #refinedsugarfree)recipe link in my bio 👈 or Google 'healthy carrot cake lazy cat kitchen' 🥕#refinedsugarfreetreats #veganeaster #veganbaking #vegandesserts #vegandessert #healthierchoices #healthydessert #veganfoodblogger #veganfood #veganfoodshare #whatveganseat #Easter #egglesscake #vegantreats #plantbased #dairyfree #easyveganrecipe #vegansweets
Load More… Follow on Instagram
Lazy Cat Kitchen is a participant in the Amazon Services LLC Associates Program, an affiliate advertising program designed to provide a means for sites to earn advertising fees by advertising and linking to Amazon.com, Amazon.co.uk, Amazon.ca.

Follow Us On Pinterest

Copyright © 2021 · Privacy Policy · Theme by Lazy Cat Themes · Logo by Sarah from The Small Object