Vegan mushroom and cabbage pierogi
Vegan mushroom and cabbage pierogi

Happy weekend, guys! After a lot of procrastination we are finally embarking on the project of doing up our living room. Currently, we have no furniture or TV in there and we took the ghastly terracotta wallpaper off in a few places just to see what’s underneath, so you can just imagine how cosy it is. We watch Netflix on my computer monitor sitting on two garden deckchairs as that’s the closest we have to comfortable seating. It’s not great and we were initially hoping to have it done by now, but things don’t always go to plan…
It’s a big job as we are knocking down part of the wall between the living room and the kitchen-diner to be able to install large internal doors, which means we need to also change the orientation and positioning of two radiators as they currently sit exactly where the opening will be.
One of the first things on the to-do list is to pick the paint for the living room as, once we get the builders in to do the opening, we will need to have the paint ready for them. We went to a decorator shop this morning to have a look at the colours on offer. While I love colours, I am also chronically indecisive, so despite us buying a sample of poetically sounding midnight teal, I am already toing and froing on it. Duncan, who is really good at making decisions, is not impressed. I’m worried that we are going too dark as our living room isn’t massive.
On the one hand, I feel that a dark colour will make it cosy and will really accentuate the nice Victorian cornice that we are lucky to have in our living room and I like the stark contrast between dark walls and white ceiling, but on the other I have never had the guts to paint any room that dark and I worry that it may make the room feel oppressively small. Argh…I know, I frustrate myself on a daily basis. It may take me a while to choose, but I will get there – my plan is to immerse myself in colour theory and look at many, many photos of other people’s living rooms before I decide.
Although the sun is shining temporarily here in Bristol – I am excited about the prospect of not running in rain for once – the air has a bit of a bite to it so it’s perfect comfort food weather, in my opinion. This is why I’ve decided to share a recipe for one of my favourite comfort foods – pierogi filled with mushrooms and cabbage. They are delicious and not difficult to make at all, although a little time consuming, of course. In contrast to some Chinese dumplings, which pierogi and all other European filled dumplings can be traced back to by the way, the pleating isn’t very intricate at all, so if you have some little helpers keen to get involved, you can safely rope them in. Making filled dumplings is a fun thing to do when you have someone to help and chat to. Enjoy!!

- 500 g / 4 cups all purpose flour
- 2 level tsp sea salt
- 30 ml / 2 tbsp olive oil
- approx. 270 ml / 1 cup + 2 tbsp hot water
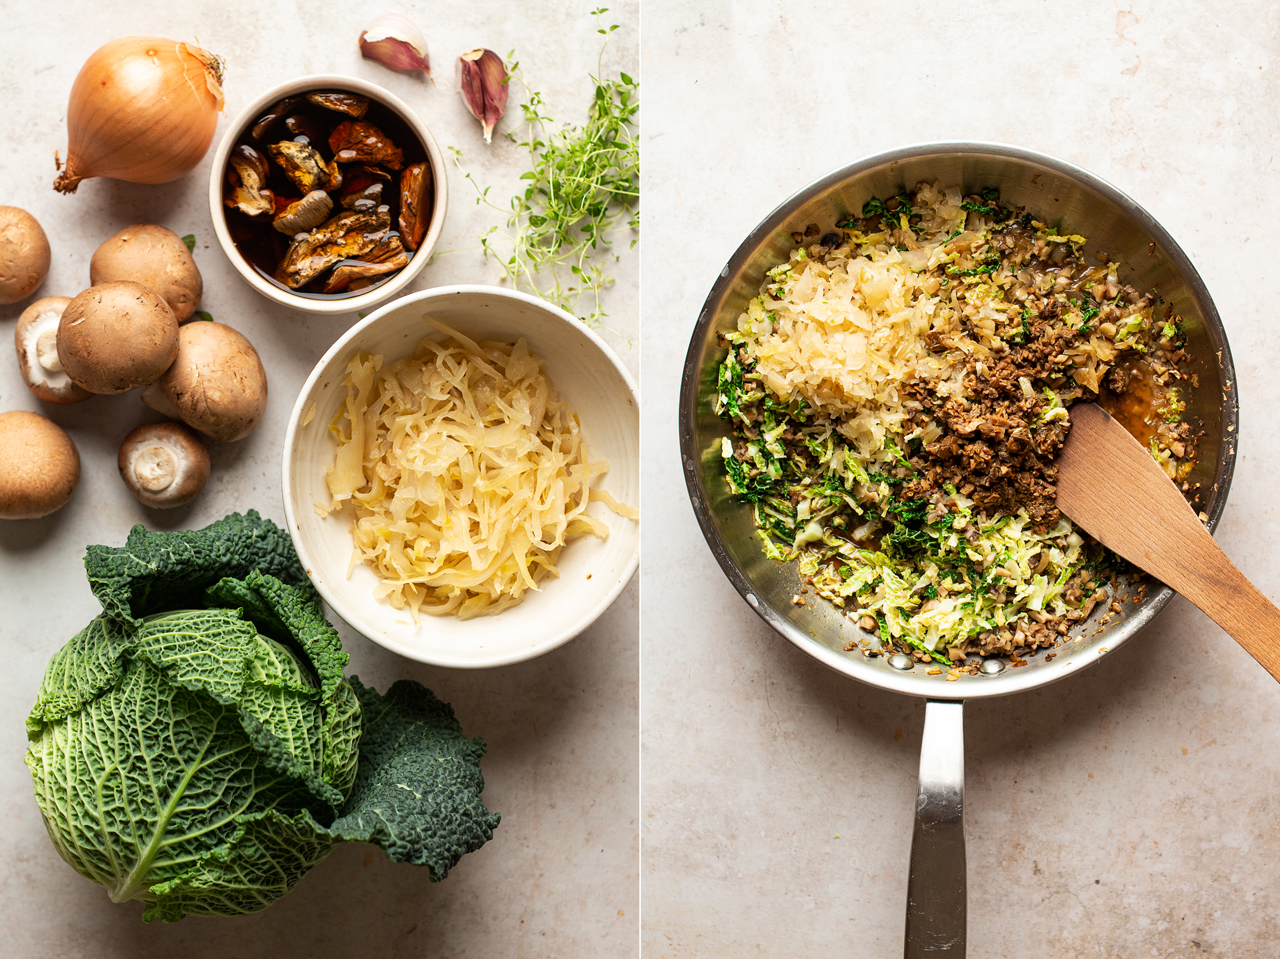
FILLING AND FRIED ONIONS
- 45 ml / 3 tbsp olive oil, divided
- 2 medium onions, diced finely
- 2 large garlic cloves, diced finely
- 250 g / 9 oz fresh mushrooms (I used chestnut / cremini), diced very finely
- 150 g / 5.3 oz white or savoy cabbage, chopped very finely
- 150 g / 5.3 oz sauerkraut, chopped very finely
- 20 g / 0.7 oz dry porcini, washed and soaked in boiling water*
- ½ tsp salt, adjust to taste
- ½ tsp dry thyme (not traditional, but I like to add)
- ½ tsp sweet smoked paprika (not traditional, but I like to add)
- black pepper, to taste
WALNUT CRUMB (optional)
- ½ cup walnuts
- 3 tbsp nutritional yeast
- 4 rosemary sprigs, leaves chopped very finely
- salt
- In a mixing bowl, combine flour and salt. Add olive oil. Mix well and add about 240 ml / 1 cup of hot water. Once combined roughly with a wooden spoon, start bringing the dough together with your hands. If after a little bit of kneading the dough isn’t holding together (initially it’s supposed to be a bit dry to the touch but hold together), it may need a bit more hot water. It is very important to add the water in very small amounts as too much water will negatively affect the dough. Knead it for about 5-10 minutes with your hands (after kneading, the dough should become very smooth and elastic, but not sticky) and then set aside for 30 minutes under a damp kitchen towel so that the dough doesn’t dry up.
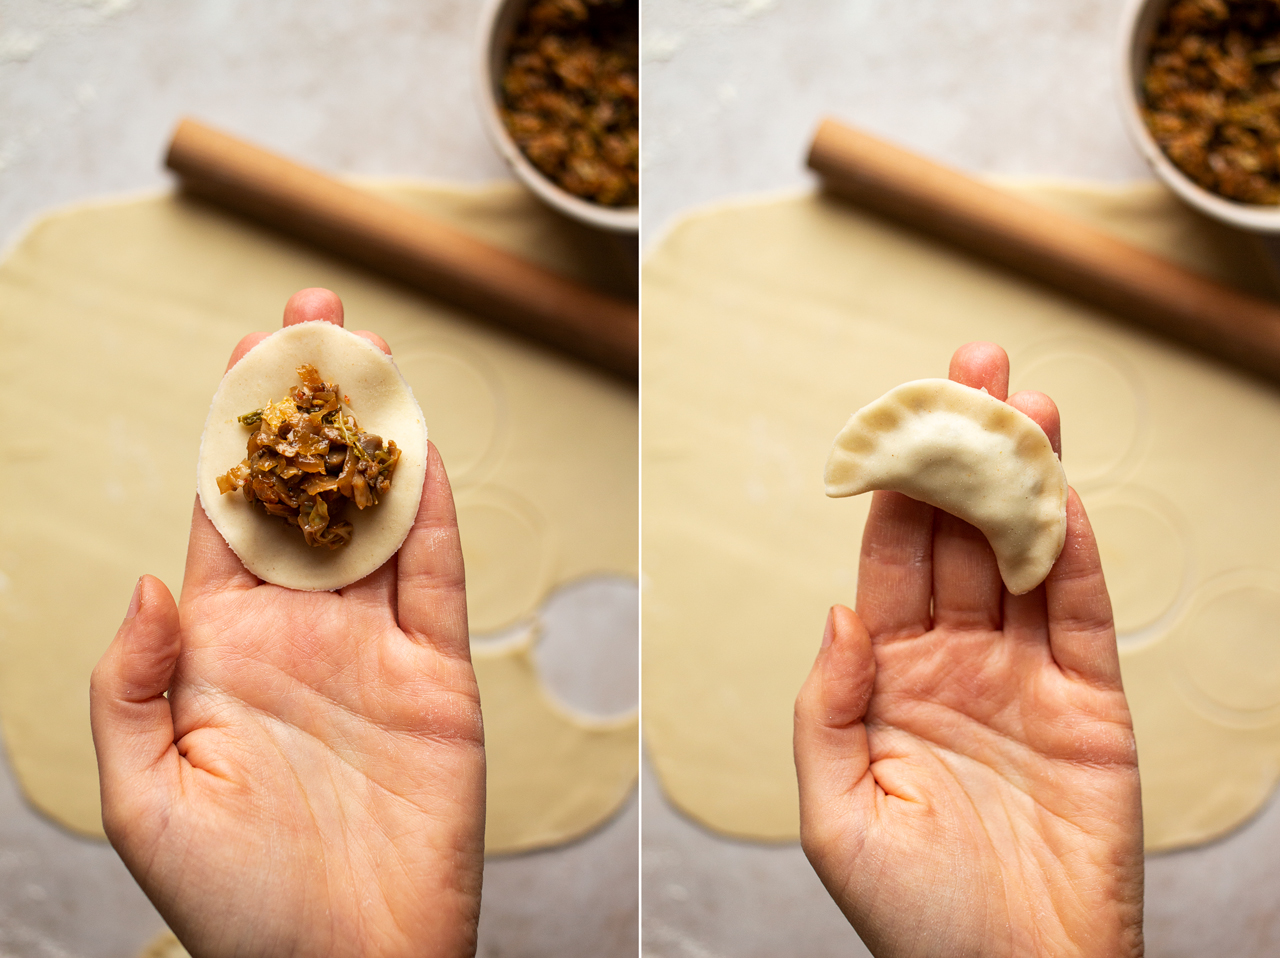
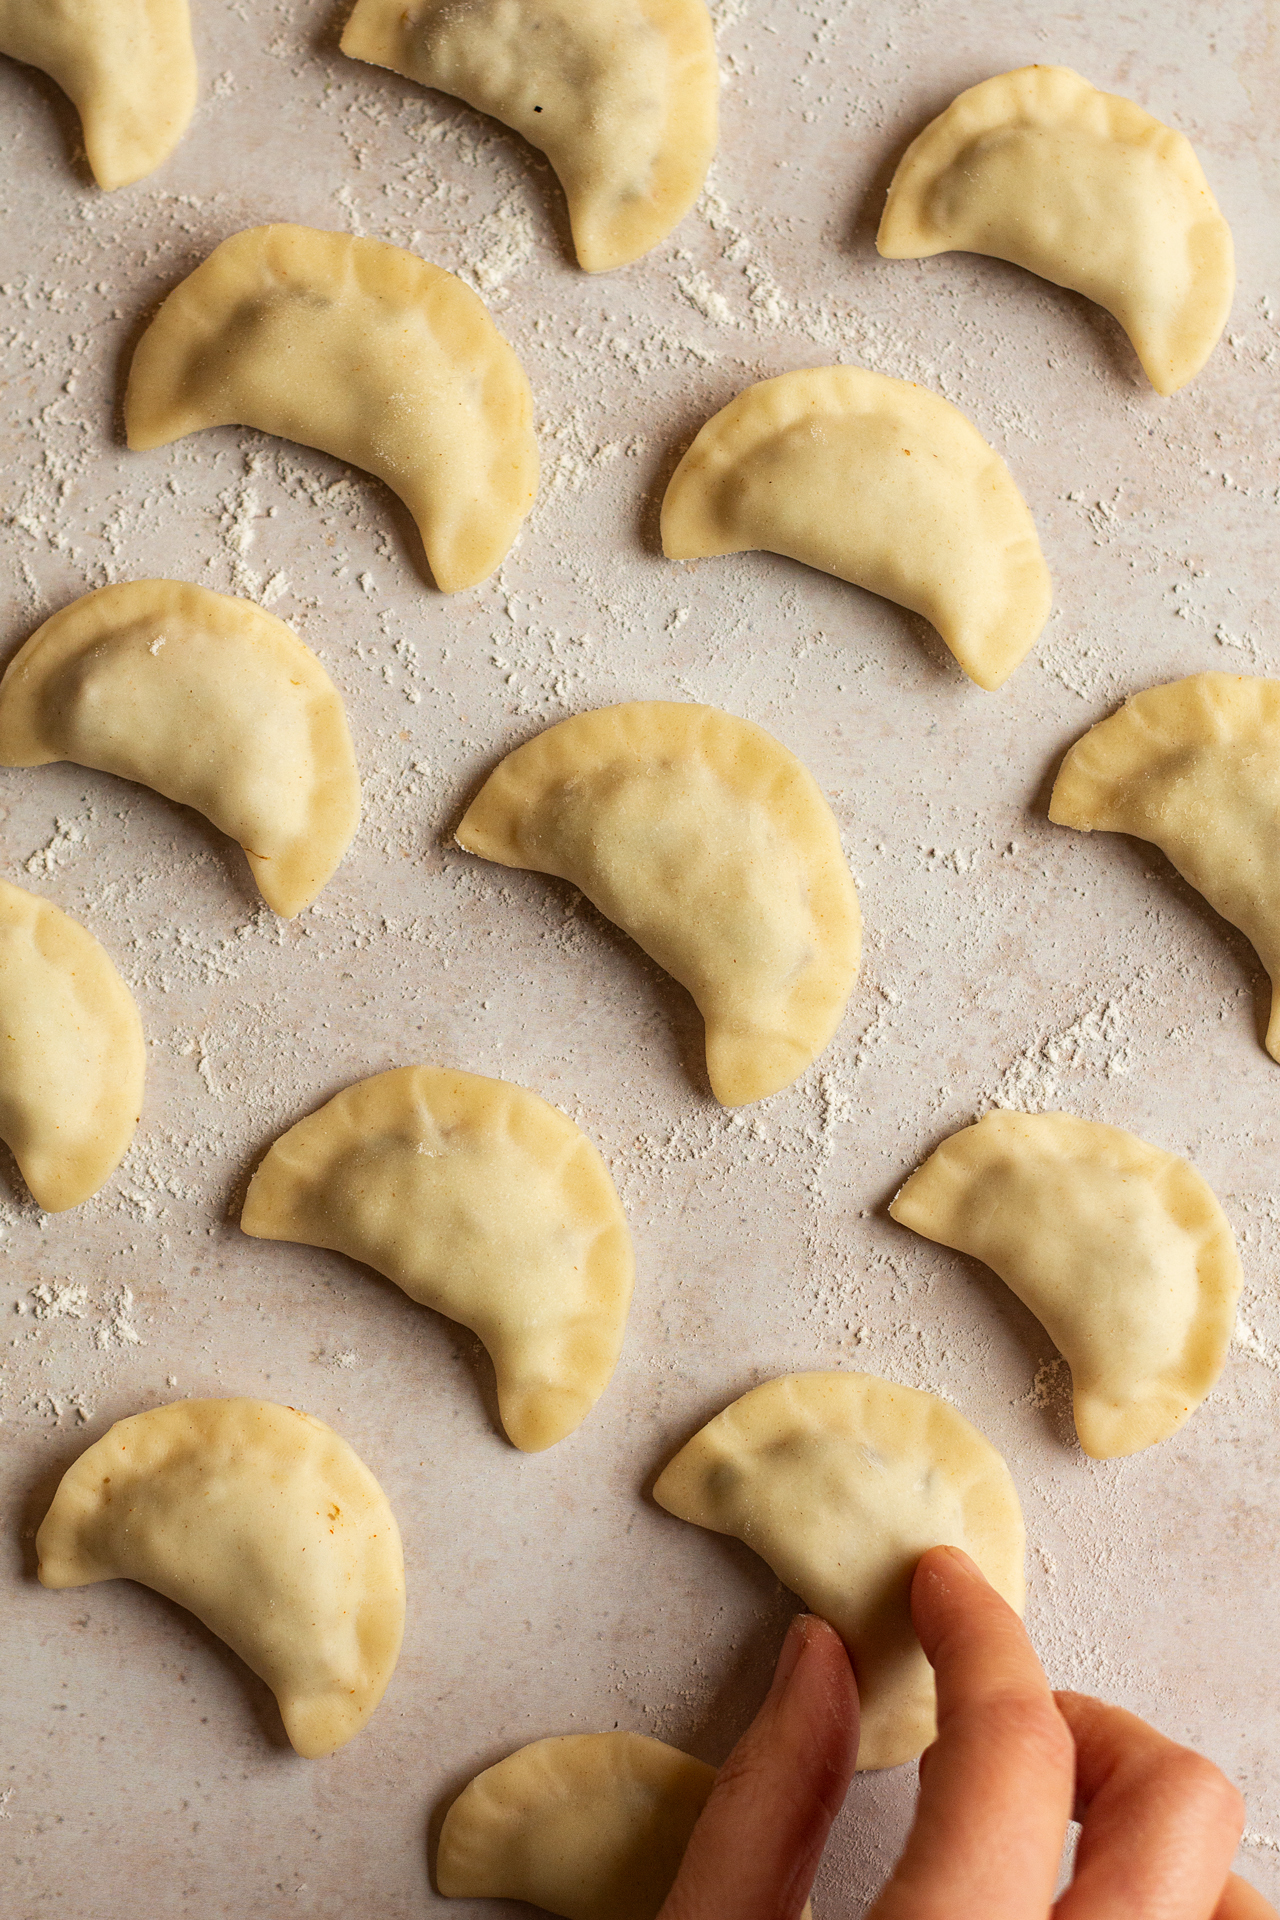
- Once the dough has had a chance to rest, grab a portion of the dough and roll it out with a rolling pin on a lightly floured surface. You want it to be about 1-2 mm thin; the thinner the dough, the tastier the dumplings. With a cookie cutter or an upside down glass, cut out circles in the dough. Place a small amount of filling in the centre of each circle, fold the circle in half and press the edges of the semi-circle together with your fingers. Go over each dumpling twice to make sure everything is sealed completely. Put the finished dumplings on a lightly floured surface and cover them with a damp kitchen towel while making the rest so that they don’t dry out. Continue in the same way until you’ve used up all of the dough or the filling.
- Bring a medium pot of water to boil. Once the water is boiling, throw in 10 dumplings at a time and from the moment the water comes to the boil again cook for 5 minutes (depending on how thick your dough is). Once the time is up, fish them out with a slotted spoon and place on a clean plate. Put a new batch in until you have cooked them all.
- OPTIONAL STEP: Heat up a little olive oil in a pan and place the cooled-down (they should be cold!) dumplings in the pan. Turn them after they’ve browned on one side. Make sure you don’t overcrowd the pan and do not turn the dumplings too early as they may start falling apart.
- Whilst you are frying your dumplings, warm up the rest of your sautéed onions, season them with salt and pepper and serve with your dumplings.
FILLING
- Heat up the olive oil in a large pan. Gently fry diced onions until translucent and lightly caramelised. Some of them will go into the filling and the rest will be used as topping. Remove half of the fried onions and oil and set aside for the topping.
- Next add in garlic cloves and fry on a gentle heat for a few minutes, stirring the whole time.
- Add chopped mushrooms into the pan, allow them to fry off for 5-10 minutes, stirring from time to time.
- Add chopped cabbage, sauerkraut, porcini stock, finely chopped porcini mushrooms, salt, thyme, smoked paprika and a good grind of black pepper.
- Sauté until the cabbage has been cooked and all the moisture has cooked out of the filling. Taste and adjust the seasoning. Allow the mixture to cool completely before filling the pierogi.
WALNUT CRUMB
- Dry roast walnuts on a hot pan. Agitate them often as they burn easily. Allow them to cool down completely.
- Pound toasted and cooled walnuts into a crumb in a pestle and mortar.
- Add nutritional yeast, chopped rosemary and a good pinch of salt. Mix together well. Store in an airtight jar. Sprinkle over pierogi, pasta, risotto, salads.
I'm delighted to hear that you enjoyed them and yes, I totally hear you - making pierogi (or any filled dumplings) by hand is a big undertaking and takes a lot of effort. It's good that you feel that it was worth it though - isn't it the worst when you spend a lot of time making something and you don't even enjoy it? Thank you for taking the time to review, I really appreciate it. x Ania
Great to hear that we have similar tastes in food! Fried onion is the traditional way of serving them, walnut crumb is my personal addition and eccentricity - I am pretty sure most of my compatriots will be appalled at how nontraditional that is, but hey - live a little ;) x Ania
I was wondering if you have any experience in using buckwheat flour to replace all purpose flour in a recipe such as this? My husband can't have gluten and I have never tried making dough for these types of recipes with buckwheat and so I wonder if I would have to substitute or add anything?
Any ideas would help tremendously as we looooove pierogi!!!!
All my best wishes from Madrid,
Lua.
Thank you, I am so glad to hear that my blog is bringing you a little bit of joy in this difficult time. I have made ravioli with buckwheat flour before (see the recipe), but I did use other tapioca and xantham gum for elasticity and I am unsure whether the dough will work without them. Hope that helps! Ania
What I mean by porcini stock is the water dry porcini are soaked in (please see 7th ingredient) - it's full of flavour. Hope that clarifies! Ania