Vegan peanut butter truffles
Vegan peanut butter truffles
It’s only just Wednesday and what a week it has been, lots going on. The most exciting thing happening this week is that finally, after almost a year since we moved in here, we are having the floor of the entire downstairs done. When we moved in, we were secretly hoping that there was an original pine wood flooring hidden beneath the dated blue carpet in the living room and we were right.
The living room felt cold due to a North-East exposition and the entrance to it was a little awkward so we decided to open it up onto the adjacent kitchen diner. As the kitchen diner had a pine floor already, we had the living room floor restored and joined with the kitchen diner in one seamless flow, using a few extra reclaimed pine floorboards. This was all done before Xmas and this week the team came back to finish the job.
After they finished sanding last night, they put several paint samples down and I was faced with one of my biggest nightmares – having to decide on a colour / finish in the space of a few hours. Naturally, I had to wait until the following morning so that I could see what the colours would look like in the daylight.
Before we saw the samples, both me and Duncan had our heart set on a light or medium oak colour, but it turned out that these colours tend to look very yellow and orangey when applied to pine wood, which we both wanted to avoid. The only two options we liked were walnut and the natural pine one, which in reality was a single coat of varnish with a bit of white pigment that minimises the yellow tones in pine and brings out its natural, cool, sand-like tone. They were at completely opposite sides of the spectrum.
While walnut looks really nice and contrasts with the walls nicely, it is also more imposing and tends to make spaces cosier, yet smaller. The natural pine floor bounces natural light around the rooms, making the space look fresh, airy and bright. It is more neutral and therefore easier to match furniture to but is also conducive to a more Scandi-inspired aesthetic, while walnut is certainly more traditional.
For a person who is chronically indecisive, this was a nightmare scenario – having to decide on an irreversible (okay, reversible but very expensive to correct) thing in a few hours with floor guys breathing down your neck. To be fair to them, they were really helpful and understanding about it despite my to-ing and fro-ing. They understood that it’s a big decision as it will dictate the aesthetic for the place and because it carries such a significant cost. In the end, we decided to go with natural pine and I promised I will not look at Pinterest photos anymore.
The varnishing process is in progress now, it won’t be finished and dry until tomorrow and so far I feel good about our choice. Our rationale is that while it will make the space brighter and therefore nice to be in during the day, it will also be more compatible with the little pops of colour that we wanted to incorporate throughout both rooms to tie them together visually. It will allow us to go for fairly modern, sleek cabinets, which is what we have in mind for the kitchen. Time will tell if we do a good enough job but there is no turning back (note to self!!) now.
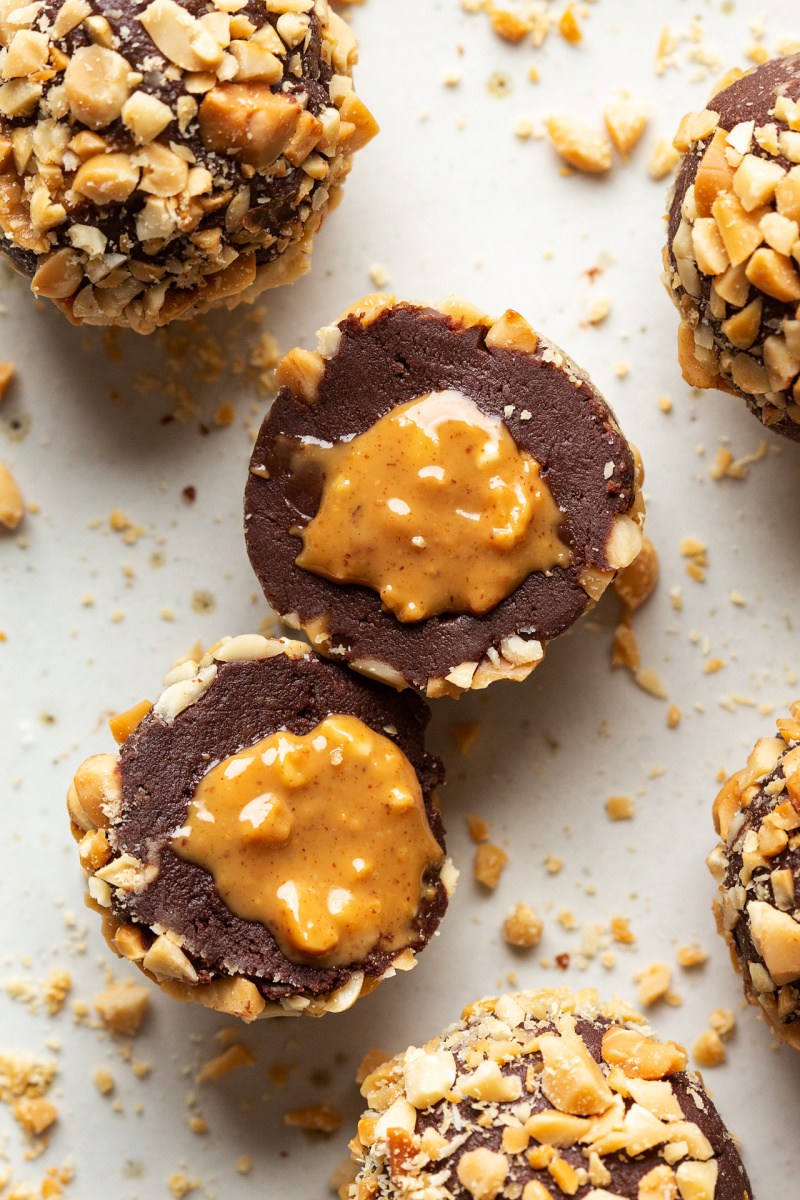
Recipewise, as it is Valentines day on Friday, I figured that a simple-to-make, yet beautiful to receive sweet recipe could be a good move. These 6 ingredients peanut butter truffles will definitely please a PB and chocolate lover in your life and they are easy to make so there is no excuse for turning up empty-handed on your loved one’s doorstep. I hope you’ll enjoy gifting them and that your partner will appreciate both the taste and the thought that went into making them. Good luck!
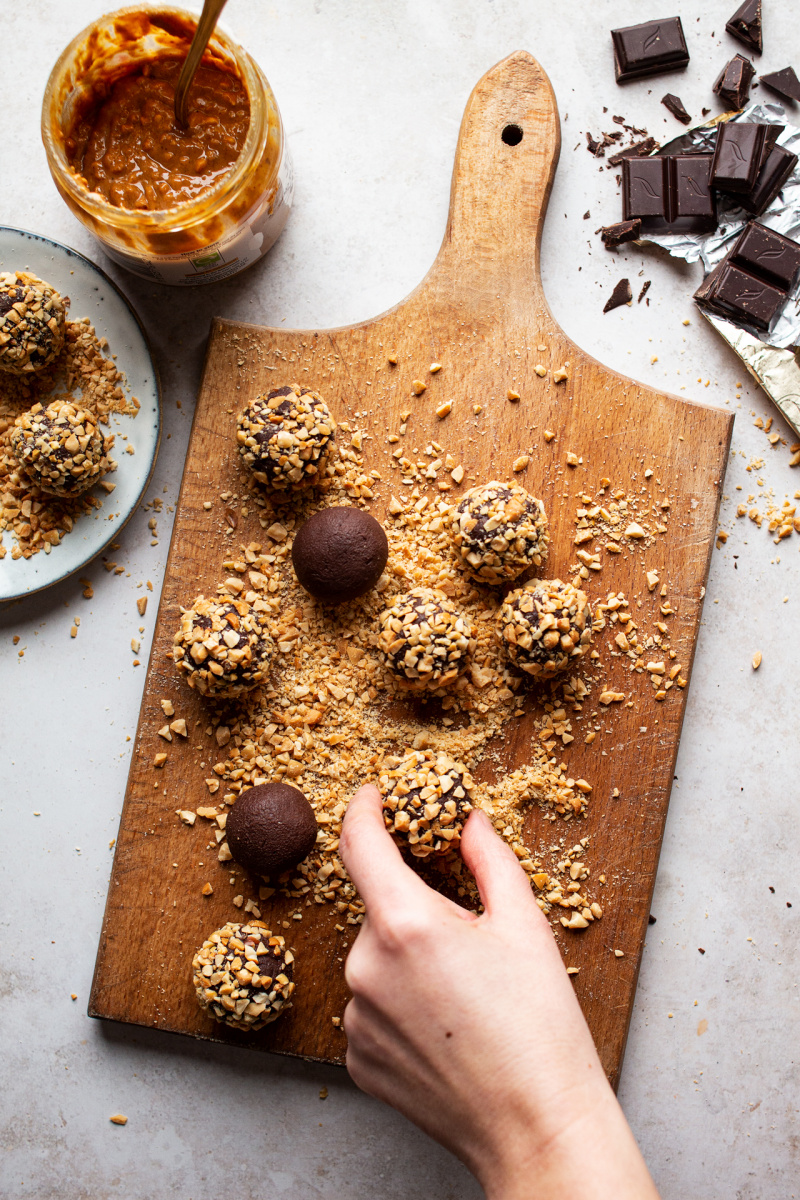
- 250 g / 8.5 oz vegan dark chocolate (70% cacao solids)
- 150 ml / ½ cup + 2 tbsp full fat coconut milk (sold in cans)*
- 30 ml / 2 tbsp maple syrup
- 4 tbsp / ¼ cup crunchy peanut butter (or almond if allergic), I used all natural peanut butter
- sea salt flakes
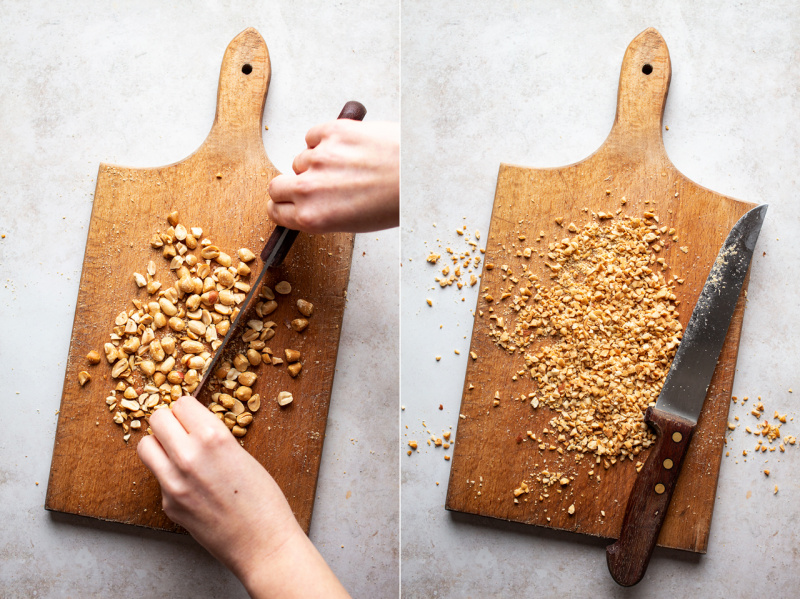
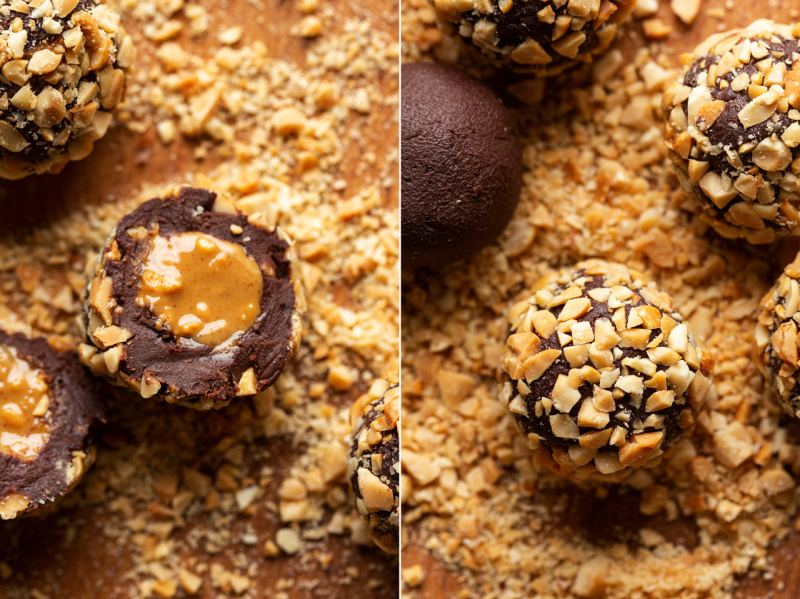
- 150 g / 1 cup roasted peanuts, finely chopped
- Whack an unopened packet of chocolate against the workbench to break it up. Place it, together with coconut milk, in a glass or metal bowl over a water bath (make sure that the water does not touch the bottom of the bowl!) and melt on the lowest setting – chocolate does not tolerate overheating very well.
- Once the chocolate has almost completely melted, remove the bowl from the heat and let the remaining chocolate melt fully in the residual heat. Gently whisk the mixture with a wire whisk.
- Add maple syrup to taste (depends how sweet your chocolate is).
- Let the chocolate mixture come to room temperature and place in the freezer for about an hour, until solid. You can also place it in the fridge, but it will take much longer to set (overnight is ideal).
- Make 25 small (½ tsp) blobs of peanut butter on a tray or plate that will fit in your freezer compartment. Sprinkle the peanut blobs with sea salt and keep them in the freezer until firm but still a bit malleable – about 30-60 minutes.
- Chop peeled and roasted peanuts finely and place on a large plate or tray. If you have raw peanuts, roast them at 180° C / 355° F for about 10-12 minutes – until golden. Then loosen the skins by placing them in the middle of a kitchen towel and rubbing with both hands.
- Once the ganache is ready, divide it into equal portions first so that you can make your truffles a lot quicker. I used kitchen scales for this, each of my ganache portions weighed about 16 g / 0.55 oz, but you can eyeball this too if you don’t mind the truffles looking a little rustic.
- Keep 5 portions of ganache out and return the rest to the fridge and take 5 blobs of peanut butter out of the freezer.
- Flatten a piece of ganache in your hands and then quickly roll a blob of peanut butter (it should be firm but still malleable when ready). Place the peanut butter ball in the middle of the ganache and close the ganache around it. Roll quickly in your hands to form a compact ball and then in the chopped peanuts to coat. Continue in the same manner until you finish the batch, then place the truffles in the fridge while you make another 5 truffles. Working in small batches is a good idea as the mixture will get messier to work with the longer it sits around.
- Store in an airtight container, in the fridge. These truffles should keep for 3-4 days.