Sourdough rye bread (beginner friendly)
Sourdough rye bread (beginner friendly)
So it’s happened, after some resistance I finally fell into the sourdough hole and I could not be more obesessed. I guess it’s no surprise. I loved chemistry as a kid until an awful teacher took over. She would say rubbish like: when it comes to grades, God can get an A, I can get a B and you lot (meaning us, kids) can at most get a C. What a role model! I mean, seriously? She should have not come anywhere near teaching.
Anyway, I digress. So what got me hooked on sourdough was a bit of homesickness and the realisation how much I miss rye bread I grew up on. Rye breads – there are literally hundreds of traditional recipes – are a true staple of Northern, Central and Eastern European diets, but not very popular here in the UK so I knew that if I wanted a taste of home I had to make my sourdough rye bread myself.
Like all good sourdough breads, rye sourdough starts with a bubbly starter. Sourdough starter is essentially a culture of wild yeast and gut-friendly bacteria that is a result of fermentation process. All you need to make a starter is quality flour (wholemeal flour – rye or wheat – which has a much higher mineral content, is most reliable), non-chlorinated water, time and a bit of care. That Guinness advert from over a decade ago – good things come to those who wait – hit the nail on the head. A starter takes approximately 7 days of waiting and daily feeding before you are able to harness its bubbly goodness in making your first sourdough.
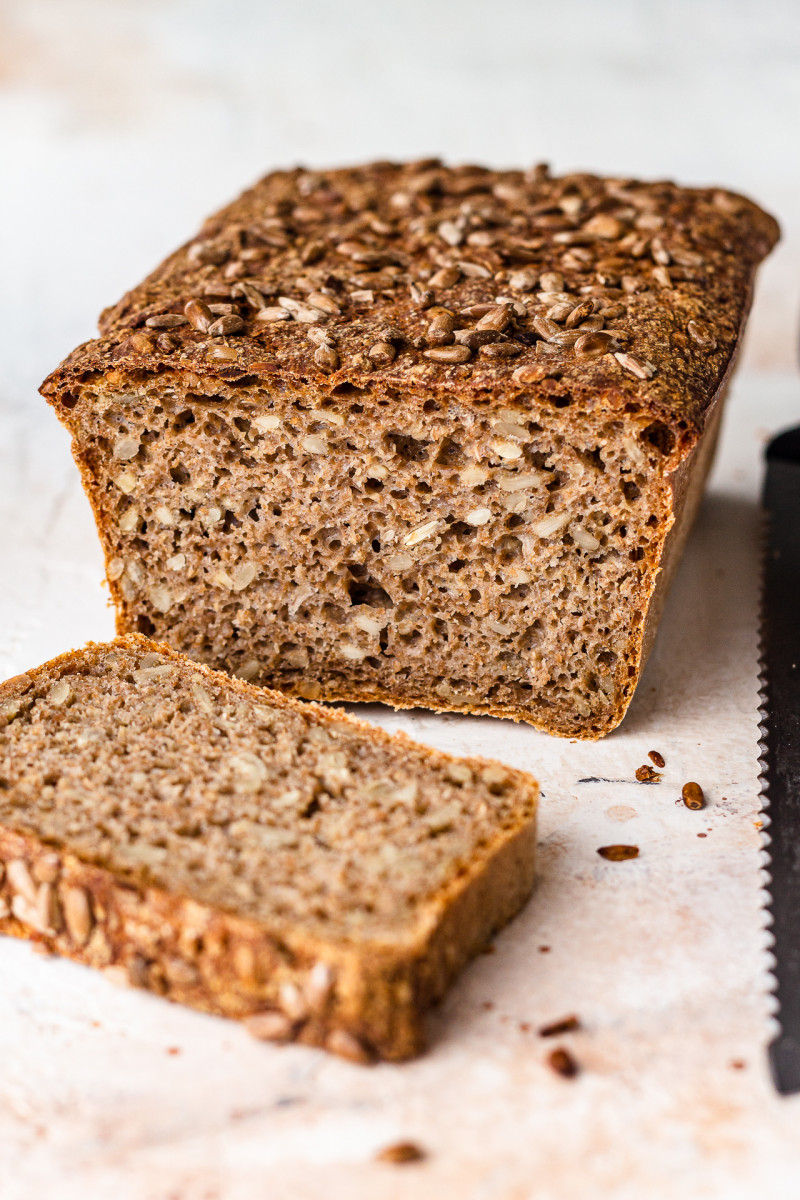
After your starter is ready, all you need to do is mix some of it up with flour, water and eventually salt and wait a bit to allow wild yeast to aerate the dough, bake the bread and wait some more for it to settle. If it sounds like there is a lot of waiting and twiddling your thumbs, it’s because there is! But don’t worry, apart from some stirring and a bit of patience, this is a pretty hands-off way to get a beautiful sourdough rye bread on your table. Your patience will be rewarded with a delicious, complex flavour loaf. It will be crispy on the outside and moist and soft on the inside, with a great crunch of some added seeds. It offers a great nutritional alternative to white bread too. I love this bread, especially lighly toasted and topped with a range of sweet and savoury toppings and I hope you will too.
If you are a beginner, don’t worry. This is a perfect sourdough to get started on. It is ridiculosly simple to make as there is no kneading or shaping required. The process is more akin to making a cake albeit with very minimal ingredients. Yet, as opposed to a cake, it is not that easy to mess this bread up. You don’t need to be careful with folding flour into the wet ingredients or vigilant when it comes to taking the loaf out of the oven the minute it’s ready, this dough is very forgiving and 5-10 minutes longer in the oven won’t ruin it.
MORE ABOUT THE INGREDIENTS
Below are all of the key ingredients that go into this simple sourdough rye bread, with the exception of sunflower seeds. Sunflower seeds can be omitted or replaced with a different seed: pumpkin, sesame, flaxseed or even chopped nuts.
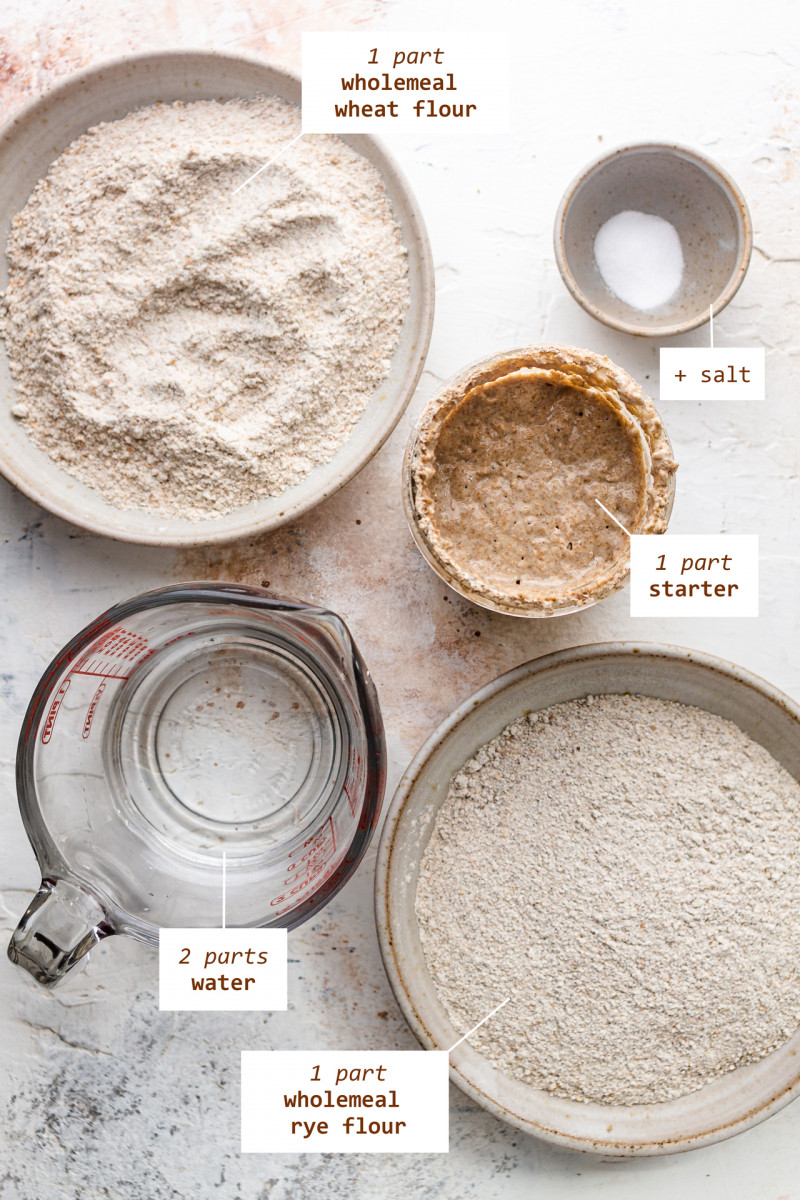
What is helpful to remember is that the ratios of the main ingredients in this recipe are: 1 : 1 : 1 : 2, meaning 1 part sourdough starter, 1 part rye flour, 1 part wheat flour and 2 parts water. Remembering this formula will enable you to easily increase the volume of your bread to match the size of the bread tin you own.
SOURDOUGH STARTER: I made a starter with wholemeal rye flour and it took 7 days of feeding before I was able to bake my first loaf. I followed this regimen and it worked a treat. I was able to bake my first sourdough bread on day 8 of my starter.
DAY 1: I mixed 70 g (2.5 oz) of wholemeal rye flour and 70 g (2.5 oz) of lukewarm water in a clean jar. I mixed them together with a wooden spoon (metal can inhibit wild yeast apparently) and left on my counter to do their thing.
DAY 2 onwards: I discarded everything but 70 g (2.5 oz) of my starter and fed it 70 g (2.5 oz) of flour and 70 g (2.5 oz) of water.
I know that discarding your perfectly happy starter seems counterintuitive but there is a method to this madness. The amount of flour (and water) that you need to feed your starter needs to match the amount of starter that you are feeding so that correct acidity of the starter is maintained. If you were to keep all your starter you would have to feed it ever increasing quantities of flour, which is just not that cost effective. So this way you waste a little at the beginning to avoid wasting a lot throughout the process. Makes sense, doesn’t it? And anyway, you could add that ‘wasted’ starter (your discard) to many recipes such as pancakes, waffles, pizza dough, crackers. Discard acts as a leavener and adds pleasant tanginess to baked goods.
Btw, rye starter can be used to make a beautiful non-rye bread too. I made a white bread flour sourdough a couple of days ago and the result has surpassed my expection – for some reason I used to think that the flour used for the starter should match the flour used for the loaf. I was wrong. You can make an artisan white flour loaf with rye starter and vice versa.
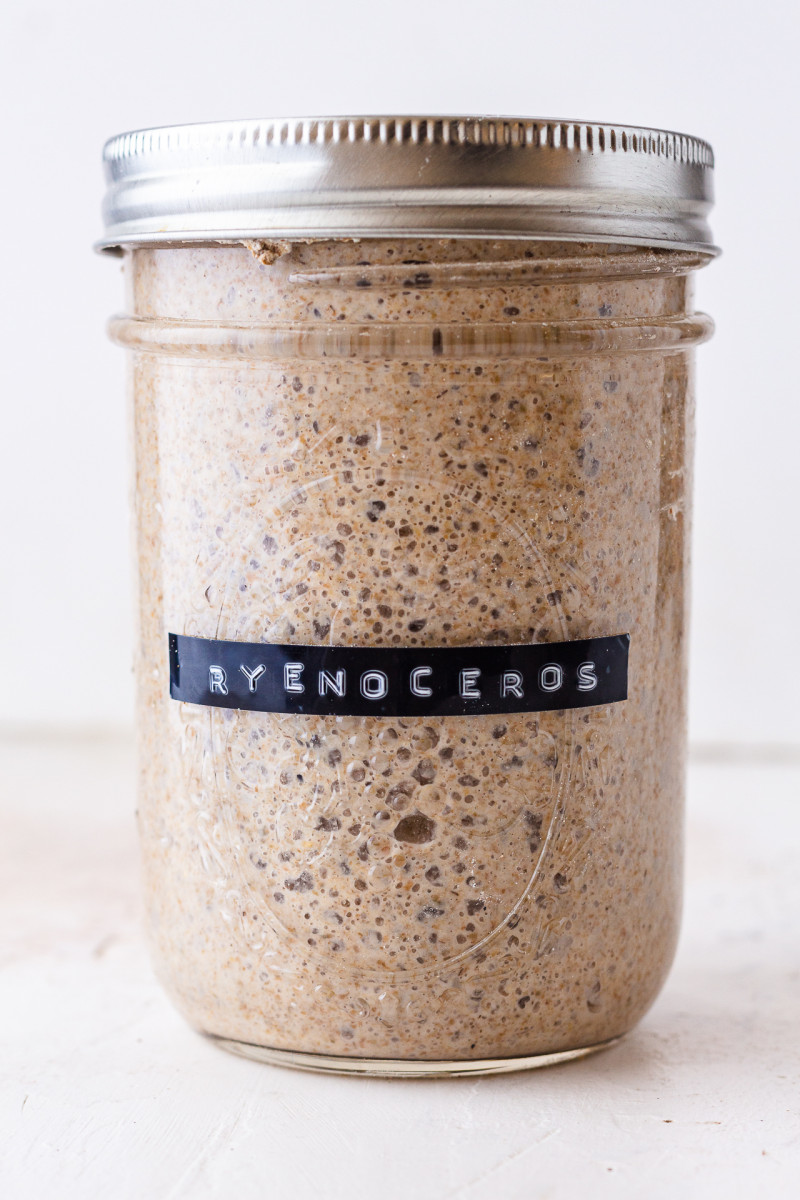
Here is what my starter looks like now. It’s happy and healthy – smells a little sour and it’s full of tiny little bubbles. I named it Ryenocerous to remind me of its humble origins (rye flour) and because it’s a voracious eater. Duncan thought it lame at first, but came round eventually. My starter is my little pet that requires a daily feed. I feed it every day as I bake every day, but if you don’t you can keep it in the fridge and decrease the frequency of feedings to once a week.
WHOLEMEAL RYE FLOUR: this would not be a rye bread without a fair amount of rye flour. I used wholemeal rye flour in this recipe and that’s what I recommend. Not only is it healthier as it’s less processed and so it retains a lot of nutritional values that are lost when using white rye flour, it is also much tastier.
WHOLEMEAL WHEAT FLOUR: even though this is a rye bread, I decided to use some wholemeal wheat flour to complement rye flour and rye-based sourdough starter. Rye flour is low in gluten so it’s quite heavy and dense, while wholemeal wheat flour is soft and springy. Marrying the two together offers a nice balance of density and lightness that’s hard to dislike. Once you become more confident with this bread, you can alter the proportions a little in favour of more rye flour or even substitute wholemeal wheat flour with white rye flour (it makes the bread denser), but this is a great starting point.
SALT: salt is simply used for flavour and so the amount of it can and should be adjusted to one’s palate. It is not added until you mix up the actual bread dough as it is believed by some to slow down yeast.
WATER: lukewarm, non chlorinated water is what is needed to bring the dough together. I would steer clear of using fresh tap water as it is likely to hinder fermentation. It is best to use boiled and cooled (you want the water to be about body temperature) or a mixture of filtered (I use carbon filters) and boiled water. The amount of water may differ if you decide to change any of the flours. I used 300 g / 10.5 oz of water in total.
SUNFLOWER SEEDS: seeds are a common staple of rye breads, they add extra crunch and nutrition. You could add any seeds or nuts you like, I went for simple and cheap sunflower seeds in this one. If you would like to get more flavour out of them, you could roast them in low oven until golden before cooling and adding to the bread dough.
MORE ABOUT THE PROCESS
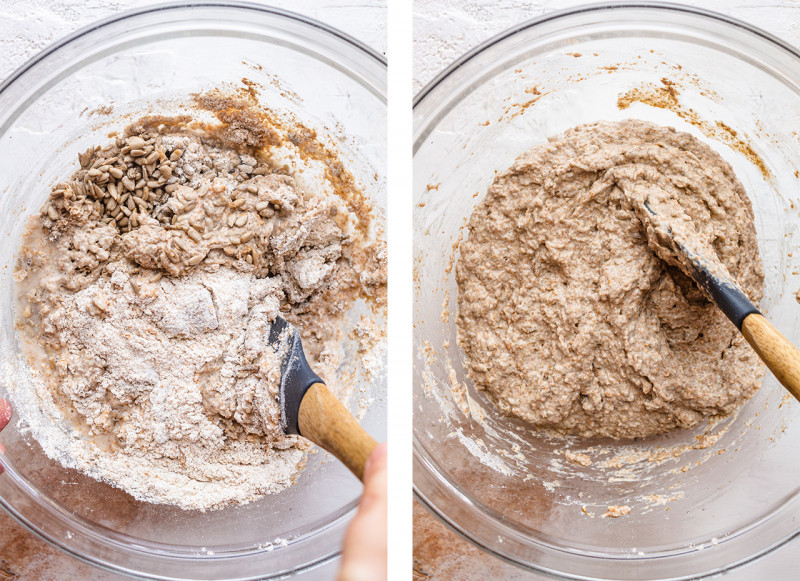
This recipe is simple and hands-off but the dough is mixed in two stages.
STAGE 1: preferment
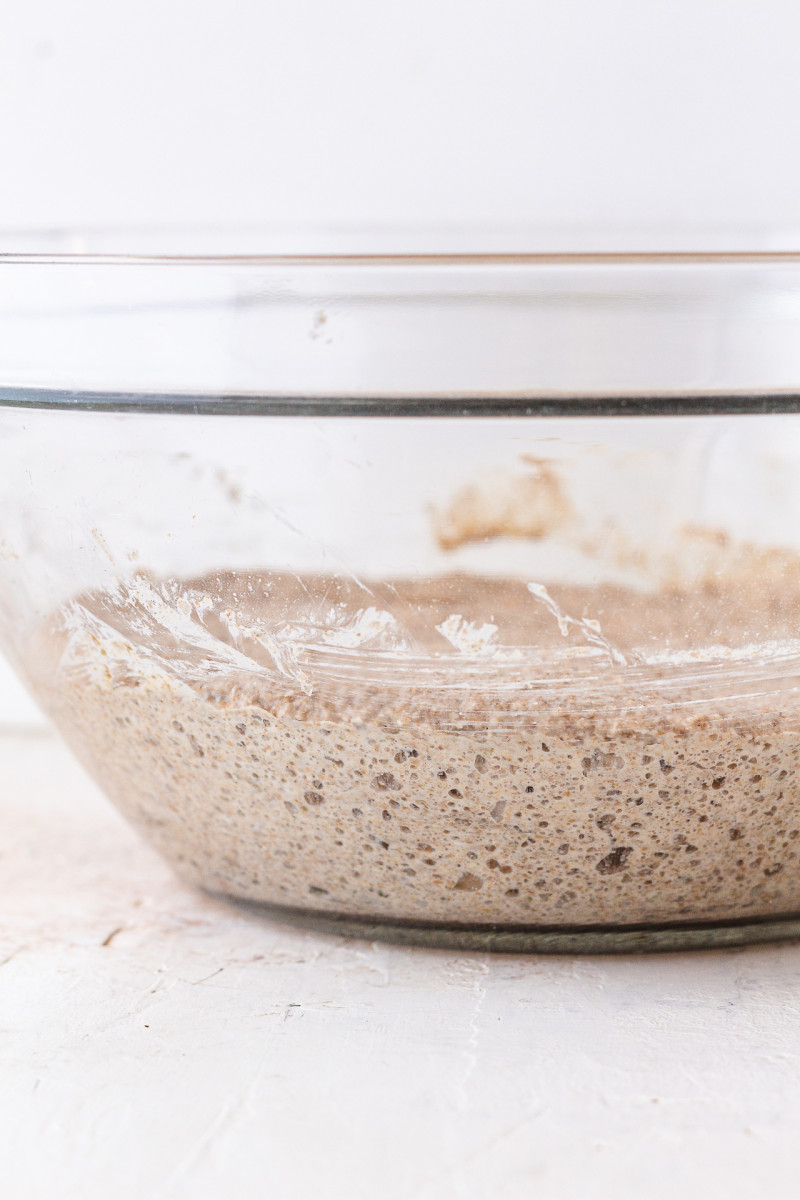
Preferment is where active sourdough starter is mixed with half of the flour and water. It is then put aside to ferment overnight (or until you see lots of little bubbles throughout – see photo). This step improves the bread’s texture and flavour and it’s so effortless that I don’t recommend you skip it.
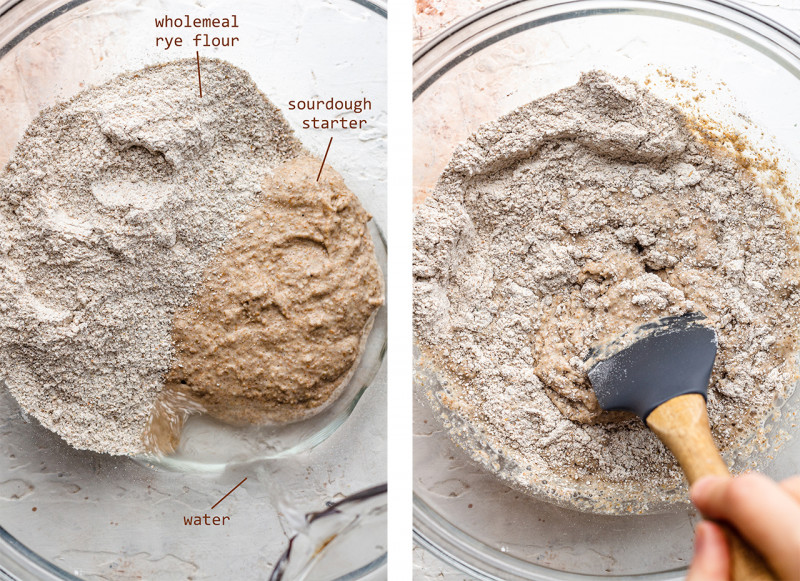
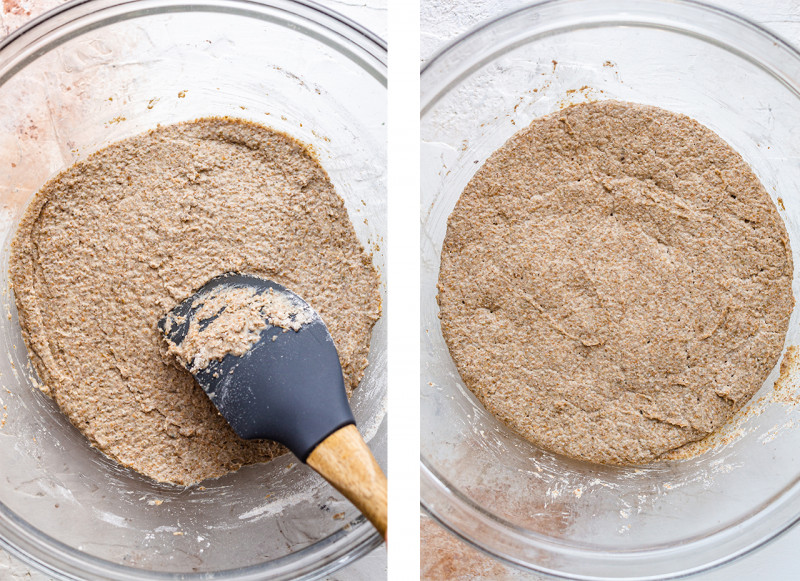
The photo on the right and below is what preferment looks like after it’s ready to incorporate into the bread dough proper.
STAGE 2: bread dough mixing
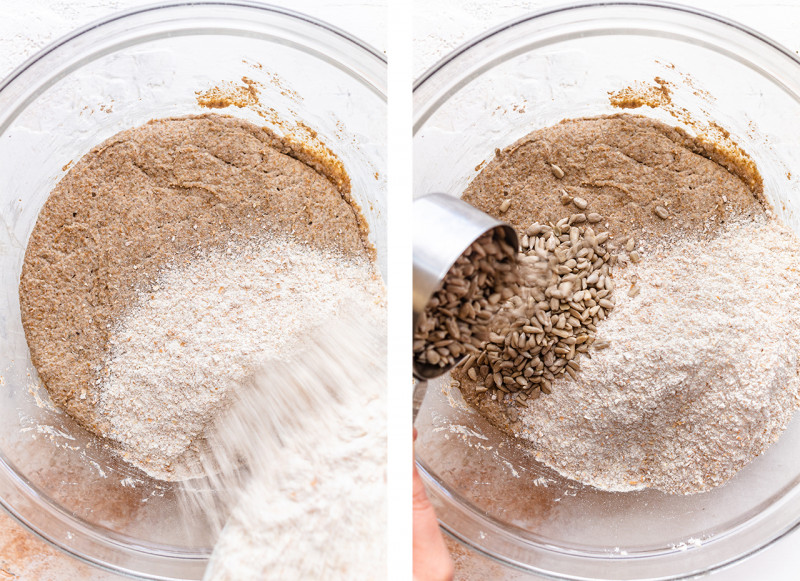
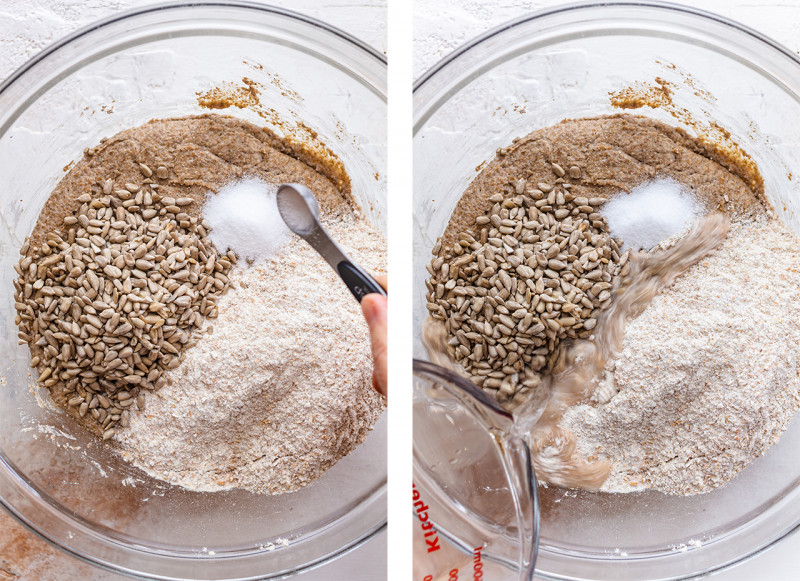
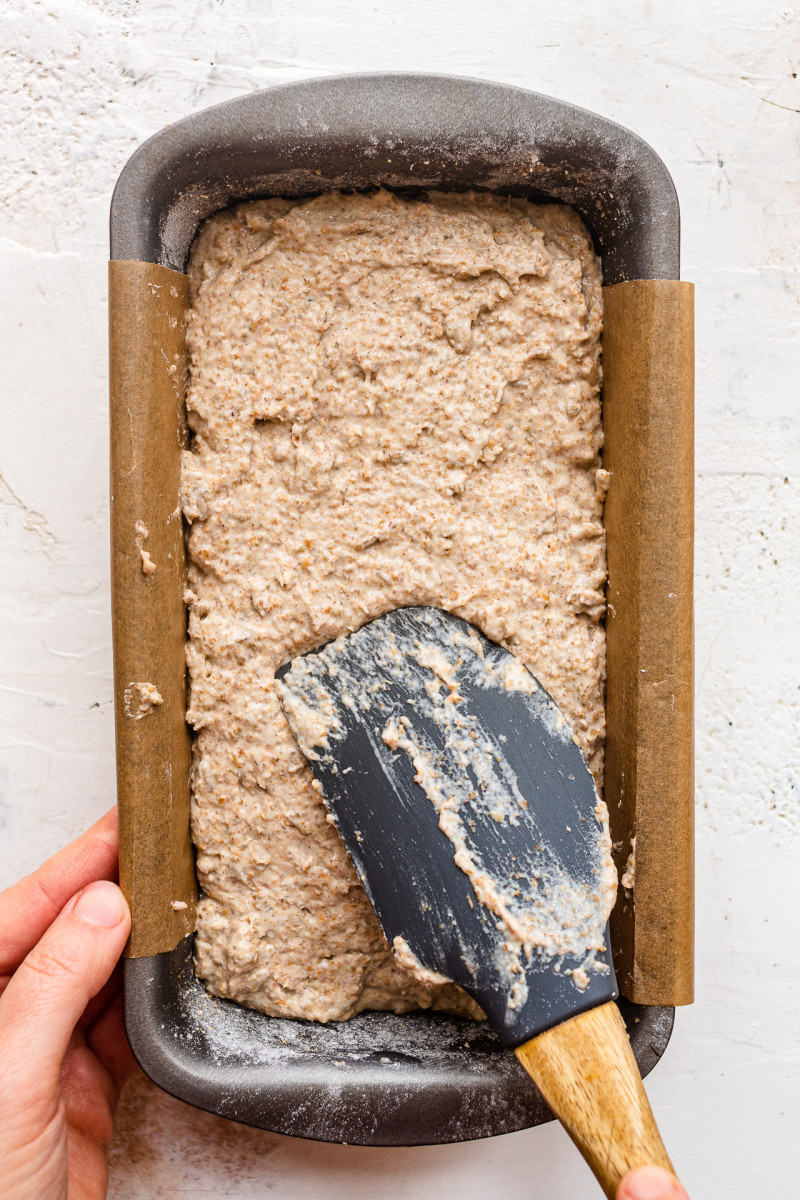
Once preferment is bubbly (see photo above) – you can do a test by dropping a small amount of it in a glass of lukewarm water and seeing if it floats to the surface. If it does, it means that your preferment is good to turn into the actual bread dough. Here is where you add the other half of the flour, water and salt to the preferment. You the transfer it into a loaf pan, ready for bulk rise.
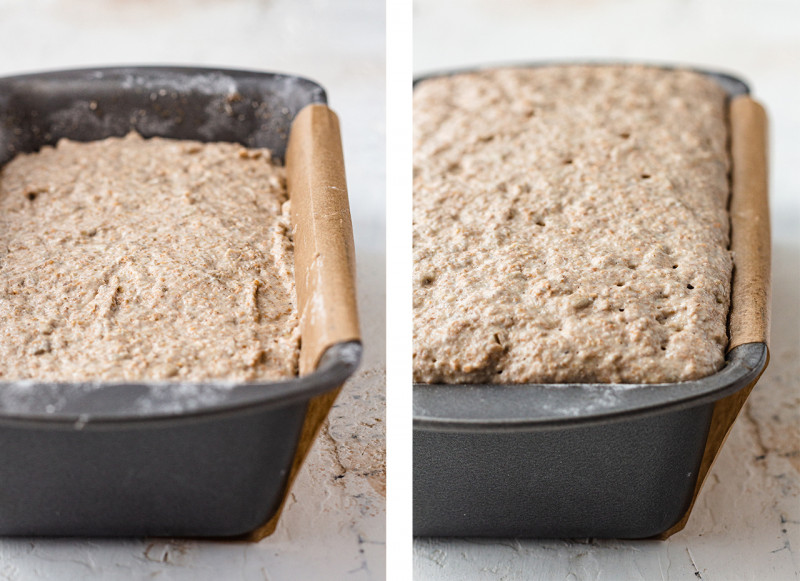
STAGE 3: bulk rise (passive step)
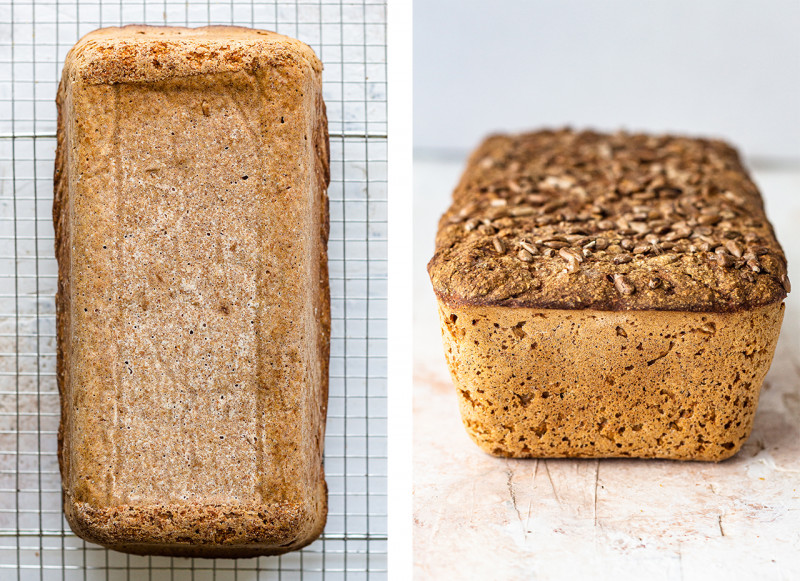
This is a passive step. Once you transferred the dough into a loaf tin, you need wait until it’s risen out of the tin and a few pin holes appear on the surface of the dough before baking.
STAGE 4: cooling (passive step)
This is also a passive step. Rye flour makes the bread moist inside, which is why you need to allow rye bread to settle once out of the oven or else it will appear underdone. It needs to be stone-cold before you cut into it. I typically allow it to cool off on a drying rack overnight.
That’s all there is to it, like I say it’s all very simple and hands-off.
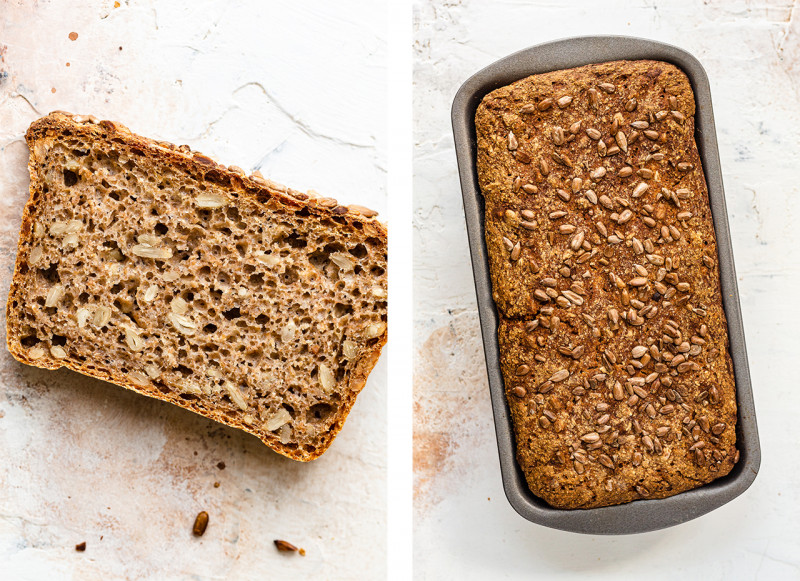
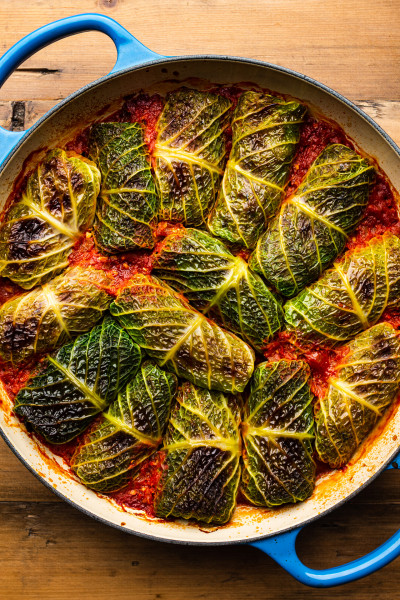
This is what my bread looked like after baking and (cross section) after it has settled overnight. It has a delicious crispy crust that keeps the bread fresh and moist, soft, sunflower-seed studded flesh with a mild tangy taste and plenty of air bubbles.
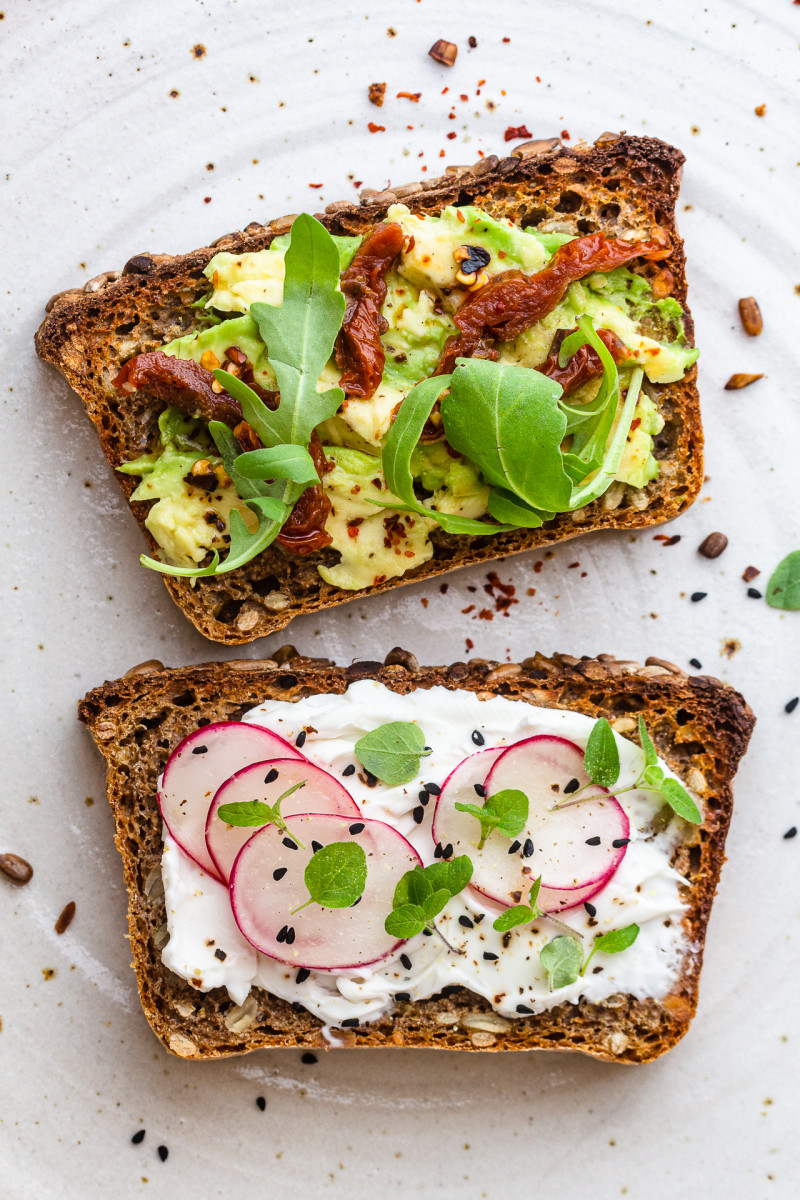
I love this bread toasted with a range of toppings. Here are some easy examples below:
– mashed avocado, sundried tomatoes, chilli oil, rocket
– vegan cream cheese, radishes, nigella seeds, micro herbs
– hummus, roasted cherry toms, chilli oil, rocket or coriander
– hummus, garlicky pan-seared mushrooms, parsely or chilli oil
– peanut butter, sliced banana, crushed peanuts
– vegan nuttella and sliced banana, crushed hazelnuts
– vegan butter and apricot jam
- 150 g / 5.3 oz active sourdough starter (see blog post)
- 150 g / 5.3 oz wholemeal rye flour
- 300 g / 10.5 oz lukewarm water*, divided
- 150 g / 5.3 oz wholemeal wheat flour or white rye flour*
- 1½ tsp fine salt
- 100 g / 3.5 oz sunflower seeds (optional)
- In a large glass bowl, combine active sourdough starter, wholemeal rye flour and half of the warm water (150 g / 5.3 oz).
- Mix into a thick paste, scarpe the sides of the bowl, smooth the top with a spatula and cover with a kitchen towel. Leave to ferment in a warm place (kitchen counter, away from draughts) overnight or until the preferment has risen and is bubbly throughout.
STAGE 2 & 3 (bread dough & bulk rise)
- Brush you baking tin with a little oil and coat it with either of the flours. If your tin isn’t non-stick, you may want to add a wide (not too wide as it will stop the bottom from crisping up) sling of baking parchment in the middle of the tin for easy removal.
- To the bowl with prefermented starter, add wholemeal wheat flour, the other half of water, salt and sunflower seeds (hold some back for the topping). Mix really well, until no flour pockets remain.
- Transfer the dough into the prepared baking tin, pressing the mixture down in the tin so that it’s evenly distributed and there are no air pockets in between spoonfuls of the dough.
- Smooth the top with a wet hand or a wet spatula. Cover with an upside down bowl and set aside for 2-4 hours in a warm place, until the bread rises and domes out of the tin and there are a few pin holes visible on the surface (see photos in the post).
- When your bread is nearly there, pre-heat the oven to 220° C / 430° F.
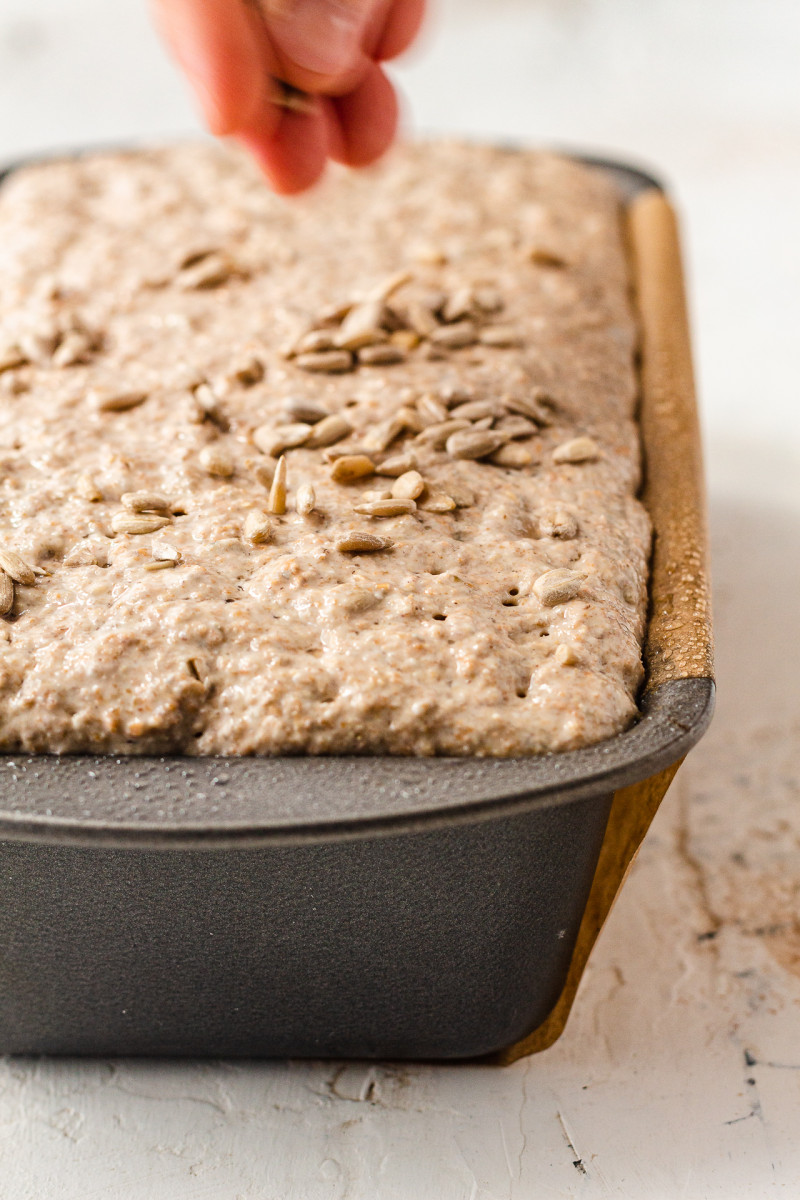
- Once the bread has risen, handle it very gently as you don’t want it to deflate. Gently spray the top with water and sprinkle with some (not too many) sunflower seeds.
- Place the bread on the middle shelf. Optionally, place a deep baking tray filled with warm water at the bottom of the oven for a less hard top crust.
- Bake for 15 minutes, then decrease the temperature to 200° C / 390° F and bake for further 55-60 minutes, the bread is ready when the bottom sounds hollow when you knock on it. It is normal for this bread to get quite dark on top, but you could cover the top with a piece of kitchen foil for the last 30-15 minutes if it’s getting too dark.
- Once baked, take the bread out of the tin (otherwise the bottom will get soggy) and place it on a drying rack to cool.
STAGE 4 (cooling)
- Allow the bread to settle (overnight or until stone-coled) before cutting into it.
- Store on the counter, wrapped up in a paper bag and a kitchen towel. It will keep for up to 5 days once cut. To freeze, slice and separate the slices with pieces of baking paper before locking away in an air-tight container. Freeze for up to 2 months.
*WHITE RYE FLOUR: if you want this loaf to be 100% rye, use white rye flour instead of wholemeal wheat flour without chaning anything else. Be aware that 100% rye loaf is going to be denser, moistier and less fluffy than 50% rye and 50% wheat flour loaf. If you are new to rye bread, I recommend you start of with the latter.
BAKING TIN SIZE: I used a small 900 g / 2 lb tin that I usually make cakes in. The tin holds 1250 ml / 5 cups of liquid (to the brim) and measures: 21.5 cm / 8.5 inches (length), 11 cm / 4.3 inches (width) and 5 cm / 2 inches (depth). Bread dough should not reach above 3/4 height of the tin or else it may not rise.
SCALING UP: If you would like to scale this recipe up, it is helpful to remember that the ratios of the key ingredients in this recipe are: 1:1:1:2 (1 part starter : 1 part rye flour : 1 part wheat flour : 2 parts water) so to make a slightly larger loaf use 200 g / 7 oz starter, 200 g / 7 oz rye flour, 200 g / 7 oz wheat flour and 400 g / 14 oz water. Remember that you may need to extend the baking time a little too.


I don't think you need to change much - I made this bread with 100% rye before (50% wholemeal and 50% white) and I didn't make any changes. The resulting loaf will be quite different but I suppose you are fine with that since you like 100% rye bread already. Hope you'll enjoy it. Ania
I am delighted to hear that you and your family (most of them) enjoy this sourdough. The temperatures I gave in the recipe are for no fan function (if you have the fan on you need to lower it by 20C), but you may have to go lower still as ovens do vary a lot so absolutely experiment. If the colour of the bread is what worries you, tent it with a piece of kitchen foil half way through cooking but also be aware that this is the characteristic of using wholemeal flour. While you can make the bread brown less, it will always be darker than one made with other flours. Hope this helps. Ania
I am delighted to hear that you and your family are enjoying this rye bread. In terms of the top getting quite dark, that's characteristic for rye flour and you cannot avoid it completely without the inside getting undercooked, I don't think. Ania
I have baked this loaf 15 times+ since I found it online and love it! It has become my main method to bake weekly, I have also shared it with a number of friends.
The main reason I love it is because it requires no stretching 😊 Thank you so much for sharing it 🙏🏾
P.S. I found the q and a very useful too and did overnight proofing for the first time, though I gave the loaf away so I am hoping for success and my friend's feedback X
The recipe is very forgiving on times as everything happens so slowly , once you've done it a few times you can rely on touch and the look of the dough to decide if it's ready for the next stage.
We added a mix of seeds - pumpkins, sesame and sunflower but must say less is more and have gone back to just sunflower, consistency and taste seems to be better
Also cooking in our oven takes less time than you suggest and never comes out soggy.
I make a lot of different sourdoughs , but this is definitely our favourite - you can feel that each slice is doing you good when you eat it, the bread lasts for ages, and even after week it great toasted.
thanks so much a game changer for us .x
would i be able to combine rye flour and chickpea flour with this recipe?
if so, do I need to do anything different?
Thanks!
You could try, but I don't think it will work as this bread needs gluten and chickpea flour has none. Ania
I will definately try a couple of your treats. Best regards, Silke
Delighted to hear that you enjoy this bread. The crust is meant to hard (it also keeps the bread fresh inside for longer until cut open) but if you wanted to soften it you could maybe wrap the hot bread in a paper bag or a clean kitchen towel - the steam should soften the crust a little. Ania
I keep my starter in the fridge because I only make 1 loaf per week.
The night before I want to make a loaf, I take the starter (100g) out of the fridge, add 100g flour and 100g water to reactivate it and leave it overnight out of the fridge.
In the morning it is nice and bubbly, so I take out 200g to make the bread and put the remaining 100g back in the fridge until next time. I have been cycling my starter like this for months now.
No, only one starter. The starter gives you about 210 g and yes, don't discard when you are about to make the bread - add it to the bread (you only discard if you cannot use the starter for anything). Feed remaining 60 g of start with 60 g of water and 60 g of flour (or you can discard 30 g and only feed 30 g) and carry on feeding and discarding like before. Hope this helps. Ania
Thank you for a great addition to our regular rotations!
can you use starter that has been made from white baking flour, not rye flour?
That's correct, the batter is supposed to look like cake batter - please see my photos if you need reassurance. If your starter is very runny - mine, which is made with rye flour drops off the spoon but isn't pourable - you may want to add a touch less water but if you don't, it really doesn't matter. Hope this helps. Ania
Do you mean 100% white rye flour or 50% white rye and 50% wholewheat? In both cases the answer is yes, but with the former the bread will be moister instead (such is the nature of rye) and less fluffy and springy as rye has very little gluten. Provided that's the texture you like, sure, otherwise I would recommend 50-50 split. Hope this helps. Ania
PS: also, you may need a little less water.
The jar contains my starter, it's in a bell jar and I cover it with a lid but do not screw it on. The preferment is what you see in the glass bowl (the side on photo with lots of air bubbles across the mixture) and I usually just throw a clean kitchen towel over it. Hope it helps! Ania
I accidentally added _all_ the water to the preferment. Any chance that I can just let it do its thing, just not add any water with the WW flour/salt/seeds, and have any hope for a loaf that rises?
It's not ideal, but you could simply mix all of the flour and salt (maybe skip the seeds in this case) in now and just let it all raise in bulk. It will probably take quite a bit longer but should be fine otherwise. Ania
I made it with 100% rye but 50% was white rye and the rest was dark rye and the amount of water was the same. Something to be mindful of is that the texture of the bread will be different, it will be less fluffy and wetter inside as such is the character of rye flour. Hope you'll enjoy it. Ania
At the preferment stage it was bubbly and the starter was rising predictably. What do you think might be the issue?
Sounds like you are on the right track and you simply need to give it longer - I typically let it sit on my counter overnight so closer to 10 hours. It will get there, just give it more time. Ania
This bread is low gluten so you won't be able to shape it, it's more like a cake in consistency before you bake it so for that reason I would not recommend a Dutch oven (it will stick it its sides). A well oiled, preferably non-stick, bread or cake tin is better suited to a bread like this. Hope this helps. Ania
Your recipe is very clear and nicely photographed so thank you.
Step 2 is only a pre-ferment so if it's ready (bubbly throughout and the surface is even and just slightly domed), you can mix in the other flour, seeds, salt and water. Transfer it to a prepared tin and place in the fridge overnight, covered with a clean kitchen cloth. The fridge will slow down the rise and tomorrow, simply take it out of the fridge and wait until it looks ready to bake - it's domed slightly and there are small holes in the surface before baking. If it's not ready yet, yes, you can place the pre-ferment in the fridge too and you should be fine to continue tomorrow. The amount of time that passes is not as important as visual signs that the pre-ferment or the actual dough is ready as a lot depends on ambient temperature and on how healthy your starter is - some starters are quicker than others. If you were to your pre-ferment on the kitchen counter overnight, the chances are that it would become too fermented and will eventually collapse - which you don't want as the bread would end up dense and brick like. I hope this makes sense and if you need help, send me a message on Instagram (@lazycatkitchen) as I am likely to get to it quicker. Hope you'll enjoy it. Ania
Ania you have been so helpful and responsive. Do you have any other soughdough recipes? I find so much conflicting info amongst the Youtubers. I would rather put my trust in you!
Thanks again, Stephen.
I was just replying to this when I saw your Instagram message - I am delighted that it worked well in the end and I am really happy my suggestions have been helpful and as I said to Jinny, if you make it often (like I do), it will be something that you can make with your eyes closed (well almost). I stopped buying bread completely after I got into the swing of baking this. I haven't published any other sourdough recipes yet, but I am working on a 50% wholemeal sourdough baked in a Dutch oven and hope to publish it soon. Ania
It sounds to me like the bread has overproofed or proofed too quickly resulting in air being trapped underneath the skin. Try proofing it overnight in the fridge maybe for a slow rise. Hope this helps! Ania
Thank you 🙏🏼
In step 7 you say " and (optionally) a small baking dish filled with water at the bottom of the oven."
Are these the same? They seem to be described differently.
Yes, the same. I started off always adding that tray filled with water but then forgot one or twice and concluded that's not so necessary (provided that you mist/brush the bread with water before baking). I will reword the instructions so that they are clearer. x Ania
I have not tried making this bread with spelt flour so I am unsure as to what the texture will be like or if any adjustments (like water content and baking time) are needed, I am afraid. It should be similar but you may not be as happy with the outcome as if you used rye flour. Ania
It won't quite be the same, but yes, sure. I have done some tests in the past but haven't got a finalised recipe. Based on my tests, I would say that you need about 2 tsp of instant yeast (if using active dry yeast you'll need to activate it first) and 370 g of flour (I used 50% wholemeal and 50% dark rye) and 450 ml water for a 2lb bread tin. I would also bake it at a lower temp 200 C for 35 minutes and increase to 220 C for the last 10-15 to speed up browning. I hope this works for you - as I say I haven't finalised the recipe, but this gave me a decent bread with yeast. Ania
my sourdough starter's name used to be Pszemek, since then she's become Żyta (or Ryea.)
Please, please, please come up with some great sourdough discard recipes 🙏🙏🙏
When you are making the starter, you said you discard anything about 70g, then "add the same amount" back to feed it. Do you mean you added another 70g as you started out with? Or let's say you discarded 10g of starter, did you add 10 grams of flour/water back into the starter?
Also, what do you do with the leftover starter? I've read that the leftover is the base you keep forever and ever, and you can keep making sourdough bread from the original starter....??? If so, do you need to keep adding to the original starter so it doesn't run out? If so, what do you add? (Sorry for all the questions, this is the first time I will be making sourdough bread and a sourdough starter....)
Thanks,
Nancy
So on DAY 1, I mix 70 g water and 70 g flour. From DAY 2 onwards, I discard everying BUT 70 g of starter and mix in 70 g of flour and 70 g of water. The reason you discard some of the starter is that amount of flour and water has to match the amount of starter so that the correct PH of the starter is maintained. If you were to keep all of the starter you would need to start feeding it ever more increasing quantities of flour, which is not very cost-effective. So little waste at the beginning is better than huge amount of waste later - if you see what I mean.
Now, it terms on what you can use the matured discard for, you could incorporate it into pancakes, waffles, pizza dough, crackers - see this post. I will publish my favourite discard recipes with time also.
Hope this helps,
Ania
Yes, this is the actual regimen I used to make my starter. Please take a look, it's very straightforward. I hope you'll give it a go as it's extemely rewarding and versatile - it can be used for anything sourdough (not just rye bread). x Ania