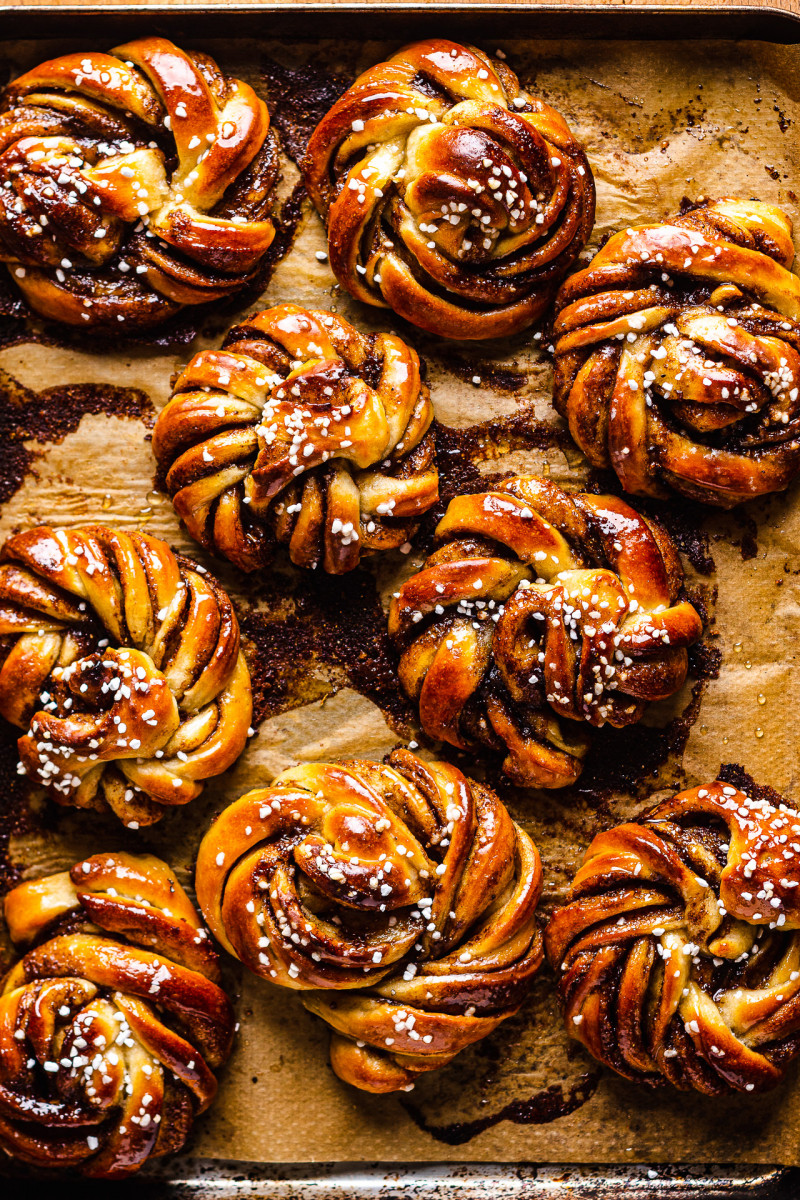
Vegan kanelbullar – Swedish cinnamon buns
Vegan kanelbullar – Swedish cinnamon buns

We’ve recently come back from a short trip to Stockholm and I promised myself to make their famous cinnamon buns at home, I loved them so much. I mean it’s hard not to, unless you don’t like cinnamon or cardamom, which even the cinnamon buns are heavily laced with. I love them both so I was in heaven. I wasn’t too worried about making the dough as they are made out of enriched dough – something I’ve had experience with before, but the folding part looked tricky – spoiler alert: it’s really not.
I set to work and probably about 10-12 tray of buns later I am ready to share the recipe. I started off loving them but now I really need a break from cinnamon baked goods for a while. Even my poor neighbours who initially welcomed them with open arms, started dreading me making another batch, I am pretty sure.
Initially, I spend all my energy on learning about all the different ways to fold them and obsessing over which one I like best. Then, as I was ready to make them for the blog something went wrong with my dough and I could not figure out what it was. I did everything the same way I thought…except that I switched from making them by hand to using a food processor because I was tired.
I don’t own a standing mixer yet, but I finally bought a new food processor, which is supposedly quite good at dough kneading. Since I was tired of making these buns by hand, I decided to rope it in and here is where my trouble started. It took me a few tries and a lot of Googling to find out where I’ve gone wrong. Food processor is okay when making simple – flour, yeast, water – kind of dough, but it turns out that it’s not that great at handling heavily enriched dough like this one. This dough has 20% fat added to it and it takes a lot of time for that fat to get incorporated into the dough, which produces lots of friction and therefore heat.
By the time my dough was silky smooth, it was nearly 40° C / 104° F whereas it should be about 25-26° C / 77-79° F (I found this video very helpful). High dough temperature causes it to ferment really quickly, which meant that by the time I was shaping the buns the dough was tearing due to the fact that it was already overfermented. Now that I look back it all seems so easy, but I was really stumped about the whole thing. I then made another attempt by chilling my flour in the freezer, using fridge-cold plant milk and cold butter flattened into thin shards with a rolling pin and it worked a treat. If you own a standing mixer, which is more of a specialist dough making machine, I am sure that you won’t have as much of a problem with your dough getting too hot, but I would still suggest using cold ingredients and chilling your dough hook and metal bowl ahead of starting as it takes a long time for all that butter to be absorbed by the flour.
If you are up for making them by hand, that’s totally doable – especially a small batch like this. I invite you to really immerse yourself in the process – make it your mindfulness exercise – and you’ll be rewarded with a tray of beautiful sweet treats by the end. Below, you’ll find detailed, step-by-step photos of the process to guide you through the steps and put your mind at ease when things don’t look like they are coming together – they will! First, though, let’s quickly run through the ingredients’ list to clear up any confusion.
MORE ABOUT THE INGREDIENTS
FLOUR: I used bread flour (also known as strong flour) to make these buns. Since the dough contains as much as 20% of fat, which hinders gluten development and softens the dough, I decided to use bread flour for its higher gluten content (bread flour tends to have between 12-16g of protein, while all purpose flour only 8-10 g). Higher gluten content helps with the rise, it produces fluffier crumb and a crispier shell. You could use all purpose flour, but you’ll probably need to spend more time kneading to develop gluten before adding fat.
SUGAR: I used caster sugar (superfine sugar) to sweeten the dough, to make the filling and to glaze these buns. I also use light muscovado sugar (50%) for the filling to intensify its flavour. I only sweetened the dough a touch (2 tbsp) as I find that the filling an sugar glaze bring a ton of sweetness and no more sugar was needed. Before these buns go into the oven, they get a sprinkling of pearl sugar – hard sugar that does not melt easily. It makes them look pretty and adds a bit of crunch. I got mine while on holidays in Sweden as I knew I would be making these buns once I get home, but if you cannot get it where you live, simply skip it, it’s not essential. You could top them with flaked almonds, for example, if you want them to look prettier.
YEAST: Yeast is what gives this bread rise and a lovely, fluffy texture. It is important to use the correct type of yeast and to activate it correctly. I tend to use instant yeast, which is a type of powdered yeast that can be added directly into the flour and does not require any prior activation. If you were to use what is labelled as active dry yeast or fresh, you need to activate it in a portion of the liquid allocated for this recipe first, before adding to the dry ingredients. The amount of fresh yeast is roughly double in grams so for this recipe, you would need 10 g (0.35 oz) of fresh yeast.
VEGAN BUTTER: Kanelbullar dough is a type of enriched dough, meaning it has a relatively (you can go higher than that for sure) high percentage of fat. Traditionally these buns are made with butter so I simply used vegan butter block instead. Naturli is my favourite, but since it’s not sold locally, I’ve used Violife, which is also good. If making these by hand, use softened butter. If, however, you are making these using a machine, I suggest using cold butter flattened with a rolling pin (between two sheets of baking paper). Maintaining correct dough temperature is a challenge when making these in a food processor, for example, and using cold ingredients minimises this. Vegan butter is also used for the filling and for this application the butter should be soft.
CINNAMON: Cinnamon is the key spice in these so make sure you use good quality cinnamon and a generous amount.
CARDAMOM: Cardamom isn’t what you typically associate with cinnamon buns, but Swedes are obsessed with this spice and so they use it both in their cinnamon and cardamom buns, although in different amounts. I really love the combination of cinnamon and cardamom and so if you haven’t already tried adding this spice to your cinnamon buns/rolls, I strongly encourage to try. It really pays off to grind your cardamom seeds (you want to buy green cardamom pods for this) fresh – they add so much more flavour and perfume to these buns. I added cardamom to the filling, but if you love it you can also add it to the dough itself – that’s what Swedes often seem to do. I wanted a prominent taste of cinnamon with just an underscore of cardamom so I used a teaspoon of freshly ground cardamom (use more if using ground cardamom as it’s less potent) and a heaped tablespoon of cinnamon and I love the balance.
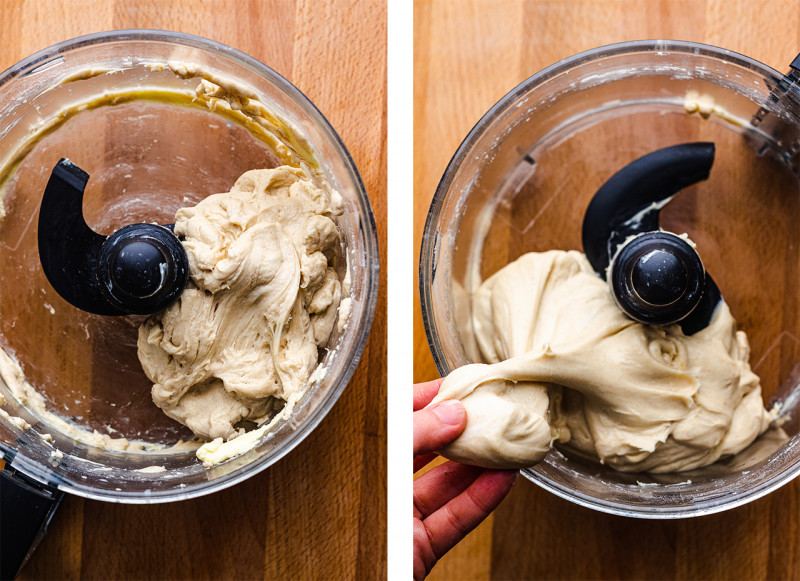
I don’t have a standing mixer but I do have a food processor with a dough kneading function and that’s what I used to make this dough. I ran into some problems at first when the dough was proofing too fast – this was due to the dough getting too hot in the food processor as I later realised with the help of this video. The way to remedy this is chill all your key ingredients (flour, plant milk, butter) and a bowl/dough hook if you have a standing mixer before you start. The picture on the left is what the dough looks like after you start adding butter, the picture on the right is what the dough looks like after all of the butter has been incorporated – the dough is supple, shiny and smooth and it comes away from the bowl easily.
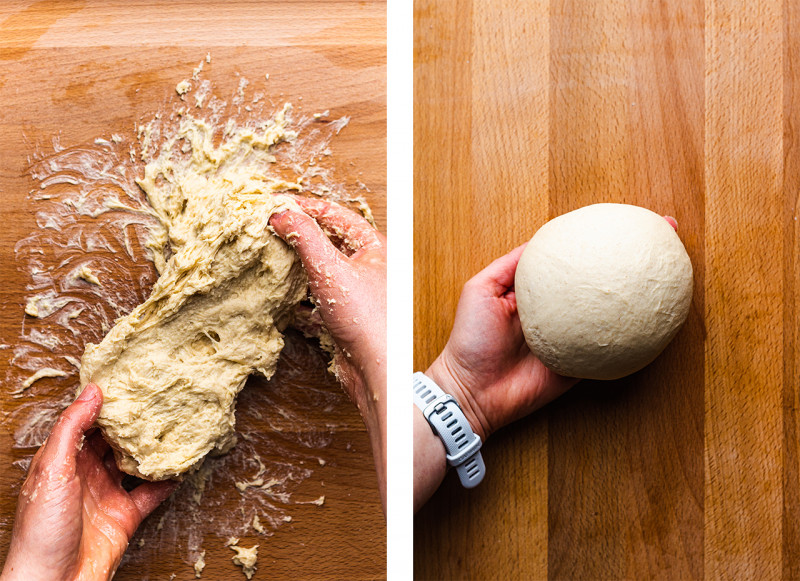
It is perfectly possible to make this dough by hand, especially this small 6 bun batch. All you need is a clean (ideally stone) worktop and about 20 minutes of your time. Before you undertake this I wanted to make sure you know what to expect. So the first 8-10 minutes of kneading is a piece of cake – the dough is easy to handle. Once you add the butter, the dough turns into a greasy mess (see picture on the left), BUT after 10 minutes (I counted several times!!) of consistent handling (I would not quite call it kneading…), it transforms into a smooth and satiny dough ball, see the picture on the right. It is now ready for the first proof, known as bulk fermentation/rise.
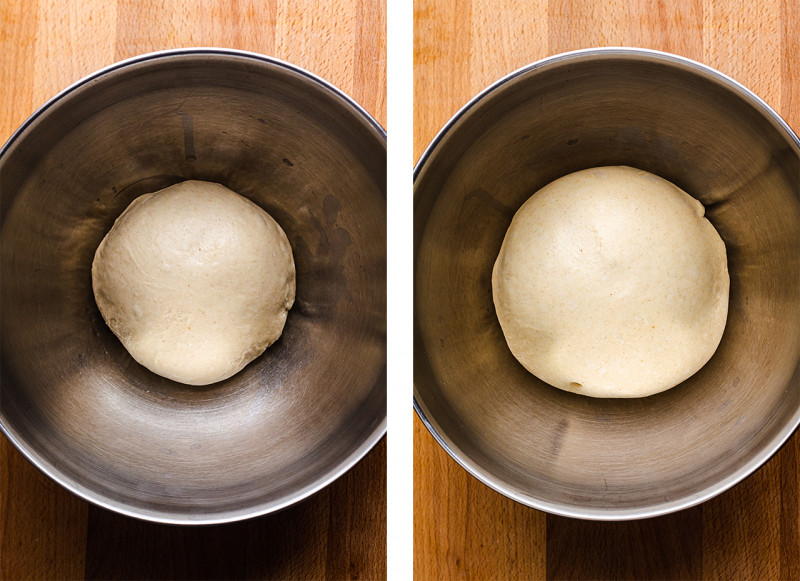
Once your dough is smooth and shiny, oil it very lightly and place in a bowl covered with a kitchen towel to allow it to rise/proof (this is called bulk rise). You can either proof it at room temperature until it becomes puffy and nearly doubles in size or you can stick it in the fridge and allow it to proof slowly overnight. The latter, known as cold fermentation, means better flavour.
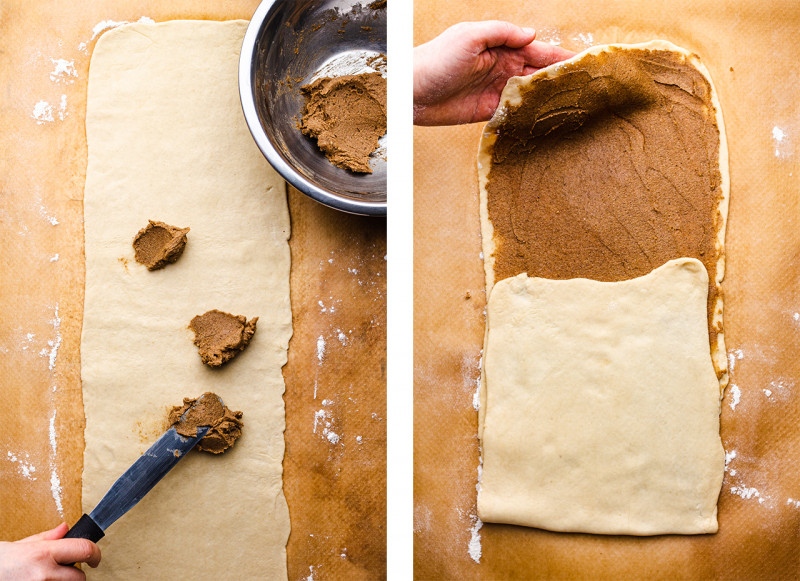
Once your dough has proofed, deflate it and then roll it out into a thin and very long rectangle – try using as little flour for dusting as you can get away. If your dough is tense and difficult to roll out, rest it for 10 minutes and try again. Once you roll it out, spread room temperature filling on top, go all the way to the edges. Next, triple fold the dough as in the picture on the right.
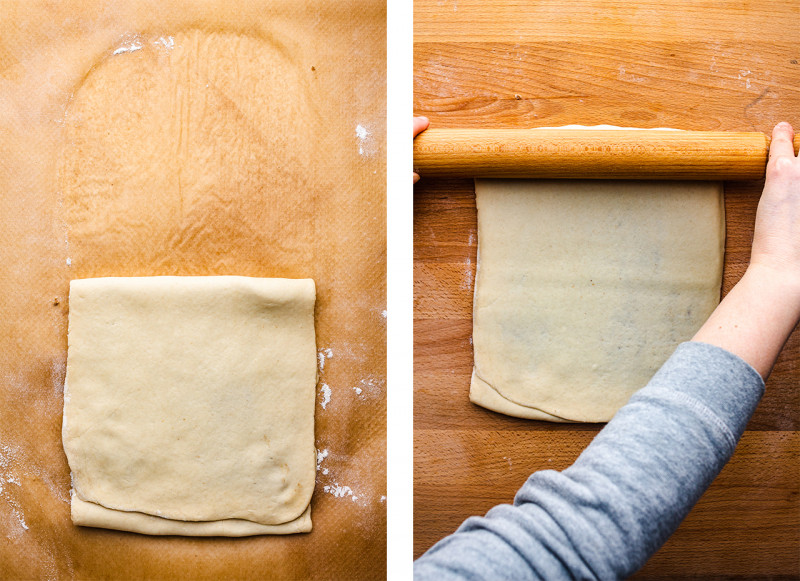
Roll the dough out a little more applying very gentle, even pressure so that the resulting rectangle is about 30 cm / 12 inches in length and 18 cm / 7 inches across.
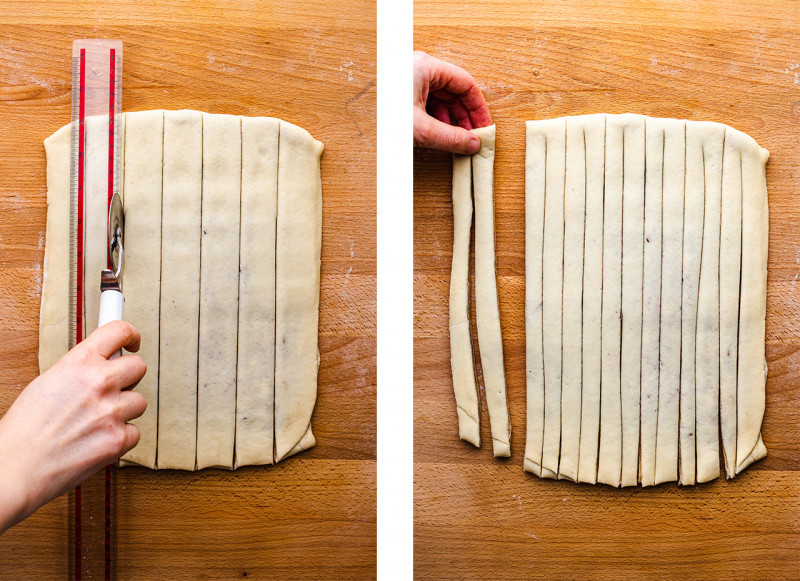
Using a pizze wheel or a sharp knife and a ruler, cut the dough into 6 even strips lengthwise (each piece is 3 cm / just over 2 inches). Cut each strip in half stopping about 2.5 cm / 1 inch before you reach the end.
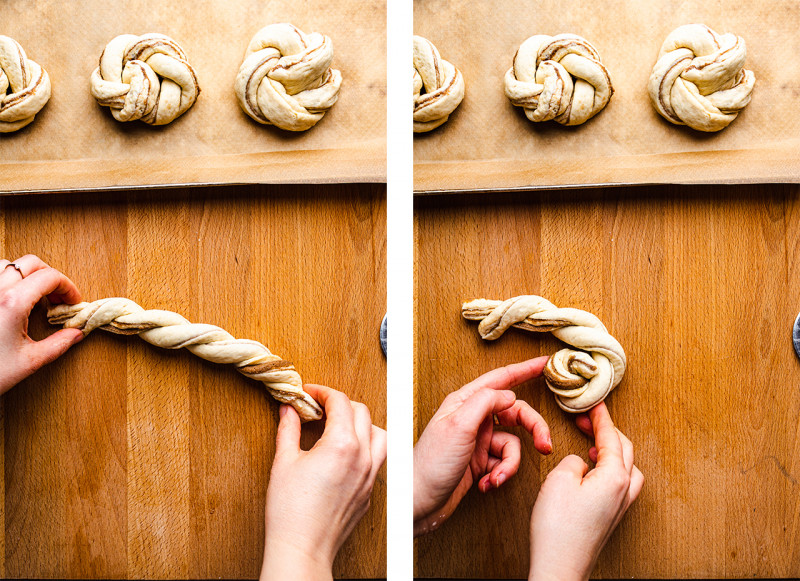
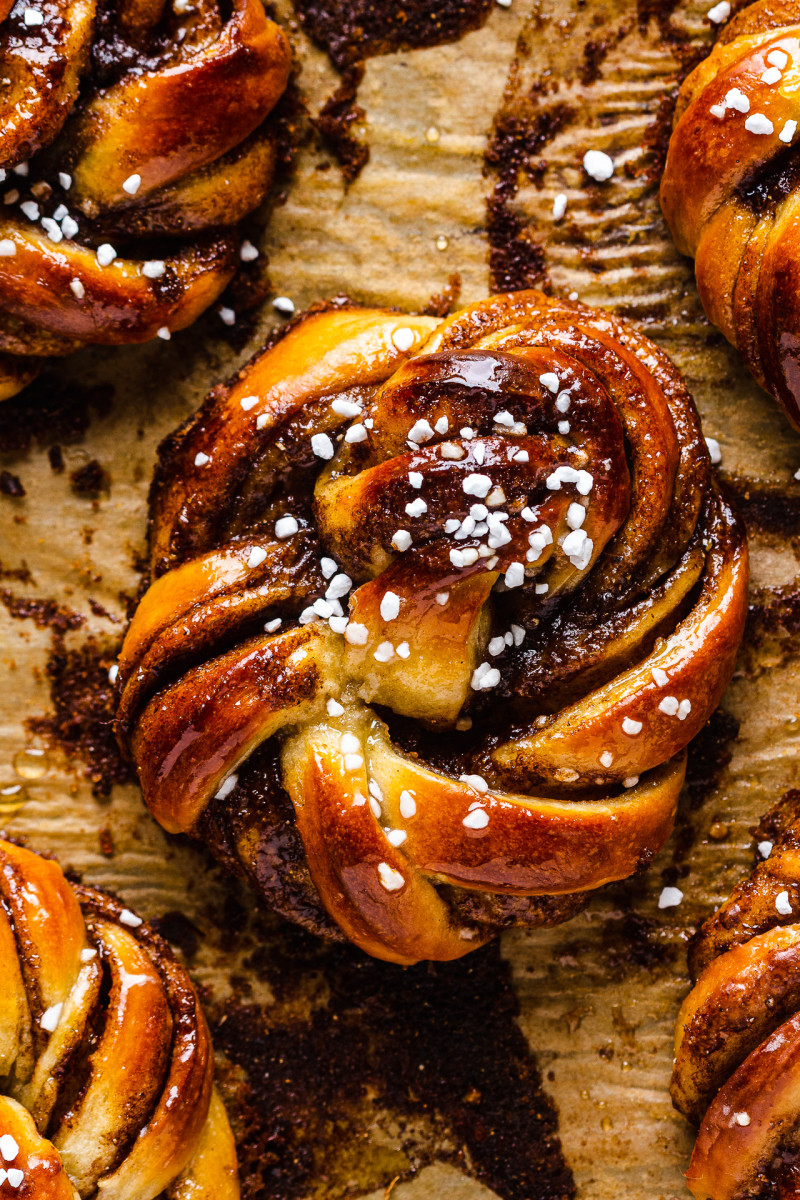
To shape, hold one end in each hand and twirl the two strands around each other. Next, coil the two twirled strands into a snail shape around the joint, tuck the ends under the bun.
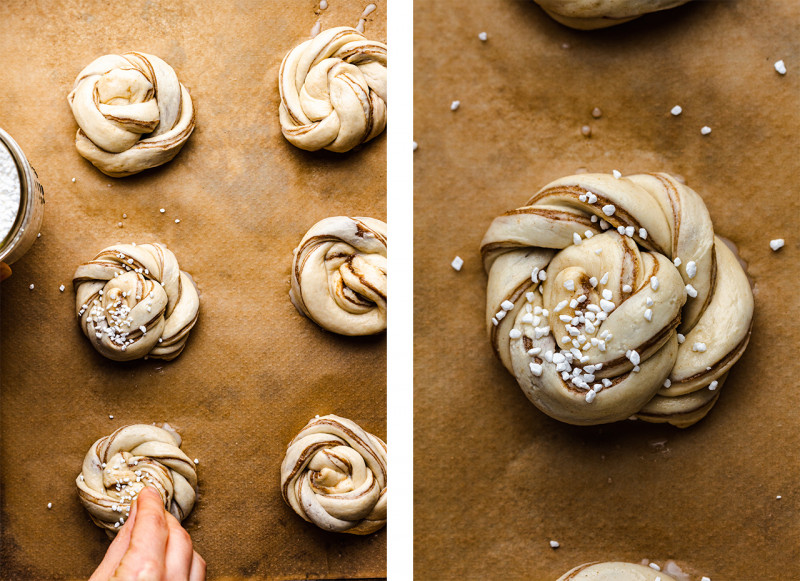
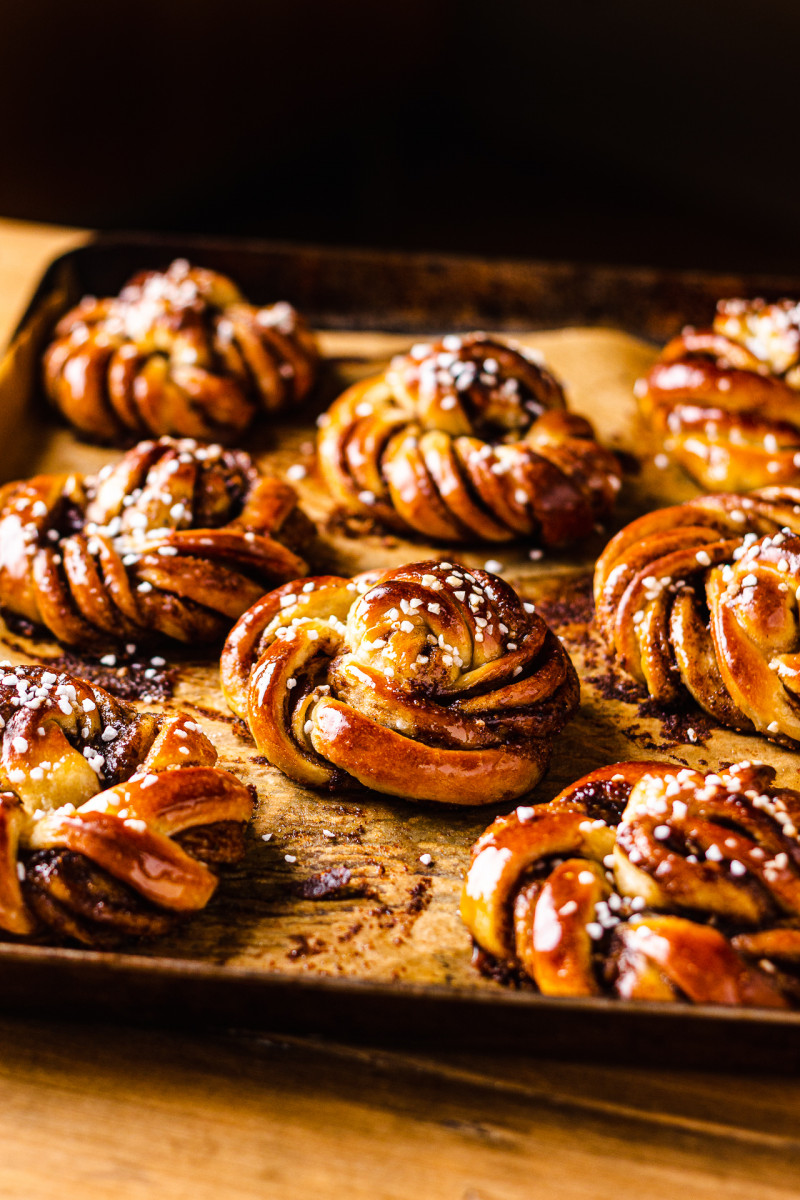
Brush the buns with soy (or other plant) milk and sprinkle with pearl sugar if using. Bake in a hot oven until shades of gold and brown. Glaze in sugar syrup and let them cool before eating.
- 250 g / 2 cups bread flour*
- 2.5 g / ½ tsp fine salt
- 25 g / 2 tbsp caster (superfine) sugar
- 5 g / 1½ tsp instant dried yeast*
- 160 ml / 2/3 cup cold plant milk (I used soy)
- 50 g / ¼ cup vegan butter (I used Violife)*
FILLING
- 75 g / 6 tbsp vegan butter (I used Violife), at room temp.
- 75 g / 1/3 cup sugar (I used a mixture of caster and light muscovado sugar)
- 10 g / 1 heaped tbsp cinnamon
- 3 g / 1 tsp cardamom (freshly ground ideally)
GLAZE
- 30 ml / 2 tbsp soy (or other) milk to brush
- 25 g / 2 tbsp caster (superfine) sugar
- 30 ml / 2 tbsp water
- 25 g / 2 tbsp pearl sugar, (optional)
- If using a food processor or another machine (which tends to get hot), refrigerate your plant milk, chill the flour and metal bowl/dough hook in the freezer ahead of mixing the dough. Place cold butter between two sheets of baking paper, whack it with a rolling pin until flattened, refrigerate until ready to use.
- Place flour, salt, sugar and instant yeast in a large mixing bowl, a suitable food processor or a standing mixer.
- Add 160 ml (2/3 cup) of cold plant milk and mix well. If using a food processor, add milk gradually while running on the lowest speed, until the dough comes together.
- Knead the dough until enough gluten develops to make the dough elastic and smooth – about 8-10 minutes BY HAND or for 3-5 minutes on a medium setting if using A FOOD PROCESSOR/MIXER. If it’s not coming together, rest it for 10 minutes and try again.
- If kneading BY HAND, form the dough into a flat disc and pile softened butter on top of it, close the dough over the butter. If using A FOOD PROCESSOR/MIXER, add pieces of cold butter gradually while processing on the lowest speed. Occasionally, you may need to scrape the bowl and reposition the dough.
- If kneading BY HAND, knead the dough until all of the butter gets absorbed (about 10 minutes). If using a FOOD PROCESSOR/MIXER, about 3-5 minutes – you want the dough to be supple, smooth, satiny and only just tiny bit tacky. It should come away from the sides of the bowl cleanly.
- Form the dough into a ball, oil it lightly and place in a bowl, cover with cling film and let it proof until puffy and almost double in size. You can do leave it on the kitchen counter or do an overnight proof in the fridge. The time this takes depends on the internal dough temperature (if you used a machine, it’s likely to proof quicker) and the ambient temperature, between 1-3 hrs on average.
- Make the filling by mashing together room temperature vegan butter with sugar and spices, until the mixture is homogenous. Make sure it’s at room temperature before using.
- Roll the dough out until you have a long large rectangle measuring approximately 75 cm / 29.5 inches by 16 cm / 6.25 inches (if making a double-batch, 75 cm / 29.5 inches by 32 cm / 12.5 inches). Try to use as little dusting flour as possible.
- Using a flexible spatula or a palette knife, spread the filling on the rolled out dough going all the way to the edges.
- Divide the dough into 3 roughly equal pieces in your head. Fold the third of dough over the middle piece, then the remaining piece on top. You could also just fold it in half if you prefer.
- Gently, applying even pressure, roll out the dough so that it reaches about 18 cm / 7 inches across and 30 cm / 12 inches in length.
- Using a pizza cutter (or a sharp knife), divide the dough into 6 equal pieces lengthwise – 3 cm / 1.2 inches wide each. Cut each strip in half lengthwise stopping about 2.5 cm / 1 inch before you reach the end.
- Grab each piece at both ends, tap it very gently against the counter to stretch just a little and then twirl the two strands of dough around each other. Coil twirled strands around the joint like a snail, tucking two loose ends underneath.
- Place the buns on a paper lined baking tray. Heat up the oven to 220° C / 425° F (200° C / 390° F with fan on).
- Cover the buns with a kitchen towel and allow them to proof until they look puffy and the dough springs back some of the way (not fully, if it springs back fully they need more time) after you gently poke it with your finger.
- Brush with soy milk and sprinkle with pearl sugar. Bake for about 12-13 minutes, or until browned.
- Once out of the oven, immediately glaze it with sugar syrup. Allow to cool off completely before eating. Store in an air-tight container for about 2 days.
SUGAR GLAZE
- Combine sugar and water in a small pot. Place on a low heat and stir constantly until sugars dissolves completely, simmer gently for a couple of minutes. Apply to hot buns with a pastry brush.
*YEAST: make sure to use the correct type of yeast and to activate it properly (if needed). I use instant yeast, which requires no prior activation and is added directly into the flour. If using active dry yeast, you need to activate it in liquid (use portion of the liquid allocated to the recipe) BEFORE adding to the dry ingredients. Read instructions on the packet to be sure. If using active dry yeast, use 25% more by weight so 6.25 g / 0.22 oz. If using fresh yeast, use 50% more so 10 g / 0.35 oz.
I do have one question: how long do you proof the shaped buns for? The step before it says to pre-heat the oven, indicating that the proof would be about 10mins, but my instinct says it should be at least 30mins?
Would love to see a cardamom bun recipe in the future
Glad to hear, I hope you'll enjoy these. Yes, absolutely, you are fine to double the recipe and make it in a single batch. Ania
when I rolled the dough to cut the shapes it was a bit hard to unstick the dough from the counter, do you have any recommendations to avoid this? :)
Recipe worked really well with my Kenwood.
Cinnamon buns will become one of our Sunday breakfast traditions!