While I really miss holidays I realise that the reality of a lockdown has probably been a blessing for the state of our house. Last year occasional spells of hot weather and going away had dampened our motivation to work on the house during summer, which is why we spent the entire winter with no soft furnishings, no TV and a living room with bare, freshly plastered walls and a half finished floor. We sort of got used to our house being perpetually dishevelled – you can get used to surprisingly uncomfortable things if you put your mind to it 😉 – but now the cup has overflown and the annoyance of living like this has motivated us to start working on things again.
This weekend is phase 2 of our living room skirting board project. We cut and installed nearly half of the skirting boards last weekend, this weekend we shall continue with the other half and then it will take yet another weekend to patch up screw holes, caulk all of the gaps and paint the boards – something I will be taking charge of as with my near pathological attention to detail and proclivity for tasks that require hand dexterity I appear to do fairly well with things like that.
What is the most time consuming and difficult thing about this job is cutting the boards at exactly the right angle. Victorian houses have a lot of charm, yet part of that charm is that they feature no straight edges or 90° angles, which makes seemingly straightforward things like fitting skirting boards quite a challenge. Luckily Duncan is good at trigonometry and he is getting the hang of using a mitre saw like a pro, so things are gathering speed. We are really spurred on by how good the room looks already, despite it being not quite finished and very messy and so the motivation is at an all time high.
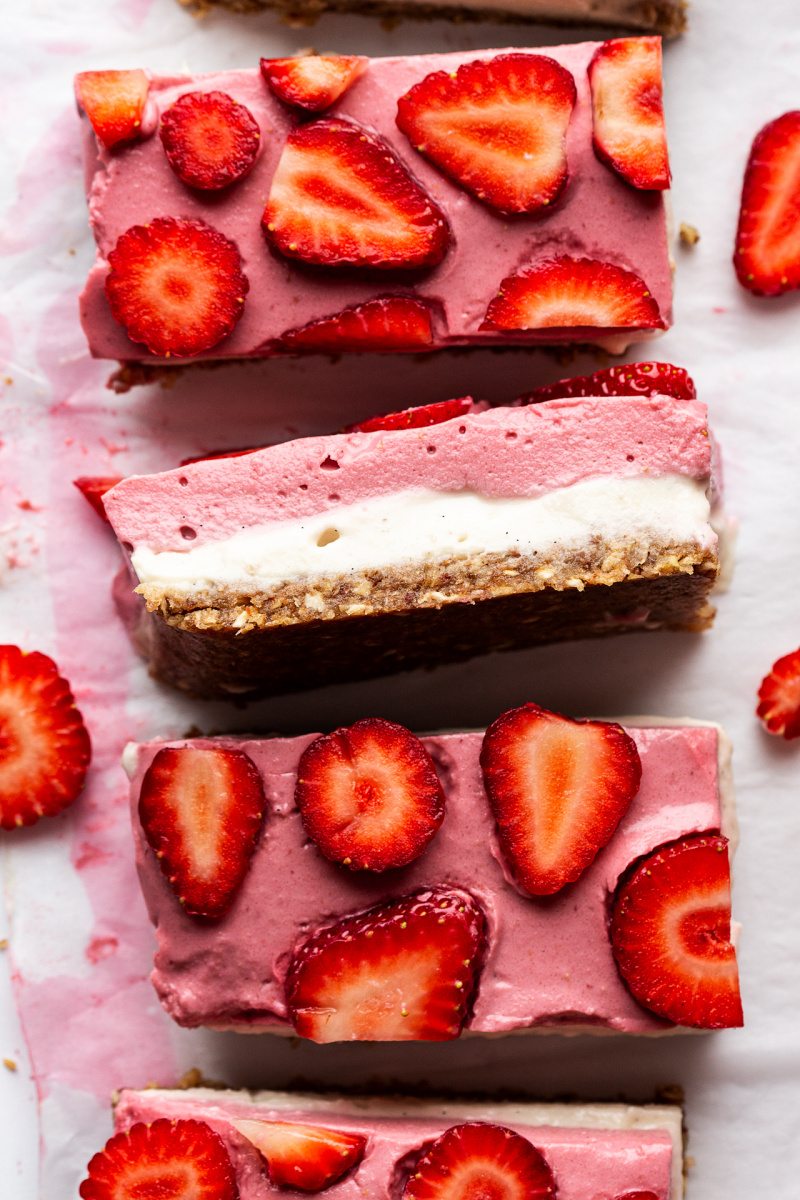
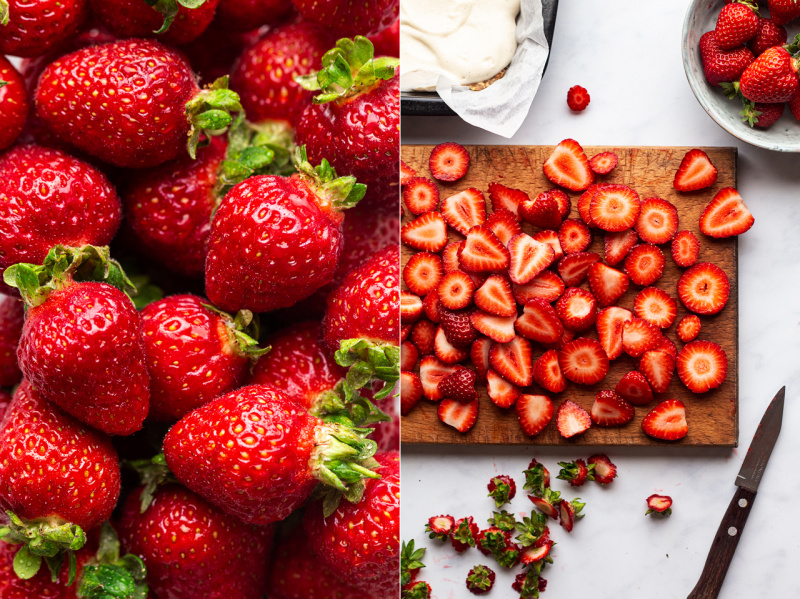
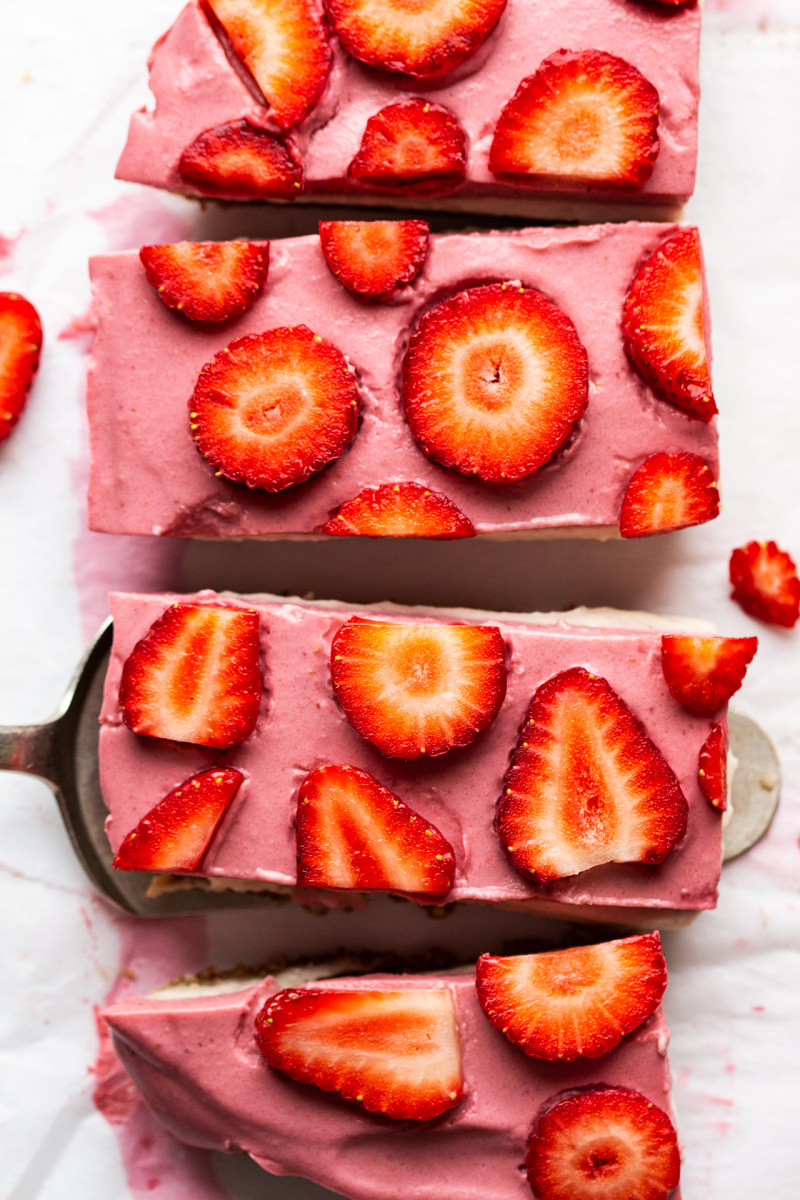
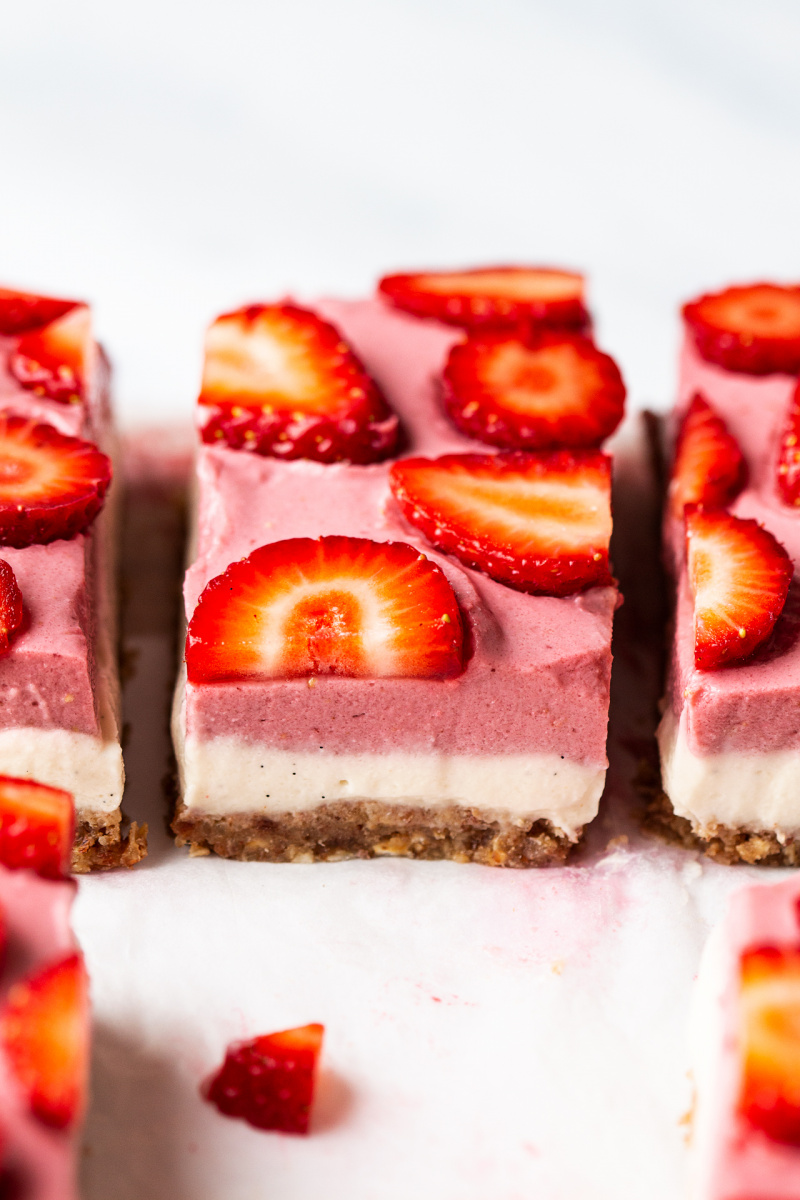
As we are bang in the middle of the strawberry season right now and I’ve spent way too much time on Pinterest looking for interior design ideas, I’ve made a super easy and quick yet delicious strawberry cheesecake slice for today. It requires no baking whatsoever and the entire thing is made in a food processor (base) and a blender (creamy layers). It contains no oil, it’s naturally gluten-free and is entirely sweetened with dates and maple syrup. It’s set with agar agar, but the amount of it is carefully calibrated to make sure the layers are just barely set. The result is delicate, creamy and a pleasure to eat and not a rubbery slice that you could bounce off a wall. Agar agar is quite heat tolerant, which makes this a perfect hot weather dessert. I hope you’ll make it and enjoy it as much as we did.
BASE
- 6 Medjool dates (115 g / 4 oz), pitted and soaked in boiling water for 15 minutes
- ¼-½ tsp fine salt (I like ½ tsp better)
- 1 cup / 125 g pecans
- 1 cup / 90 g jumbo rolled oats
- 1½ tsp softened coconut oil (optional)
WHITE LAYER
- 230 g / 1 cup thick vegan coconut yogurt* (I used The Coconut Collaborative)
- 45 ml / 3 tbsp maple syrup
- 2 tsp vanilla extract or ½ vanilla bean
- ½ cup / 75 g cashews, soaked in boiling water for 30 minutes
- 1½ tsp agar powder**
PINK LAYER
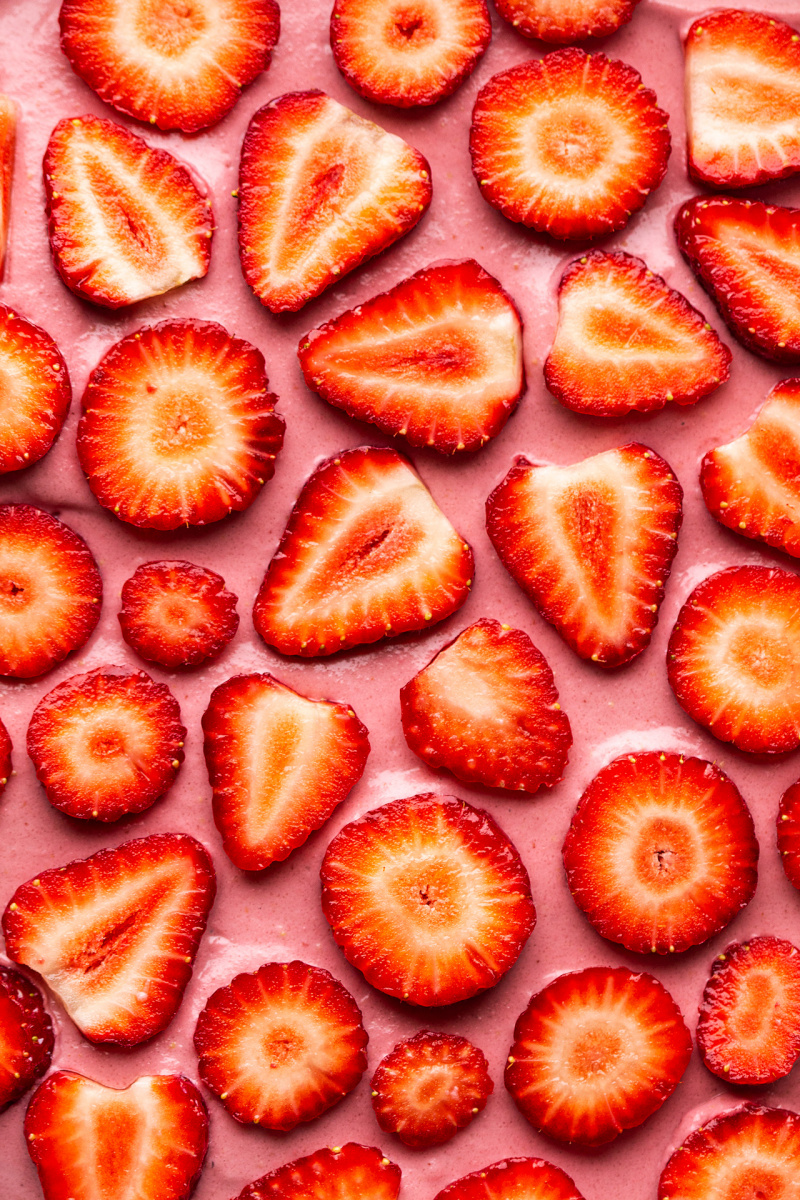
- 300 g / 10.5 oz RIPE strawberries, more to decorate
- ½ cup / 75 g cashews, soaked in boiling water for 30 minutes
- 30 ml / 2 tbsp maple syrup
- 2¼ tsp agar powder**
- Line the bottom and the sides of your tin with baking paper. I used a shallow baking tin of the following dimensions: 20 cm / 8″ x 15 cm / 6″ so when choosing a tin make sure the surface area of yours matches mine.
BASE
- Place softened and squeezed dry dates in a food processor together with all of the base ingredients apart from the oil.
- Process until oats and nuts are well chopped and you have a sticky ‘dough’ that holds together well. At this point you may want to add softened (no need to melt) coconut oil. I found that a tiny amount helps with texture, but it is not at all essential. If the dough is too dry, add a teaspoon or so of water.
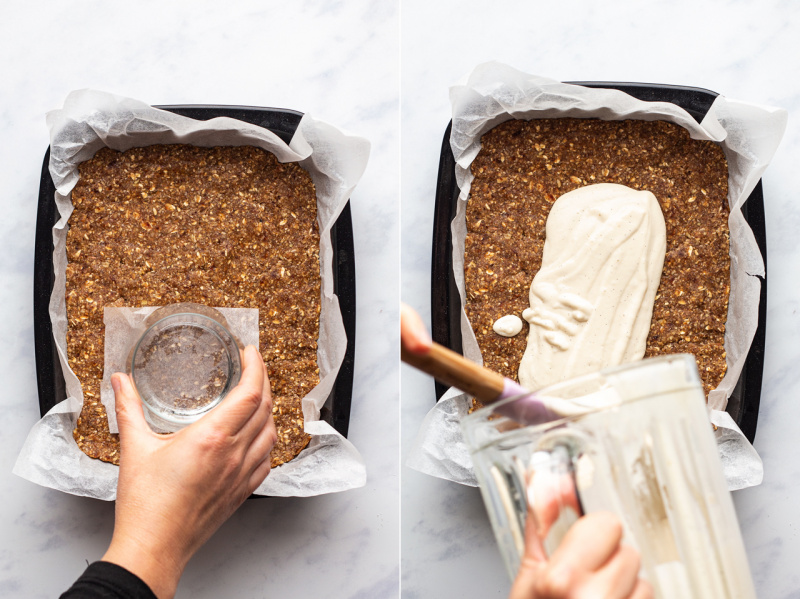
- Line the bottom of the baking tin with the ‘dough’. Press the mixture down well with your fingers so that there are no gaps / air bubbles. Use the bottom of a glass, placed on a small piece of non-stick paper to prevent sticking, to compact the mixture even more. Put into the fridge while you make your cheesecake mixture.
CHEESECAKE MIXTURE
- Place coconut yogurt, maple syrup, vanilla and cashews in the blender, blend until super smooth.
- Activate agar agar in 60 ml / ¼ cup of water (or thin plant milk). Follow the instructions on the packet and be ready to act quickly as once the agar agar is activated, you’ll need to act fast so that it doesn’t set in the blender.
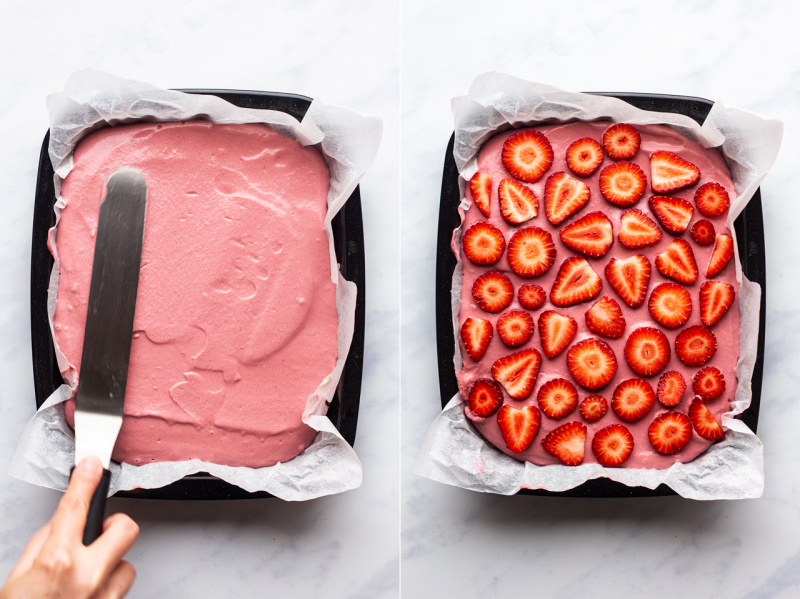
- Add activated agar agar to the white cheesecake mix, blend for a few seconds so that it’s well distributed and then pour over the base and quickly level with a spatula. Allow it to set (fridge will speed things up but it’s not necessary) while you make the pink layer.
- Place half of the destemmed strawberries and drained cashews at the bottom of the blender (you don’t need to wash it) and blend until the cashews are super smooth. If there isn’t enough moisture in the blender, add a couple more strawberries.
- Now add the rest of the strawberries and maple syrup. Blend until smooth.
- Prepare the strawberries for decorating by destemming them and slicing whichever way appeals to you. Set aside. You can decorate the top with strawberries once you pour the pink layer out or after cutting – as it is a very lightly set dessert decorating it after cutting produces neater looking slices.
- Activate agar agar in 60 ml / ¼ cup of water (or thin plant milk). Follow the instructions on the packet and be ready to act quickly as once the agar agar is activated, you’ll need to act fast so that it doesn’t set in the blender.
- Add the activated agar agar to the pink cheesecake mix, blend for a few seconds so that it’s well distributed and then pour over the white layer and quickly level with a spatula. The cheesecake will set within 30-60 minutes and putting it in the fridge helps a little. I found that it is even nicer the day after it has been made so I recommend making a day ahead if you can. Store it in an air-tight container in the fridge, it keeps for 3-4 days.
**You can use agar agar flakes instead but please be aware that they are 3 times less potent than agar powder so make sure to triple the amount specified. It also requires prolonged simmering to activate – please follow the instructions on the packet.