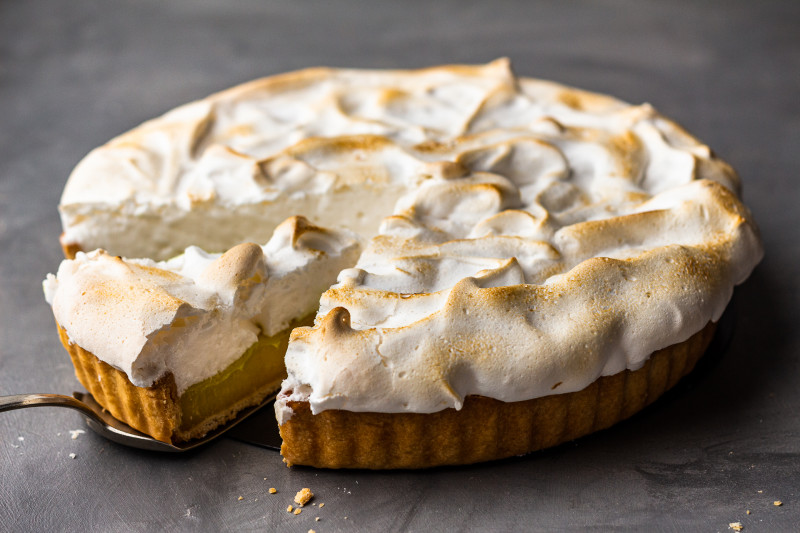
I’m so excited to bring you this recipe for vegan lemon meringue pie today, it’s been at various stages of testing for ages but I was not 100% happy until now. The timing is good as lemon-flavoured desserts are definitely a Spring thing so here we go.
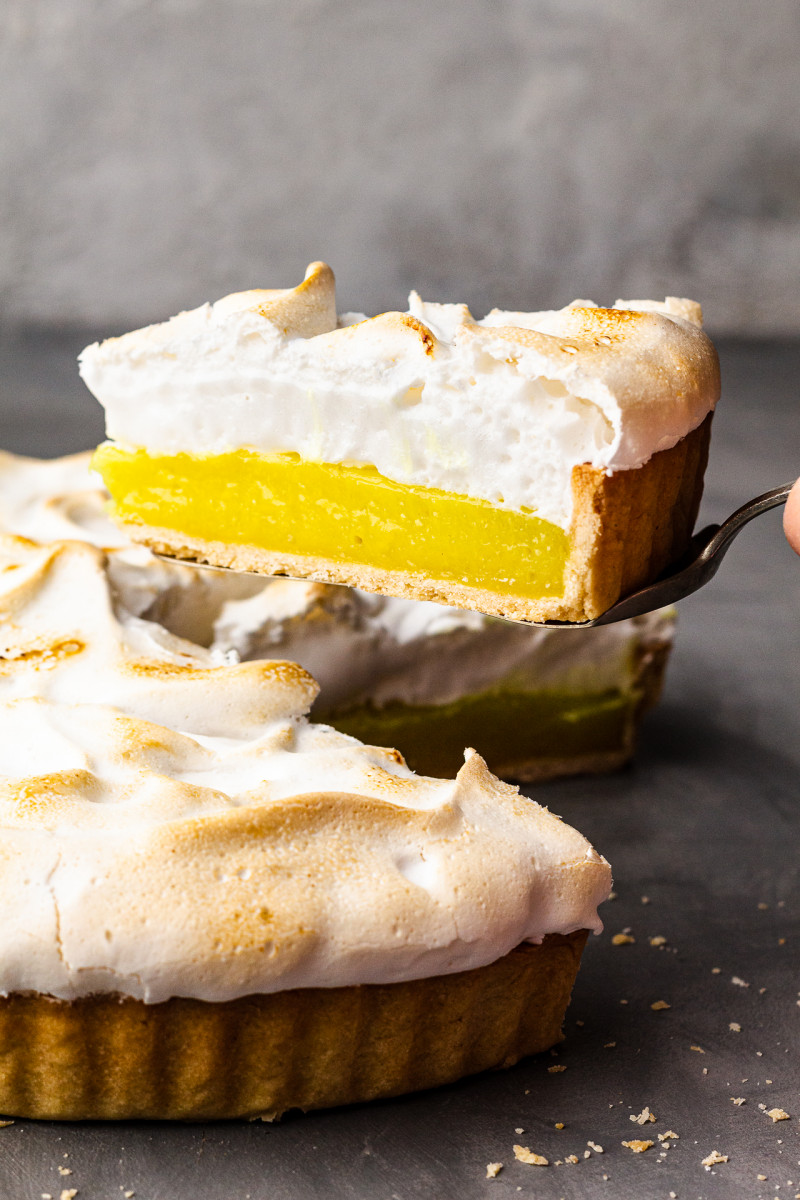
This vegan lemon meringue pie is my twist on a classic. My aim was to reproduce the traditional version as closely as possible without using eggs (which are quite key in both components of this dessert, actually) or dairy and I must say that I am finally pleased with the end result. Not just me, several non-vegan taste testers rated it highly too.
In a bid to help me get though large quantities to cakes and desserts that my house is inundated with on a regular basis, I created a cake give away neighbourhood group and, to my astonishment, many people have signed up. I wish I had done it ages ago, but I did not think there would be any interest in accepting cakes from a stranger. I was mistaken. Lemon pie was first in line and people loved it even though most of them are not even vegan. I was chuffed and so happy to have finally found a solution to my ‘cake problem’.
The biggest difficulty with making a lemon meringue pie, vegan or not, is all the waiting time involved between different components, especially after the meringue has been baked (it needs about 5 hours to cool) and the fact that it is so perishable so it’s best eaten on the day – these two things seem mutually exclusive but it is possible to reconcile them. Here are some tips on speeding the whole thing up:
SHORTCUTS (to speed things up)
1) make the curd a day ahead, refrigerate;
2) make the pastry a day ahead, line the tin with it but bake on the day to keep it as fresh as possible;
3) instead of prebaking the curd in the tart case, like I did, place the filled pastry in the fridge for a couple of hours to set;
4) instead of baking the meringue until crispy, simply toast it lightly with a chef’s torch (like this) or under a broiler for only a few minutes.
MORE ABOUT THE INGREDIENTS
GF FLOUR MIX – you can effortlessly make this dessert gluten-free if needed, simply use a well balanced gluten-free flour mix and a smidge of xanthan gum to help with the binding. Rather than rolling gluten-free pastry, I personally find it easier to scatter it in the tin and then mould it to the interior of the tin with my fingers.
SUGAR – sugar is integral, not just to taste, but the structure of this dessert – both the curd and the meringue rely on sugar for its structure so please do not be tempted to reduce unless you know what you are doing and accept the risk (I do not want to hear that it did not work afterwards 😉 , okay? ). Caster (also known as castor or superfine white) sugar is used in both instances and that’s the only sugar I tested with. You can get away with using coarser sugar in the curd but certainly I would not recommend doing that in the meringue. Small particles mean that it can dissolve fully during the whipping process, otherwise your meringue won’t work or will be gritty and unpleasant to eat at the very least.
VEGAN BUTTER – vegan butter is used both in the pastry and in the curd and what you need here is vegan butter that comes in a block (often called vegan block, in fact, like the Danish brand: Naturli). In makes the pastry nice and tender and ads richness to the curd and helps it keep its shape. You can substitute with coconut oil, I always recommend using odourless one to keep the flavour profile coconut-free.
CORNFLOUR / CORNSTARCH – cornflour (or cornstarch for the US readers) is a thickener that is key in thickening the curd as well as in stablising the meringue. Theoretically, you could try using tapioca or potato starch instead, but I have not tested with either of those so cornflour is the only one I can recommend with 100% certainty.
PLANT MILK – rich and creamy plant milk works best here, like oat, soy or almond. You could use thinned coconut milk but it may introduce an unwanted flavour so I would personally go for a more neutral option.
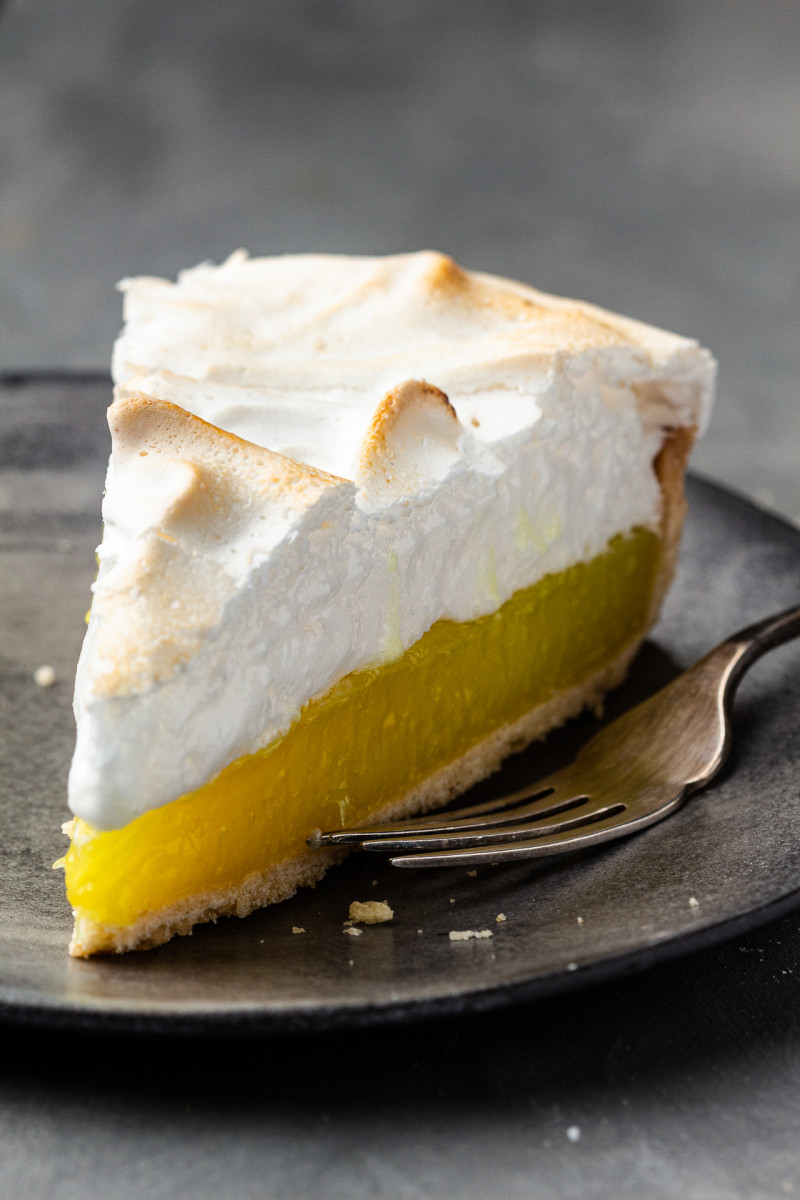
LEMON JUICE – I used a lot of lemon juice in my curd to make it sharp as I like that beautiful contrast between the sourness of the curd and the over-the-top sweetness of the meringue. My taste testers all agreed that the balance was good, but if you like things less tangy, simply swap out some of the lemon juice for plant milk. I also use a touch of lemon juice in the meringue as it helps to achieve stiff peaks (you can use cream of tartar) instead.
AQUAFABA – that’s right, here I go again with my favourite bean juice (I love working with it as may you know by now). I used aquafaba from homecooked chickpeas as I always cook chickpeas but you can also just open a tin or a jar of chickpeas and use the brine. Make sure all your utensils, bowl and hands are spotlessly clean as aquafaba and grease hate each other like cats and dogs (that actually is not true as exemplified by numerous ‘my cat and my dog are BBFs’ videos but you know what I mean 😉 ). To banish grease, use a glass or metal bowl and wash your whisk attachments in soapy hot water carefully.
XANTHAM GUM – those of you who bake gluten-free will be already familiar with this ingredient as it’s one of the binders used in gluten-free pastry and dough. It also happens to improve the lifespan of a vegan meringue and stop it from deflating after baking so I really recommend adding it to your whipped meringue. I kept this pie in a tupperware box, out of the fridge overnight and the meringue kept its shape and did not weep or deflate for an entire next day.
USE SCALES – pastry work needs precision so I strongly recommend using scales instead of measuring by volume, which is inherently imprecise and may lead to a disappointing outcome. I give US measurements as people ask for them but they are approximations only and when it comes to making desserts like this one being accurate is key.
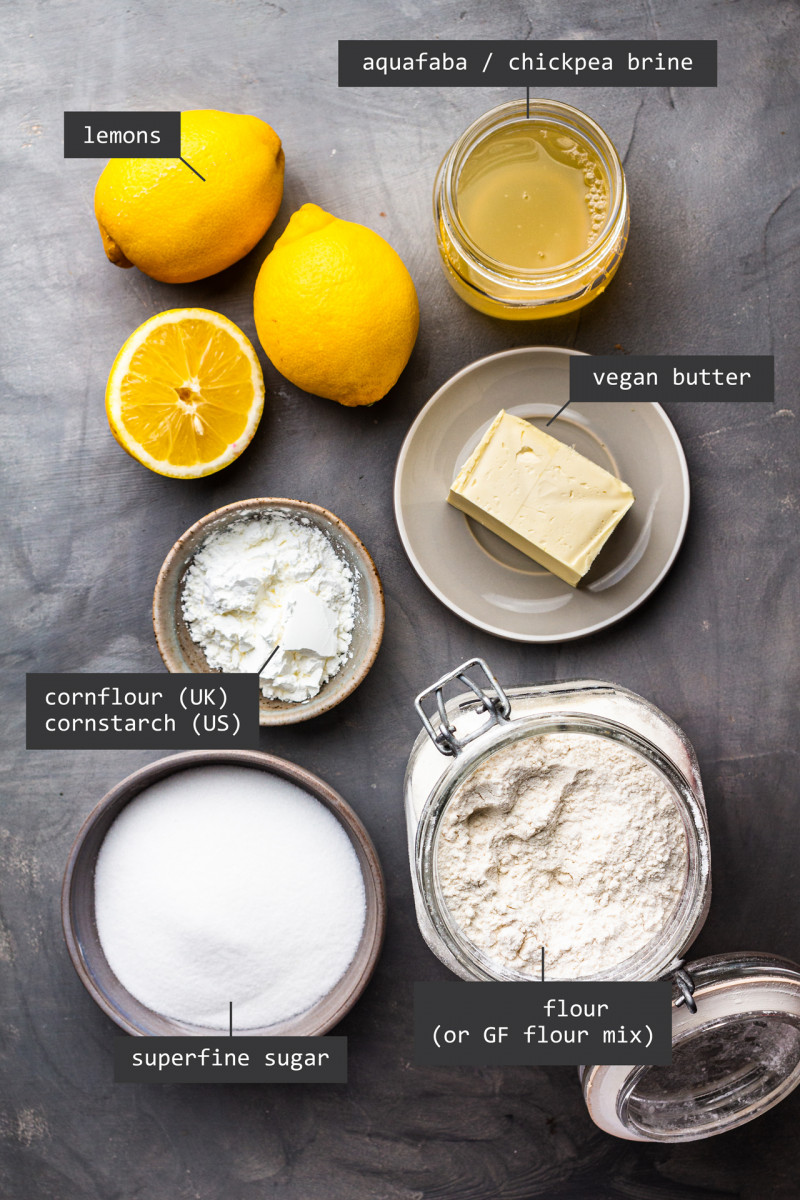
Above are all of the key ingredients at a glance although I realised too late that I completely forgot about PLANT MILK when setting up this shoot (it was very late…), my apologies! Please make a mental note that you’ll need creamy/rich plant milk as well and I will update this photo next week.
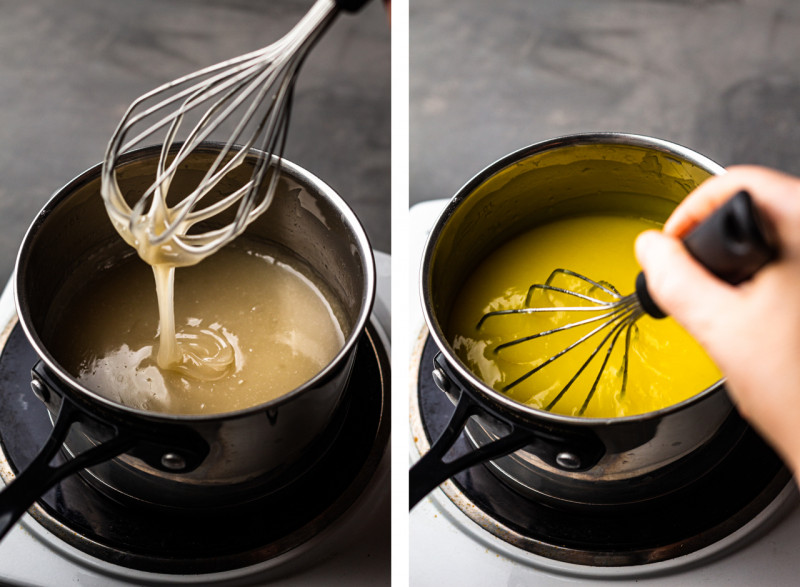
Make the curd in a sturdy saucepan by making a thickened sugar syrup first and then flavouring it with lemon and finally incorporating a little bit of vegan butter for a more luxurious mouthfeel. Pre-bake the curd in a pre-baked pastry case later or simply fill baked pastry case with it and chill them both (this works better if you do not intend to bake your meringue, only just toast it).
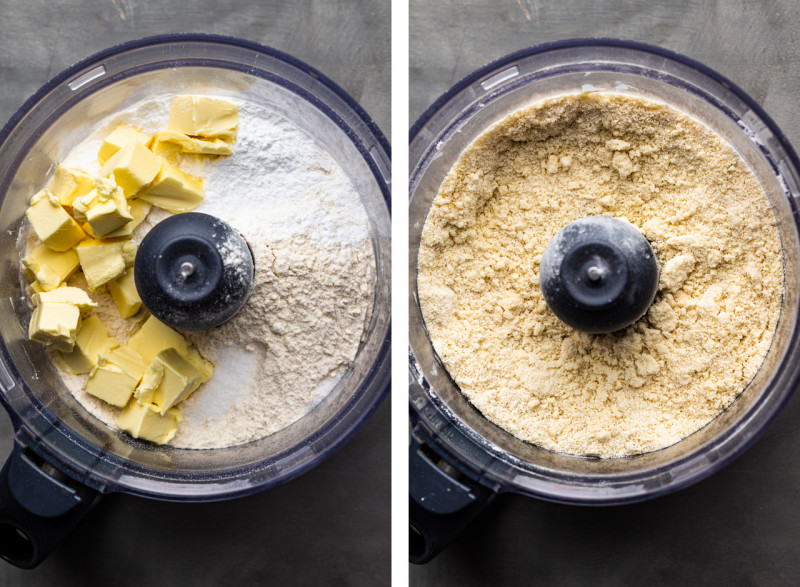
Make the pastry by combining all the ingredients, except for water, in a food processor and pulsing a few times until the mixture resembles breadcrumbs. Then trickle in cold water while pulsing to moisten the dry ingredients just enough so that they can form a dough.
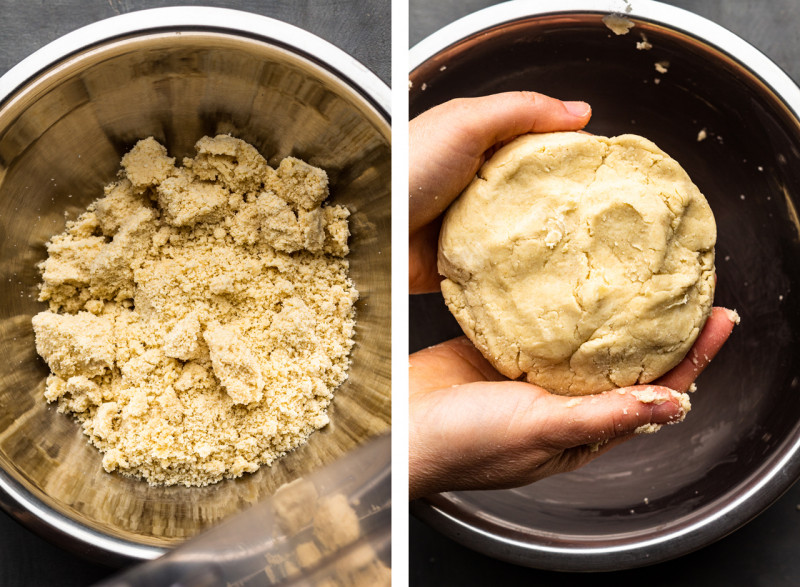
Transfer the mixture to a mixing bowl or empty it on a work surface and using your hands gently bring the dough together. Form the pastry into a disk, wrap in cling film and chill.
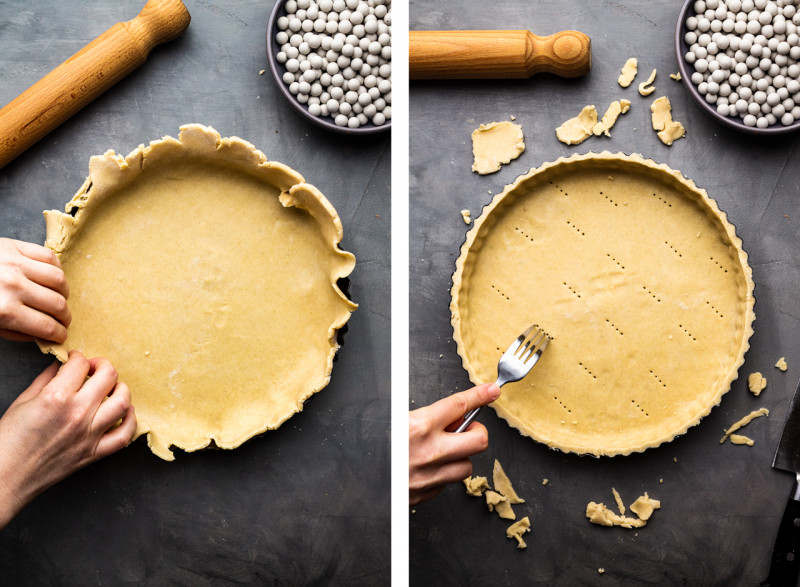
Roll chilled pastry out on a lightly floured surface, line your pie dish with it making sure it’s neatly tucked into all the nooks and crannies, cut off excess with a sharp knife and patch up any holes with excess bits. Prick with a fork and chill again before blind-baking.
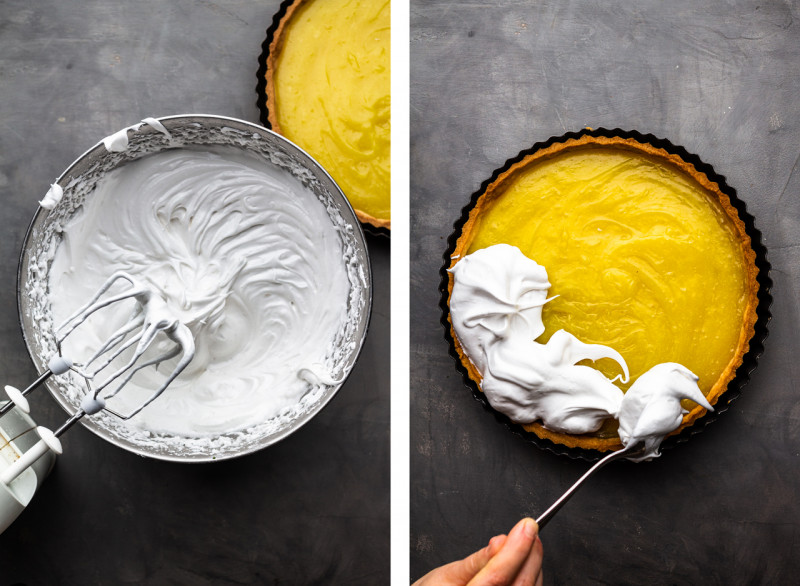
Whip up a batch of vegan meringue. Once glossy and stiff, spoon it over the pre-baked pie going around the edges first.
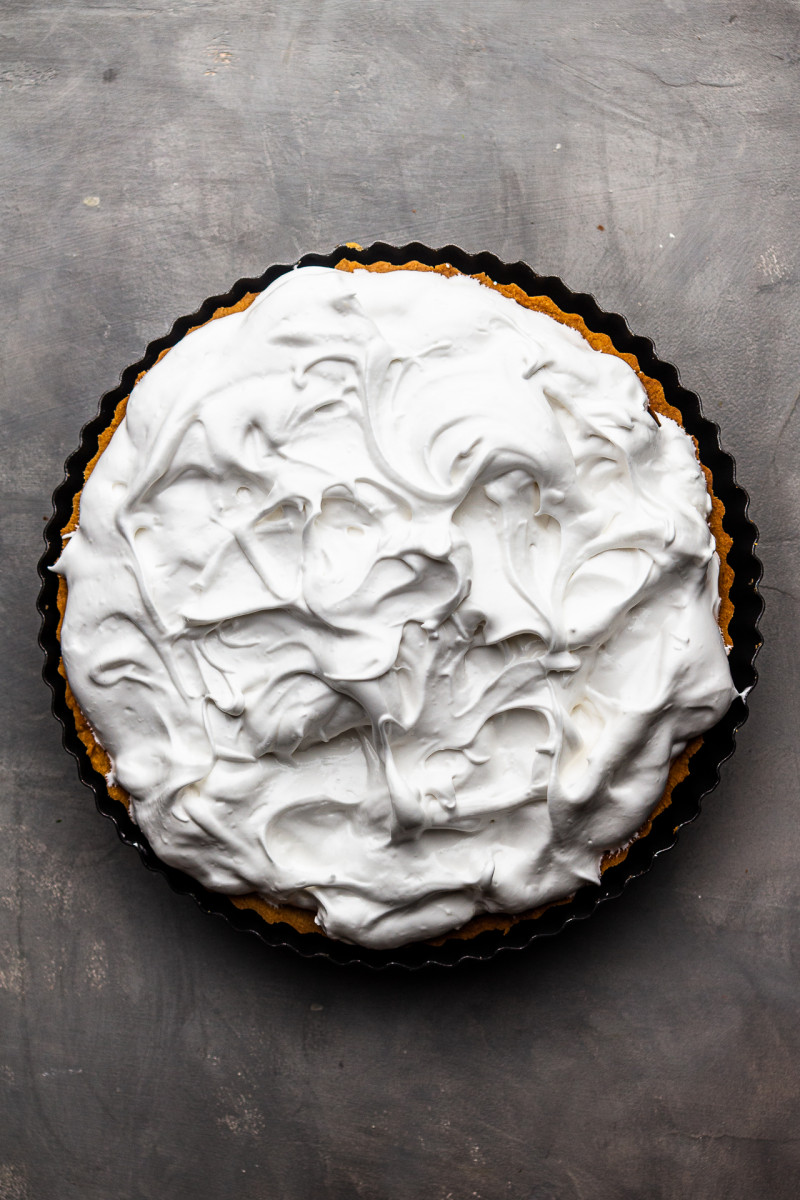
Once you pile the meringue onto the pie, use a spoon to make decorative swirls all over. Bake the pie and then allow it to cool COMPLETELY before cutting up (5 hours approximately). Using an ice-pack wrapped in a kitchen towel underneath the pie helps! Alternatively, toast the meringue using a chef’s torch (or put it under a broiler for only a few minutes) and cut it up staight away. This works if instead of pre-baking the filling, you chill it in the pastry case for a couple of hours.
- 210 g / 1¾ cups white all purpose flour or GF plain flour mix
- 25 g / 2 tbsp icing or caster / superfine sugar
- ½ tsp fine sea salt
- 1½ tsp xanthan gum (only for GF pastry)
- 100 g / ½ cup cold vegan butter or coconut oil
- 45 ml / 3 tbsp ice cold water
LEMON FILLING
- 50 g / 6 tbsp cornflour / cornstarch
- 300 g / 1½ cups caster / superfine sugar
- 240 ml / 1 cup creamy plant milk (soy, oat or almond work best*)
- 270 ml / 1 cup + 2 tbsp lemon juice* (4-5 juicy lemons)
- zest of 2 lemons
- ½ tsp fine salt
- 1/8 tsp ground turmeric (for colour)
- 65 g / scant 1/3 cup vegan butter (I like Naturli) or odourless coconut oil
MERINGUE
- 180 ml / ¾ cup aquafaba (homemade or from a can/jar of chickpeas)
- 1 tsp lemon juice or ½ tsp cream of tartar
- 250 g / 1¼ cup caster / superfine sugar
- 1 tbsp cornstarch / cornflour
- ¾ tsp xanthan gum (optional, but recommended)
- Place flour, sugar, salt and xanthan gum (only if you are making a GF pastry) in a food processor. Whizz to combine.
- Add chopped up vegan butter. Pulse a few times, until your mixture resembles breadcrumbs (photo in the post).
- Slowly feed cold water through the chute while pulsing the mixture a few times.
- Transfer the mixture onto a work surface. Using your hands, bring it together and form into a disc – it should nicely stick together, if it’s still too dry and crumbly trickle in 1 tsp of cold water at a time. Handle as little as possible and do not knead.
- Wrap the pastry disc up in cling film and chill in the fridge for 30 minutes. Make lemon curd while you wait.
- Remove the pastry from the fridge and roll it out on a lightly floured surface until you get a circle large enough to cover your entire tart case, about 2-3 mm in thickness.
- Place the rolled-out dough over a tart case and gently line the inside of it with the pastry. Tuck the pastry in well, ensuring that it fits snugly into all the nooks and crannies. Trim the excess pastry with a sharp knife and patch any holes/or thinner bits with the cut-off excess. If making gluten-free pastry (which tends to be more crumbly), you may be better off placing the crumbled pastry in the tart case and simply moulding the pastry with your hands to the shape of the tart tin.
- Pierce the bottom of the pastry with a fork in a few places and chill the pastry-lined tart case in the fridge for another 30 minutes. You can also just leave it in the fridge overnight if making ahead
- Meanwhile, preheat the oven to 180° C / 355° F (regular, no fan setting). Line the pastry case with a large piece of crumpled baking paper and fill with baking beads (or dry beans) for a blind bake.
- Blind bake the pastry for 15 minutes. Remove the paper and beads and bake for another 10 minutes – until cooked and pale golden. Keep the oven on.
LEMON CURD (make a day ahead for easier assembly)
- Place cornflour / cornstarch and sugar in a small heavy bottomed pot. Whisk well to combine.
- Set the pot on low heat and immediately afterwards, slowly pour in plant milk while whisking the whole time to ensure there are no lumps.
- Allow the mixture to come to a simmer while whisking. Carry on cooking the mixture until it starts bubbling and becomes thick (it should coat the back of a spoon).
- Whisk in lemon juice, zest, salt and turmeric. Carry on cooking the mixture until it thickens again.
- Switch the heat off. Gradually whisk in cubes of butter, allowing them to melt into the hot curd. Allow the curd to cool a little before filling the pie.
- Once the pastry is prebaked, fill it with warm curd and return to the oven for 15 minutes (see NOTES for an alternative). If the edges of your pastry case are already brown, protect them with a strip of tin foil first. Allow the pie to cool, once only just slightly warm, start on your meringue.
MERINGUE
- Preheat the oven to 150° C / 300° F (regular, no fan setting).
- Combine aquafaba and lemon juice in a spotlessly clean bowl – even a trace of grease will inhibit aquafaba from reaching stiff peaks.
- Whisk on medium speed until you reach stiff peaks (when you invert the bowl, whipped aquafaba should stay put). Depending on your equipment, it may take around 8-10 minutes (it does for me and I have an old handheld whisk).
- This bit is tedious, but necessary! Start adding sugar in 1 tbsp increments whipping well (going around the bowl if you have a handheld whisk) and slowly counting to 20 after each addition. I know, but trust me!
- Once all the sugar has been added, gradually sprinkle in cornflour and xanthan gum while the whisk is going. By this point you should have a glossy, thick meringue mixture that needs to go on the pie straight away.
ASSEMBLY
- Dot spoonfuls of the meringue on top of the lightly warm (not hot as it will make it melt) pie going around the edges first. Make sure the meringue touches the crust so that a seal is created. Be careful not to leave any air pockets under the meringue as these will be hollow after baking. Once you cover the entire pie with meringue, make decorative swirls with the back of your spoon.
- Place the pie in the pre-heated oven and bake for 25 minutes. By the time you are done, the meringue should get a crispy, pale golden crust. You can use a chef’s torch to make it look more dramatic if you wish.
- Remove from the oven and place on a wire rack. Allow it to cool COMPLETELY. Placing an icepack wrapped up in a kitchen towel under the wire rack (keep the pie in the tin) will speed things up a little.
- Meringue pies are best eaten on the day, but this one kept well for another day, sealed away in an air-tight container at room temperature (not in the fridge as it will make it weep). Keep away from any source of moisture, like steam raising from cooking pots, for example. Sugar in the meringue wicks moisture out of the air making meringue go soft.
*PLANT MILK – it’s best to use a creamy plant milk. Soy, oat and almond will work well. Thin coconut milk will do too but its flavour isn’t as clean so you may be able to detect it in the pie.
*LEMON JUICE – my curd for this pie is SHARP but its sharpness is nicely offset by super sweet meringue on top and so it really works in my opinion. All of my taste testers agree, but if you prefer it to be less tangy, simply reduce the amount of lemon juice and compensate by increasing the amount of plant milk used.
*BAKING THE FILLING – If you don’t particularly care about the neatness of the curd once cut and you just want to brown your meringue with a chef’s torch/under a broiler rather than bake it until crispy, you do not need to prebake the filling. Instead, cool both the pie and the curd separately. Spread the curd in the pie shell and refrigerate for 2 hours or until the curd is firm before topping with the meringue and toasting with a chef’s torch/sticking the pie under a hot broiler for only just a few minutes.
*XANTHAN GUM: it stabilizes the meringue and helps with its structure, if you don’t have it it’s not the end of the world but I find that the quality of the topping is nicer with it.