It’s the season where the siren call of your couch feels more seductive than ever or is it just me? I find myself having to work hard against this pull towards being a bit lazy and sedentary at this time of the year. I joined my local gym in the hope of keeping the lazy gremlin at bay and I continue to meet my personal trainer in the park once a week despite the fact that it’s getting a bit too cold for comfort right now. Thanks to Xmas and birthday presents from Duncan, I have plenty of warm exercise gear in my wardrobe so I have no excuse. I also need to offset a number of Thanksgiving and Christmas test cooks – like today’s recipe – as they tend to add up over the course of a few weeks…
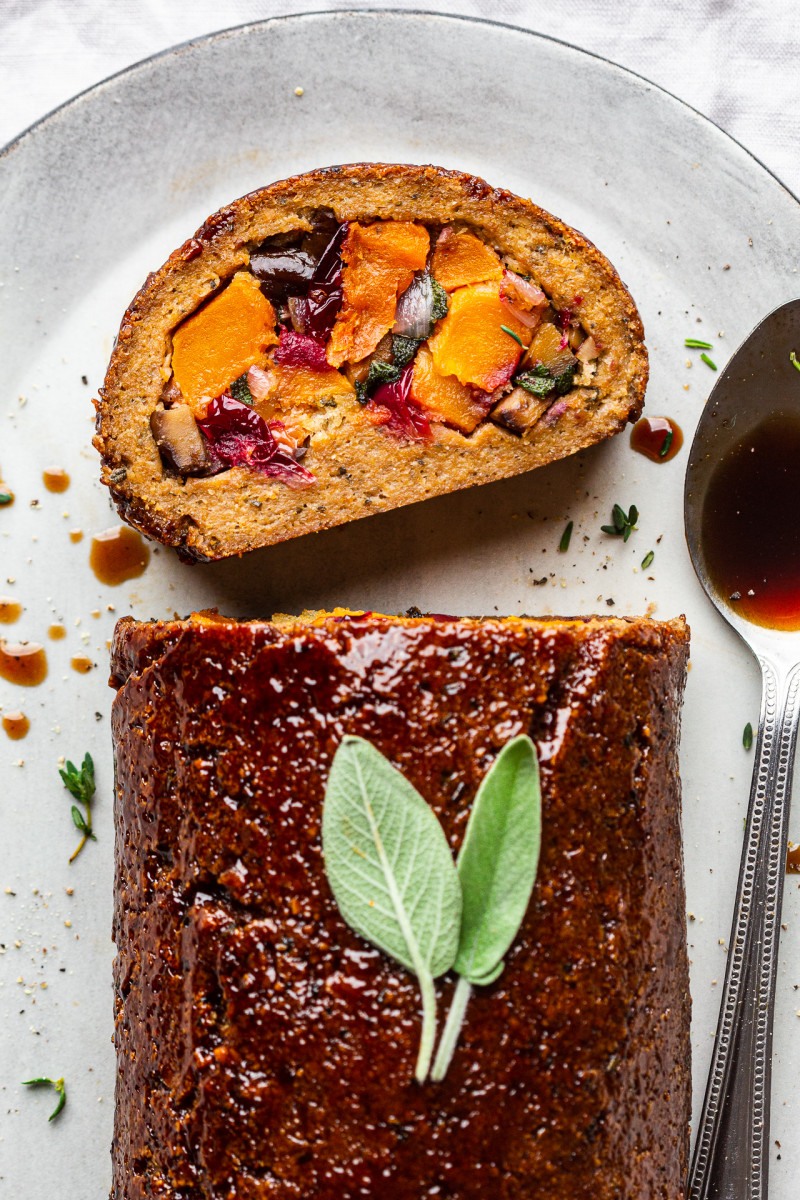
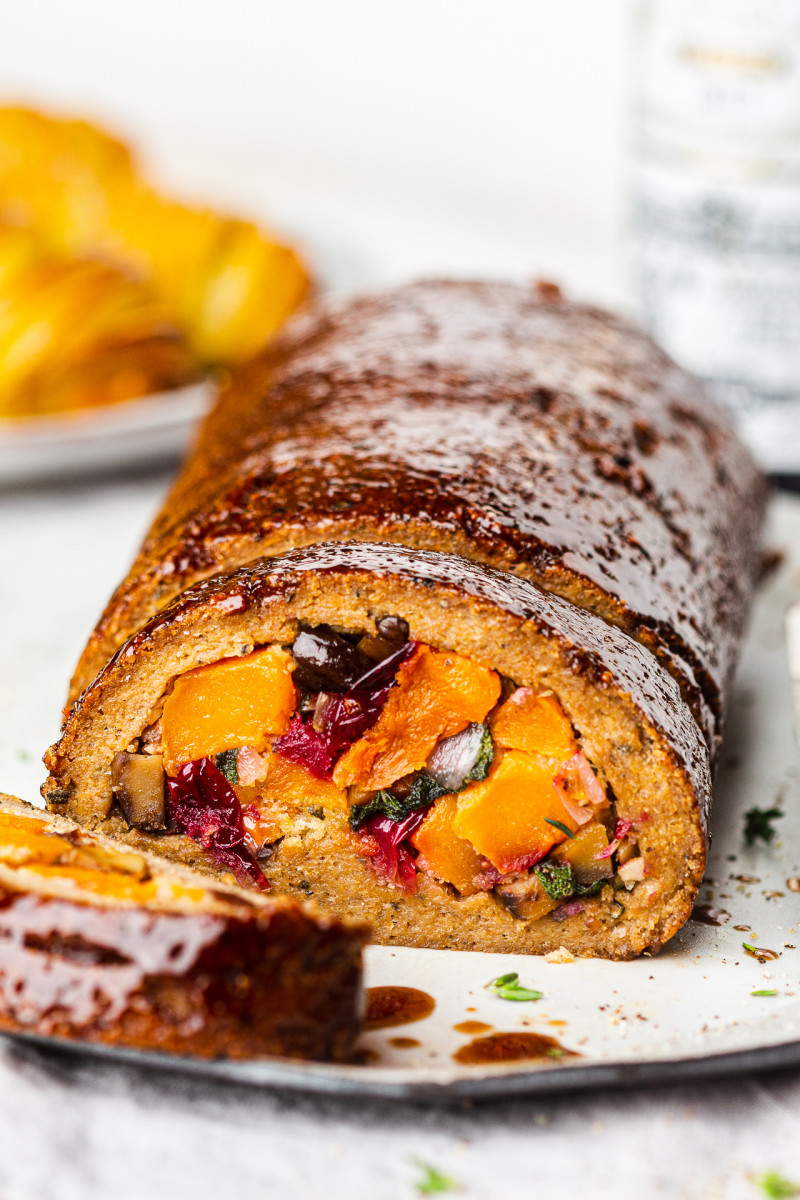
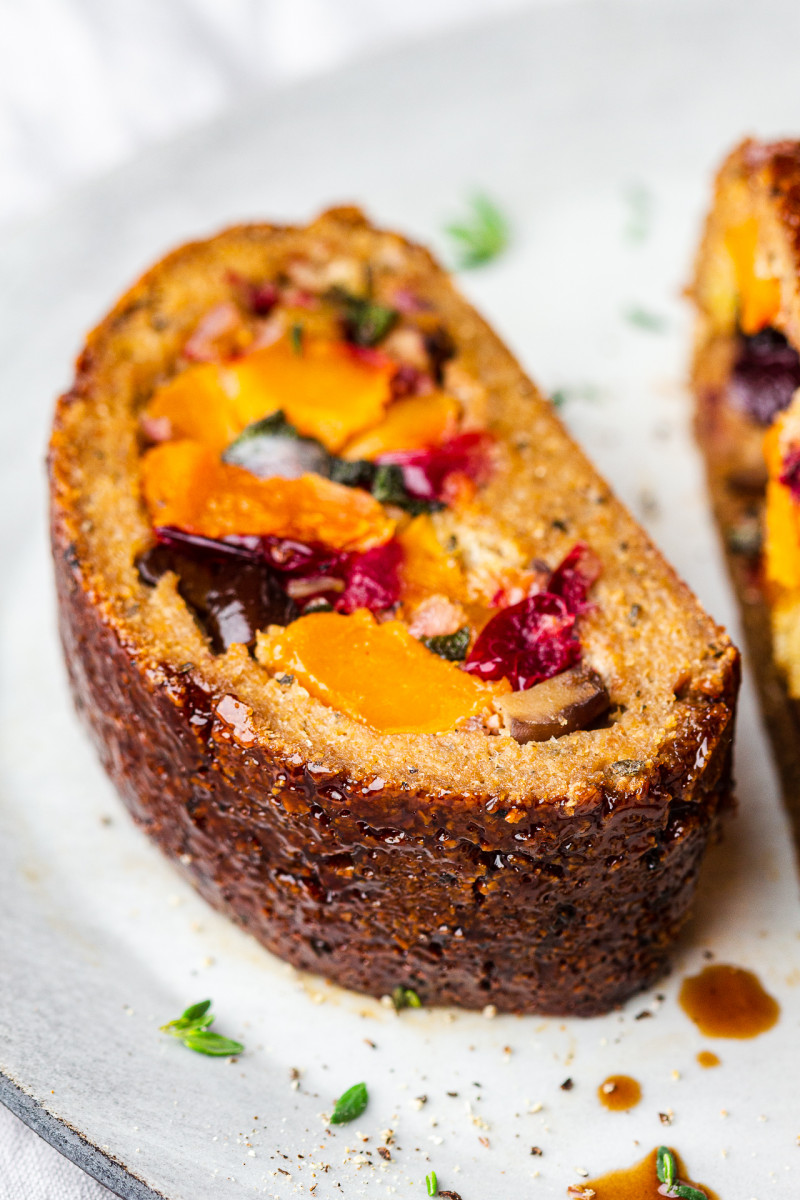
As my American friends are about to celebrate Thanksgiving next week and many other countries are slowly gearing towards Christmas, this week I have got a new plant-based centerpiece that anyone can enjoy. It’s a delicious vegan roast stuffed with roasted pumpkin, cranberries, chestnuts and sage. It looks impressive, but it’s not that hard to make actually.
Although I am still big fan of this Vegan Wellington I came up with years ago, I realise that some of you may be after a pastry-free festive main that can easily be made gluten-free too. If that sounds alike a good idea, you are going to love this no seitan vegan roast. I’ve streamlined the process as much as I could and took plenty of step-by-step photos to help you assemble it with ease. Here is a brief walk through the key ingredients and process.
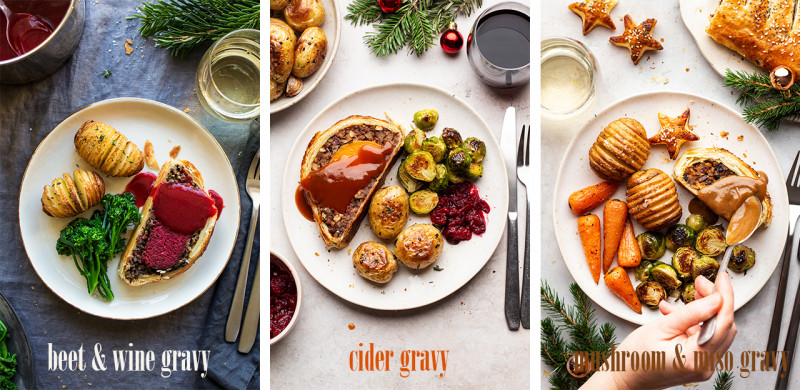
Oh and if you are after a gravy to go with it, I have three flavour packed vegan gravy recipes on this site:
MORE ABOUT THE INGREDIENTS
SQUASH/PUMPKIN: I made the stuffing with roasted butternut squash as it’s such a beautiful vegetable with heaps of colour and so seasonal right now. You can use any type of firm eating pumpkin or squash, it will work just as well. The weight given in the recipe is AFTER peeling and coring.
CHESTNUTS: roasted chestnuts, which tend to appear on the supermarket’s shelves around this time add delicious richness and seasonality to the stuffing.
CRANBERRIES: roasted in the oven cranberries, sweetened with a touch of maple syrup provide a lovely pop of festive colour and sour taste. I used fresh cranberries, but you could also use frozen – they will simply need a few more minutes in the oven.
BREADCRUMBS: I used coarse breadcrumbs to shape the filling and to absorb any extra moisture. You can also use roughly crushed croutons, pretoasted and coarsley ground up pecans, walnuts or pumpkin seeds both in the stuffing and in the tofu layer. Leftover cooked brown rice or barely also works well in the stuffing (not so much in the tofu layer). The idea is not to make the stuffing solid – I don’t move the stuffing at all until it has a layer of tofu around it as it won’t stay put – but to fill in all the nooks and crannies between chunkier and more textural stuffing ingredients. As the tofu layer is minced smooth, I really wanted to have some texture in the stuffing.
HERBS: fresh winter herbs are instrumental in making fragrant and aromatic festive fare, but you could use dried if fresh are unavailable. I used rosemary, thyme and sage in the tofu layer and sage in the stuffing.
SMOKED FIRM TOFU: smoked firm tofu is the key ingredient of the outer layer. Once baked, it forms a nice firm layer around the stuffing that’s not as firm as seitan. I recommend using smoked tofu as it’s flavour is usually well judged and evenly distributed, but if that’s unavailable, add some liquid smoke or smoked paprika to the tofu layer. The key to a good exterior layer is to press tofu well. If you are in a rush and your tofu is still quite waterlogged, you could skip the stock althoghether and add psyllium husk powder straight to the food processor with the rest of the ingredients. Once processed, it will bind with the other wet ingredients in the mixture and activate this way.
BALSAMIC VINEGAR: I added thick (aged) balsamic vinegar to the tofu layer and to the glaze. It’s worth purchasing a better quality balsamic if you can as it is much more flavoursome and more syrupy.
WHITE MISO PASTE: adds an extra depth of flavour and some saltiness. If white miso paste isn’t available, you can use red miso – which is a bit more intense in flavour so add less, taste and then decide if more is needed.
NUTRITIONAL YEAST: a staple vegan seasoning used to add flavour. If you don’t have any, skip and use a touch more miso adjusting to taste.
PSYLLIUM HUSK POWDER: PSYLLIUM HUSK POWDER: is a powerful wholefood plant-based binder. It can be found in health food shops, in pharmacies (as it is also used as a source of insoluble fibre to help digestion) and online. It exists in the form of powder and whole husks – I recommend the former as it’s more potent and doesn’t impact texture of foods.
I tested the same dish with FLAX SEEDS and while it can work I feel that psyllium offers superior texture. To use flaxseeds, use twice as much (4 tbsp) of GROUND FLAX SEEDS and only about a couple of tablespoons (30 ml) of stock instead, but be aware that the layer ends up less flexible and it is therefore prone to cracking during assembly and baking. You can smooth out the cracks that form during assembly with your hands. It has much lower moisture content so bake it at 180° C / 355° F for only about 25-30 minutes before glazing. To prevent cracking when using flax, go for an easier – baking tin – assembly procedue – see METHOD.
OAT/RICE FLOUR: use either oat or rice flour to give the tofu layer more body and help it bind together better during baking.
SALT: although, I’ve indicated the amount of salt I used, please be sure to taste (there are no animal products in anything so it’s safe to do so) both components and adjust to your palate. I used coarse flake salt (Maldon brand) so if you are using fine salt you may want to use even less than I did.

Start off by roasting squash/pumpkin and cranberries, which will go into the stuffing and shallots and a whole head of garlic, which will go into the exterior layer.
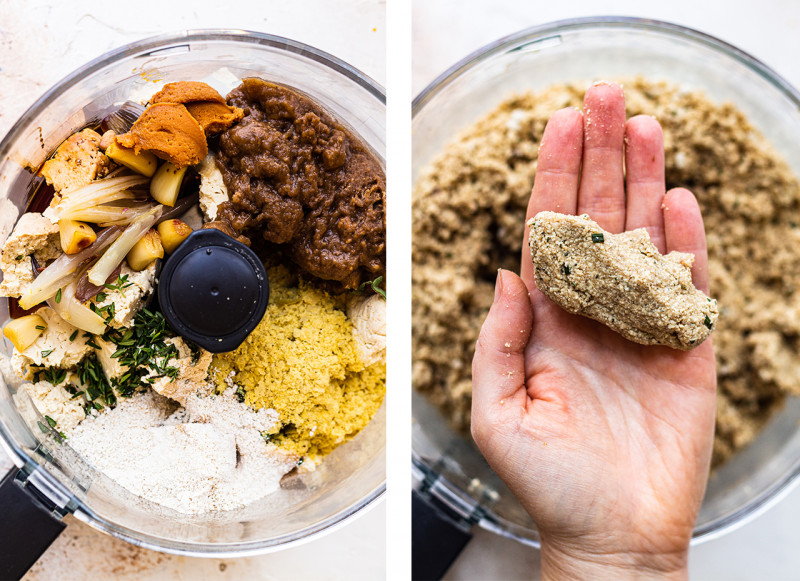
Once your shallots and garlic are roasted, peel them and chuck into a food processor with the remaining tofu layer ingredients. Process until homogenous. The mixture should not feel wet but it should stick together well once squeezed. If it feels wet, add a bit more flour and if it’s too dry a small amount of water until it feels right.
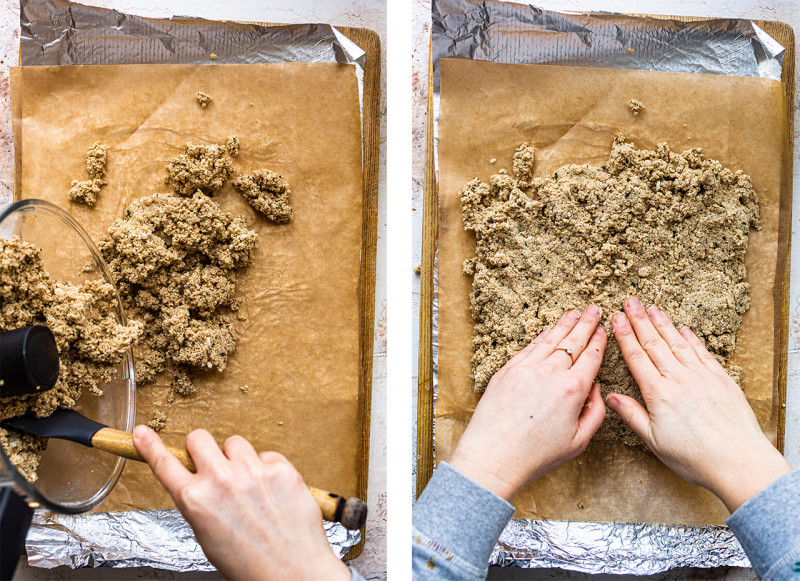
Once you are happy with the tofu mixture, spread it on a piece of greased baking paper, compacting it really well with your hands.
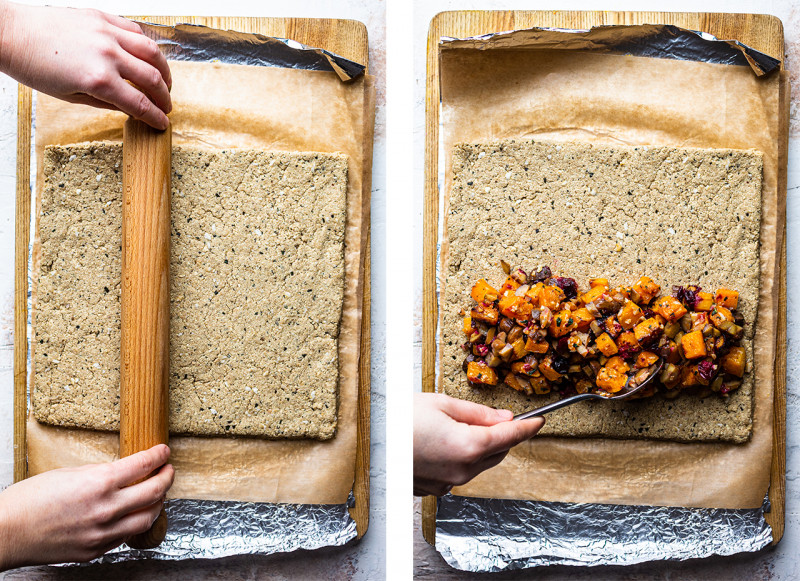
Use a rolling pin to even it out – you want roughly a 26 cm / 10 square that is approximately 1 cm / 0.4″ thick.
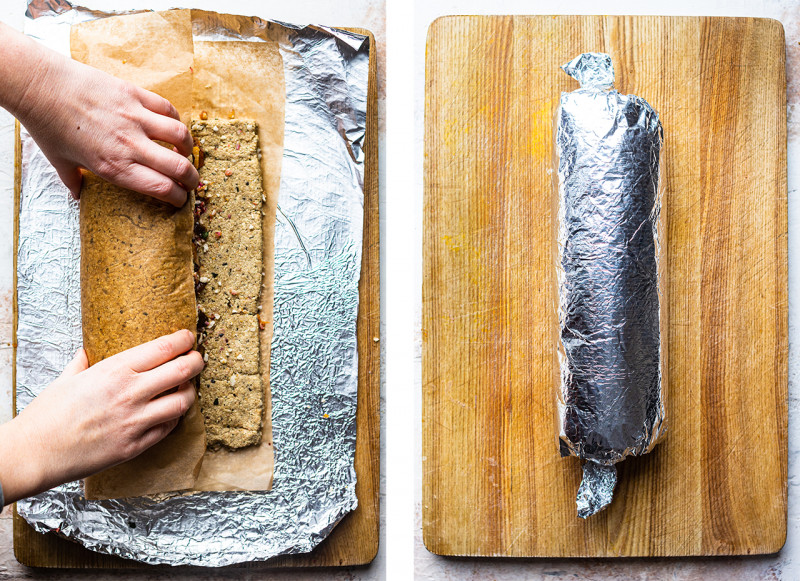
Arrange the stuffing mixture in a thick snake close to (but leaving a bit of a margin) one of the edges of your square – ideally you want the stuffing parallel with the longest edge of the kitchen foil for easy wrapping. Using the paper gently roll the tofu layer around the stuffing – don’t move the stuffing – rather fold the tofu layer over it. Seal two meeting ends of the tofu layer together (get the end of the paper out of the way) and place the whole log on its seam. Tighly wrap in a double piece of kitchen foil and refrigate for a few hours (overnight is best) to settle.
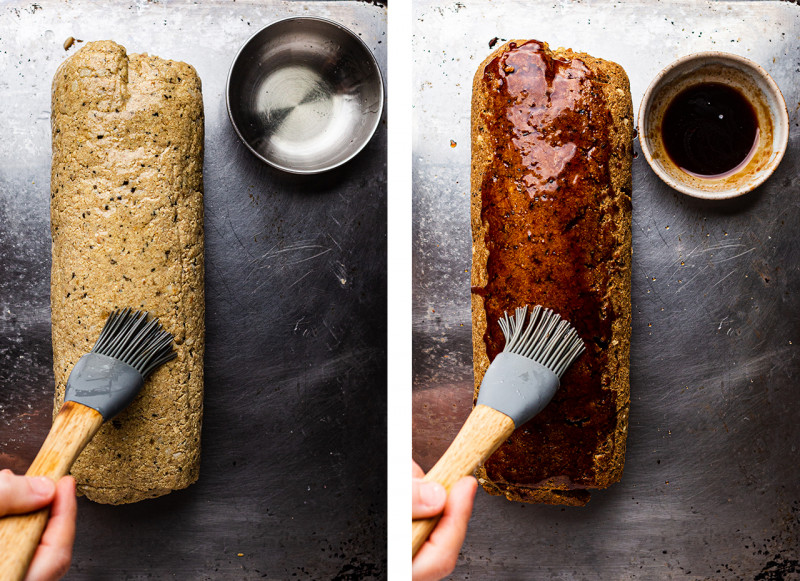
Gently transfer to a baking tray, unwrap with care, grease and then bake in a hot oven until firmed up and browned all over. Glaze it twice baking the glaze for a few minutes each time.
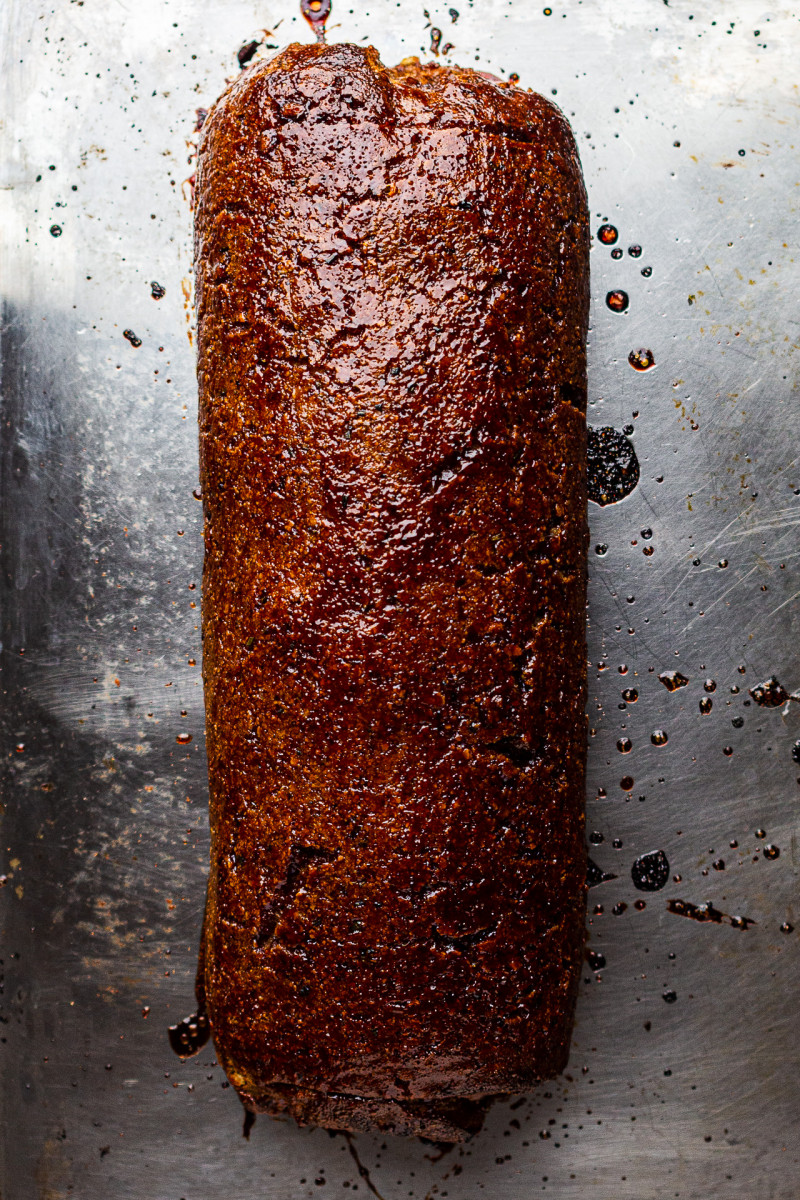
Once baked, allow it to settle before tucking in.
- 30 ml / 2 tbsp olive oil, divided
- 2 shallots or ½ onion, finely diced
- 4 garlic cloves, finely diced
- 1 tbsp chopped sage leaves or 1 tsp dry
- 650 g / 23 oz peeled & cored firm pumpkin or squash
- 100 g / 1 scant cup roasted chestnuts, roughly chopped
- 100 g / 1 cup fresh cranberries (frozen work too)
- 10 ml / 2 tsp maple syrup
- 75 g / ¾ cup coarse breadcrumbs* (GF if needed)
- salt & pepper, to taste
TOFU LAYER
- 30 ml / 2 tbsp olive oil, plus more to brush
- 2 shallots, unpeeled
- 1 head of garlic, unpeeled
- 16 g / 2 tbsp psyllium husk powder*
- 120 ml / ½ cup stock (I used porcini stock)
- 400 g / 14 oz smoked firm tofu, well pressed!
- 1 tbsp chopped rosemary leaves or 1 tsp dry
- 1 tbsp chopped sage leaves or 1 tsp dry
- 1 tbsp fresh thyme leaves or 1 tsp dry
- 30 ml / 2 tbsp (thick ideally) balsamic vinegar
- 1 tbsp white miso paste
- ¼ cup nutritional yeast
- 50 g / ½ heaped cup oat or rice flour
- 50 g / ½ cup coarse breadcrumbs* (GF if needed)
- 1½ tsp coarse salt flakes, adjust to taste
- black pepper, to taste
GLAZE
- 30 ml / 2 tbsp (thick ideally) balsamic vinegar
- 10 ml / 2 tsp ketchup
- 10 ml / 2 tsp maple syrup
- 5 ml / 1 tsp soy sauce (or tamari if GF)
- Heat up the oven to 200° C / 390° F and grab a large baking tray.
- Dice pumpkin/squash into 1.25 cm / 0.5″ cubes. Place them in a mixing bowl with 1 tbsp of olive oil, stir to coat, then spread on approximately 2/3 of the baking tray.
- Place cranberries in the same mixing bowl, stir to coat in the residual oil, stir in maple syrup and arrange in a clump on the baking tray.
- Cut 2 shallots in half keeping the skins on, brush the underside with little oil and place on the baking tray cut side down.
- Cut a quarter of the garlic head off to expose all of the cloves. Drizzle with little oil and wrap tightly in two layers of baking paper or one of kitchen foil, pop on the baking tray.
- Bake for about 20 minutes – at this point shallots and cranberries should be done so take them both off the tray – then increase the temperature to 220° C / 430° F and bake for further 10 minutes for the garlic and perhaps another 10 minutes for the pumpkin. Garlic is ready when the cloves look translucent and are soft all the way through and pumpkin is ready when soft and lightly charred all over.
- Mix psyllium powder and stock in a small bowl adding the liquid in gradually and don’t worry if it’s a little lumpy.
- Place pressed & roughly torn tofu, psyllium powder mixture, shallots you baked in the oven (take the skins off), squeezed out roasted garlic cloves (I used half of them), herbs, balsamic, miso, nutritional yeast, flour, breadcrumbs, salt and pepper and 2 tbsp of olive oil.
- Process until you obtain a homogenous mixture that clumps together in the palm of your hand. It should not feel be wet but it should stick together really well (see process shots in the post). If too wet, add more flour or breadcrumbs. Taste and adjust seasoning if needed. Set aside.
- Heat up 1 tbsp of olive oil in a frying pan, add (2) diced shallots, garlic and sage. Sautee until translucent and fragrant. Season well, then add roasted pumpkin/squash, roasted cranberries, chopped chestnuts and breadcrumbs. Allow to cool down completely.
ASSEMBLY
- Grab two 52 cm / 20 inch long pieces of kitchen foil and one 26 cm / 10 inch square of greaseproof baking paper.
- Place one piece of foil down on the counter, place greaseproof paper in the middle so that the shiny side faces up. Brush the paper with a little olive oil.
- Transfer tofu mixture onto the baking paper and using your hands compress it tighly (you don’t want any gaps) into a 26 cm / 10 inch square that is about 1 cm / 0.4″ thick. Take your time over this step.
- Compress the stuffing in a snake along the edge of the tofu square leaving a decent margin from the egde. Make sure the stuffing snake is perpedicular to the longer edge of the kitchen foil underneath for easy wrapping.
- It’s good to have another pair of hands for this next step although I managed by myself….very gently roll the paper with a tofu layer over the stuffing being careful not to move the stuffing too much as it won’t stay together. If small cracks in the tofu layer appear that’s okay smooth them out with your hands. The tofu should meet around the stuffing or overlap slighly (get the paper out of the way at the end). Compress the seal gently with your hands and gently turn the roll so for the seam is at the bottom.
- Roll the whole thing in a piece of kitchen foil as tightly as you can, twisting the ends like you would a candy. I recommend two layers of foil for extra strength.
- Place the roast on a flat tray and transfer it to the fridge for a few hours (overnight is best) so that it has a chance to settle.
EASIER ASSEMBLY IN A TIN
- Grab a small 2lb cake tin, grease it well and place two long strips of baking paper (sticking out at both ends) across the tin.
- Compress approximately 2/3 of the tofu mixture at the bottom of the tin, creating a crater in the middle where the stuffing (you may not need all of it) will go.
- Cover the stuffing with the rest of the tofu mixture.
BAKING
- Mix all of the glaze ingredients in a small bowl and preheat the oven to 190° C / 375° F.
- Remove the roast from the fridge and place it on a baking tray. Remove the foil and paper very gently.
- Brush the roast with a little olive oil and bake for approximately 35-40 minutes, until firm to touch and browned all over (cover it with foil if browing too fast).
- Apply first glaze with a brush and bake for further 5 minutes, then apply another glaze and bake for further 5 minutes.
- Allow the roast to settle for at least 20 minutes after baking and then slice and enjoy.
*PSYLLIUM HUSK POWDER: is a powerful wholefood plant-based binder. It can be found in health food shops, in pharmacies (as it is also used as a source of insoluble fibre to help digestion) and online. It exists in the form of powder and whole husks – I recommend the former as it’s more potent and doesn’t impact texture of foods.
I tested the same dish with FLAX SEEDS and while it can work I feel that psyllium offers superior texture. To use flaxseeds, use twice as much (4 tbsp) of GROUND FLAX SEEDS and only about a couple of tablespoons (30 ml) of stock instead, but be aware that the layer ends up less flexible and it is therefore prone to cracking during assembly and baking. You can smooth out the cracks that form during assembly with your hands. It has much lower moisture content so bake it at 180° C / 355° F for only about 25-30 minutes before glazing. To prevent cracking when using flax, go for an easier – baking tin – assembly procedue – see METHOD.